Running the Adventure
I. The Lamia and the Naga
Introduction
The Lamia and the Naga is a
Dungeons & Dragons campaign
with a series of adventures for 4 or more characters starting at 1st level.
During the 1st part of the campaign,
The Dark Crusades, players can advance to as high
as 5th level. During the 2nd part of the campaign,
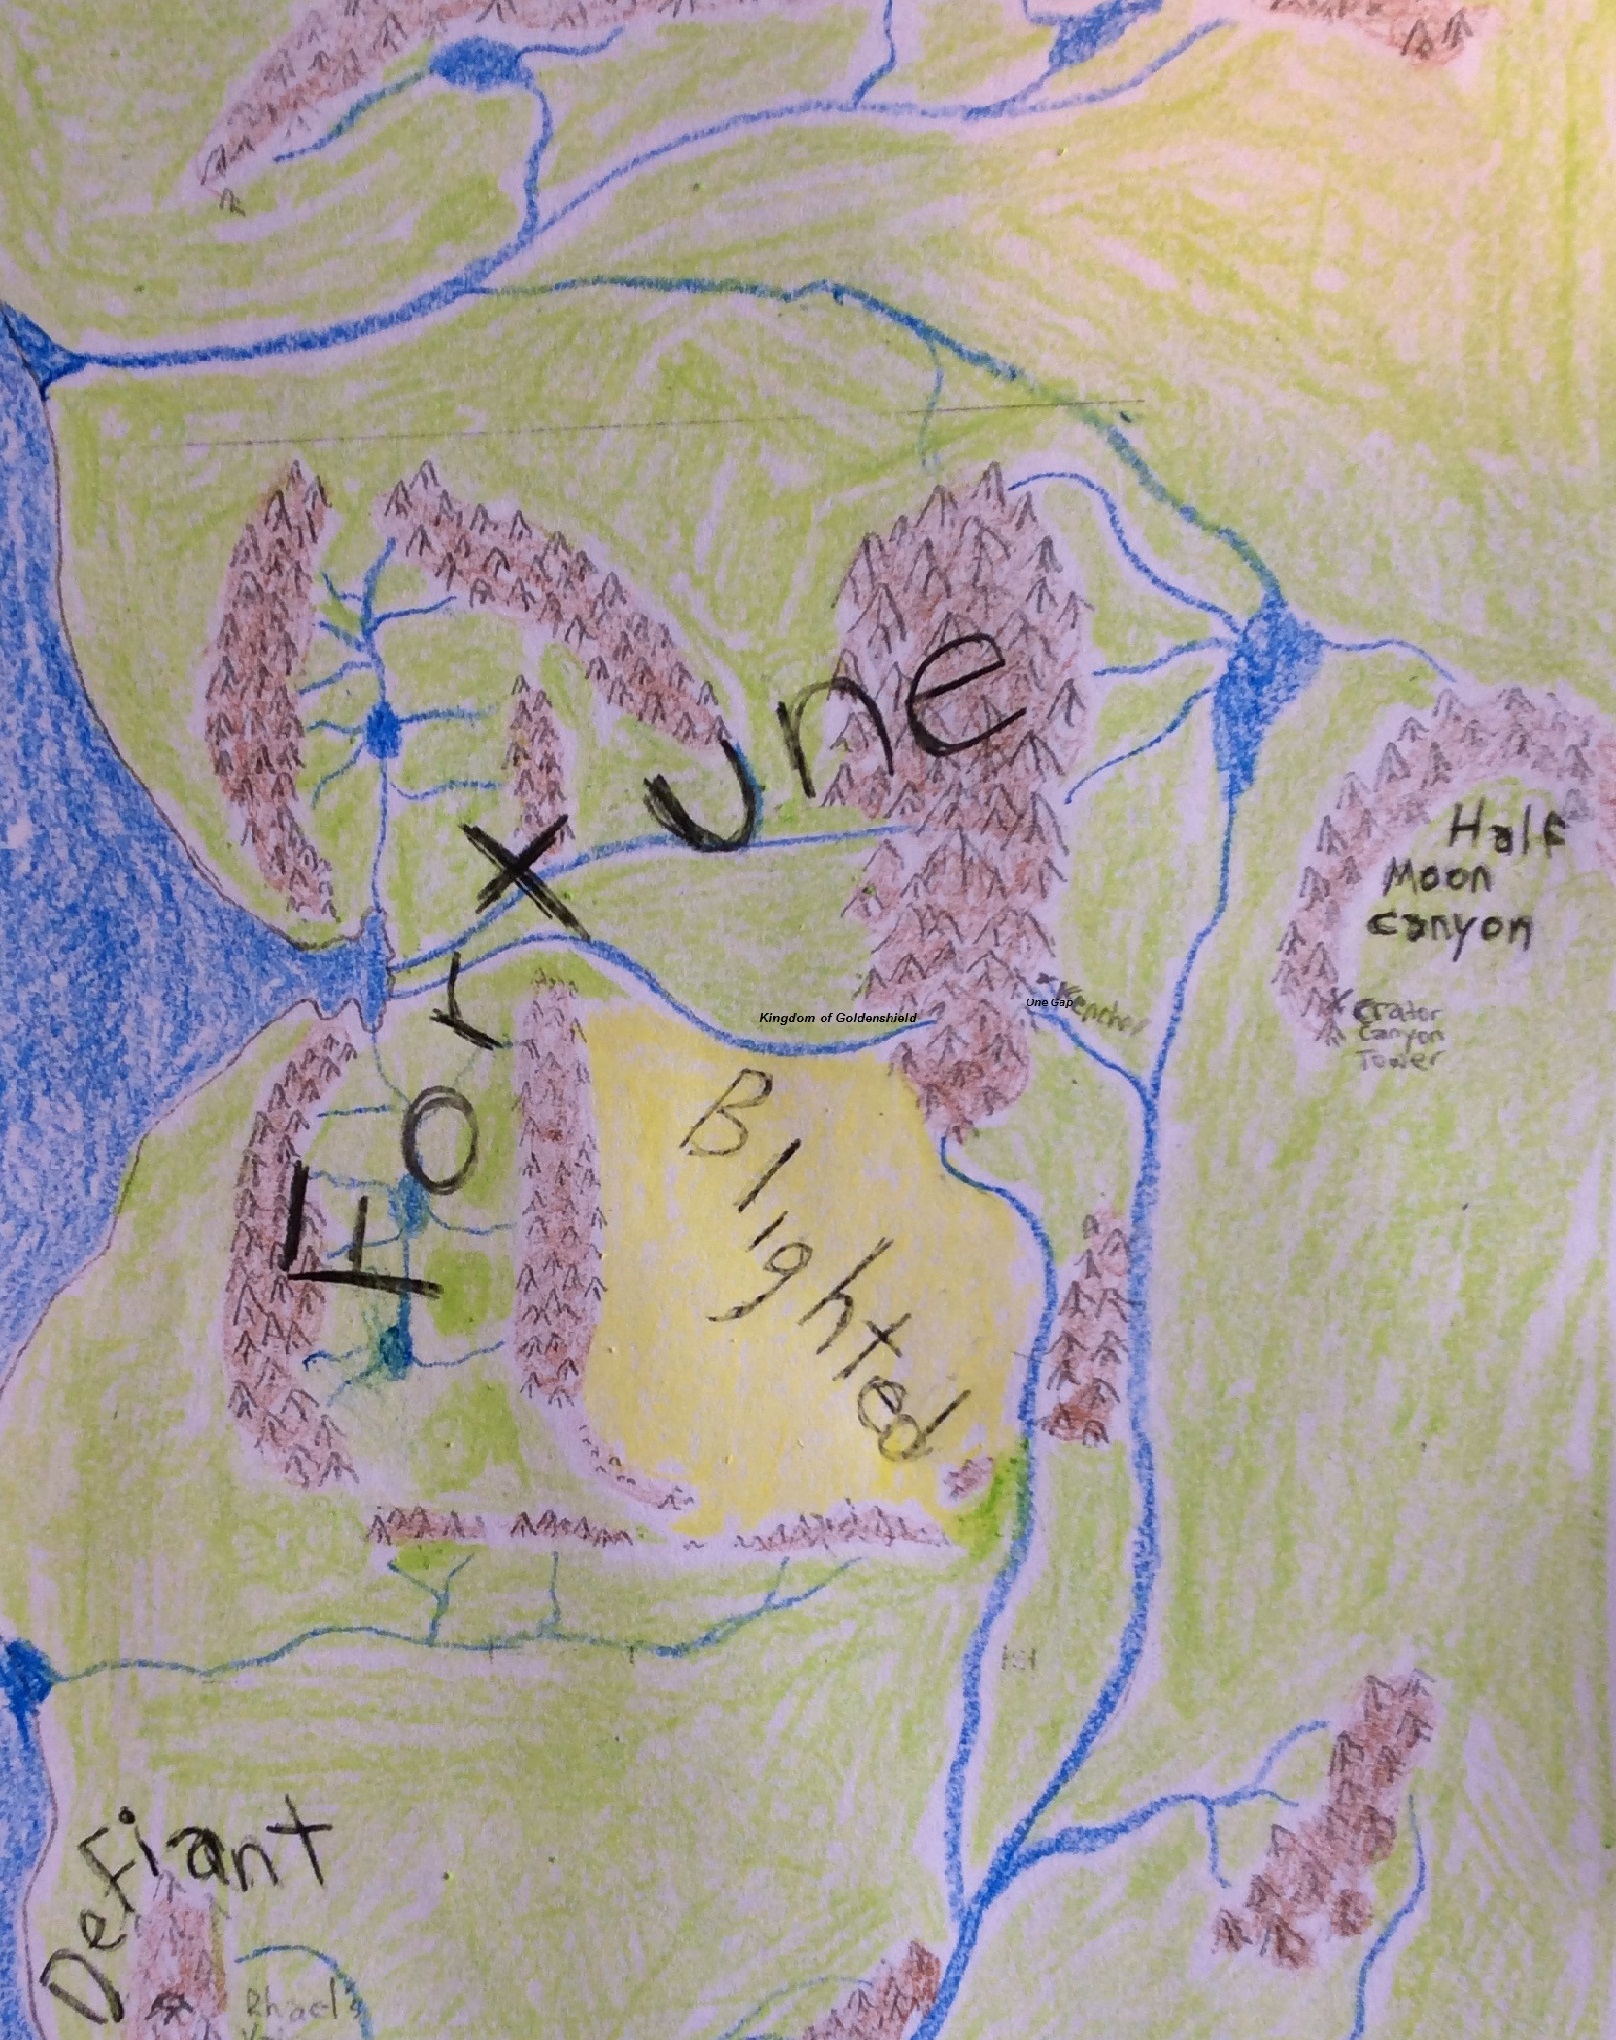
Hamakhaave Desert,
players can continue to advance to as high as they are willing to go. The campaign is set on the world of
Lophator,
on the eastern half of the continent
Qaraton,
in the lands of
Fortune and Blighted,
a vast realm of kingdoms, nations, and settlements surrounded by hostile combatants,
vicious opponents, and terrifying foes. The initial setting, where the characters begin, is set in the
the desert fortress of Kahar that guards the King's Road that spans the entire Hamakhaave desert. Kahar is one of three
desert fortresses that guard the King's Road that connects the bountiful land of South Green Field Valley to the forest
mountains of the Kingdom of Goldenshield ruled by the Paladin King.
The Dungeon Master
I have made these boxes that contain information for the dungeon master who runs the game:
Dungeon Master's Box
The Dungeon Master (DM) narrates the adventure and describes events as they occur (or better, as they are read from these
Dungeon Master Box descriptions), the Player Characters (PCs)
choose and describe their reactions, and the DM reports the results. The DM plays the monsters and villains
the PCs battle against, choosing their actions
Rules
The DM is the final authority when it comes to rules, questions, or disputes during the
game. Here are some guidelines to help arbitrate issues as they come up:
When in doubt, make it up!
It is better to keep the game moving then to get bogged down in rules..
It is not a competition
The DM is not competing against the player characters. The DM is there to run the monsters, referee
the rules, and keep the story moving. It is helpful if the DM treats the rules and the players in a fair
and impartial manner, and stays consistent (if you decide a rule works a certain way in one session, make sure
it works the same way next time it comes up in play).
It is a shared story
Dungeons and Dragons is all about coming
together to tell a group story. So pay attention, and try to make sure everyone participates, if some players
are reluctant to speak up, remember to ask them what thier characters are doing.
A. The Dark Crusades
History
However your players create their characters, they will know many of these stories and histories.
Most of them will have come to them as fairy tales told to them when they were young in order to help control their
behavior, but many others, especially about the kingdoms of the world, are known to all.
Over a hundred years ago, a necromancer and a forest dragon tasted just a bit of the power that was the
Whirlpool of Danube, and have lusted for it ever since. Unleashing that power, they were able to pass
amoung the hordes of goblinoids and orcs as gods. The necromancer filled the gobliniods with religious fervor
and the forest dragon forced the orcs to obey through fear, until at last, the necromancer led gobliniods from the
south, and the forest dragon led orcs from the north, in a great war to sieze the magic and power of the Whirlpool
of Danube. They were defeated by the unexpected arrival of a Paladin's army and a Druid's army. The Necromancer
and the dragon were forced to retreat to the east in defeat and shame. The Paladin
established the Kingdom of Goldenshield and secured the power of the Whirlpool of Danube under the great wizard
Cabal's Tower. For the next 13 years, various attacks were thwarted by the Paladin King's growing armies but
most importantly the Paladin's forces built "The King's Road", a super highway that cut through
the land of Blighted, a great desert named Hamakhaave. The King's Road was not only protected by three desert
fortresses, but also connected the lush and bountiful land of South Green Field Valley to the never ending forest mountains
of the Kingdom of Goldenshield. Even through the harsh and terrible land, great caravans loaded with goods
and riches passed quickly to the benefit of all. But all that time, the necromancer was plotting and scheming on how to sieze
the Paladin's Kingdom. The necromancer took the name Prysm, the God-king. It took 3 years for the necromancer to forge an alliance with
the family of Fire Giants in the land of Defiant, but he finally cajoled them with gifts of treasure, power, and
slaves. In the 16th year of the Kingdom of Goldenshield, the Fire Giants chose 3 champions who
led goblinoids from the south on a great campaign to sack the Land of Fortune. At the same time the dragon led
the orcs from the north in a great attack upon the Horse Lords of the North, and the first Dark Crusade was begun.
It took almost two years for the Kingdoms of the Land of Fortune to stop the attack, amoung the foremost was the
Kingdom of Goldenshield, but the war did serve to coalesce and unite the free men of the Land of Fortune and
the kingdoms of good, and they followed the Paladin King's example and began to forge roads through those impassible
lands for the improvement of trade and speeding up the movement of their armies. In the 32
nd year
of the Kingdom of Goldenshield, the Fire Giants were again paid huge ransoms and given vast gifts of slaves and goods,
and when their time of gathering came about, the Fire Giants chose 6 champions to lead the 6
th Dark Crusade.
It began with victory for the Fire Giants, with both Kahar and Kabur being broken and destroyed, but a new desert fortress
sprung up, Desert Exit, and its sculpted plateau was seen ten miles away. This was, indeed, because of the many
improvements made in roads and other infrustructure that made it possible for the armies of the free people, led by the Kingdom of Goldenshield,
to reinforce and resupply their positions with unprecedented speed. Kahar and Kabur were rebuilt just after 2 years
passed by and the cycle began again. In the 48
th year of the Kingdom of Golden Shield,
attacks, and both attacks from the north and the south were over in under 10 months. It all would have been just
a history note if not for the curious event of the Lamia. Khalista the Lamia left her desert fortress home in the south
of Hamakhaave desert, and was there at Kahar with her jackalwere servants when the Fire Giants and the goblinoids were
the God King Prysm, sent his gifts with the goblinoids, and again enticed the Fire Giants to attack The Land of Fortune
and destroy the fortresses of the Kingdom of Goldenshield. They were defeated and all the fortresses survived the
defeated. She retreated into the Red Rock Table Mountain Canyons and settled into the ruins of an ancient
civilization. There she waited 16 long years for the next Dark Crusade. She waited, and plotted, and connived
because she would not be denied her prize a second time. Over the years, she infiltrated the fortress and grew to
intimately know many of its inhabitants and much of the layout of the fortress. When the timing was right, she produced
her first traitor, and from this traitor she spawned 3 more. Finally, the long wait was over when the Fire Giant Rhael brought his
2 hill giants, Rulos and Eclith, and a 1000 goblinoids to sack the desert fortress Kahar. The 7
th Dark Crusade
had begun. Khalista rose up with her servants and went north to Kahar.
Read to the PCs:
Background
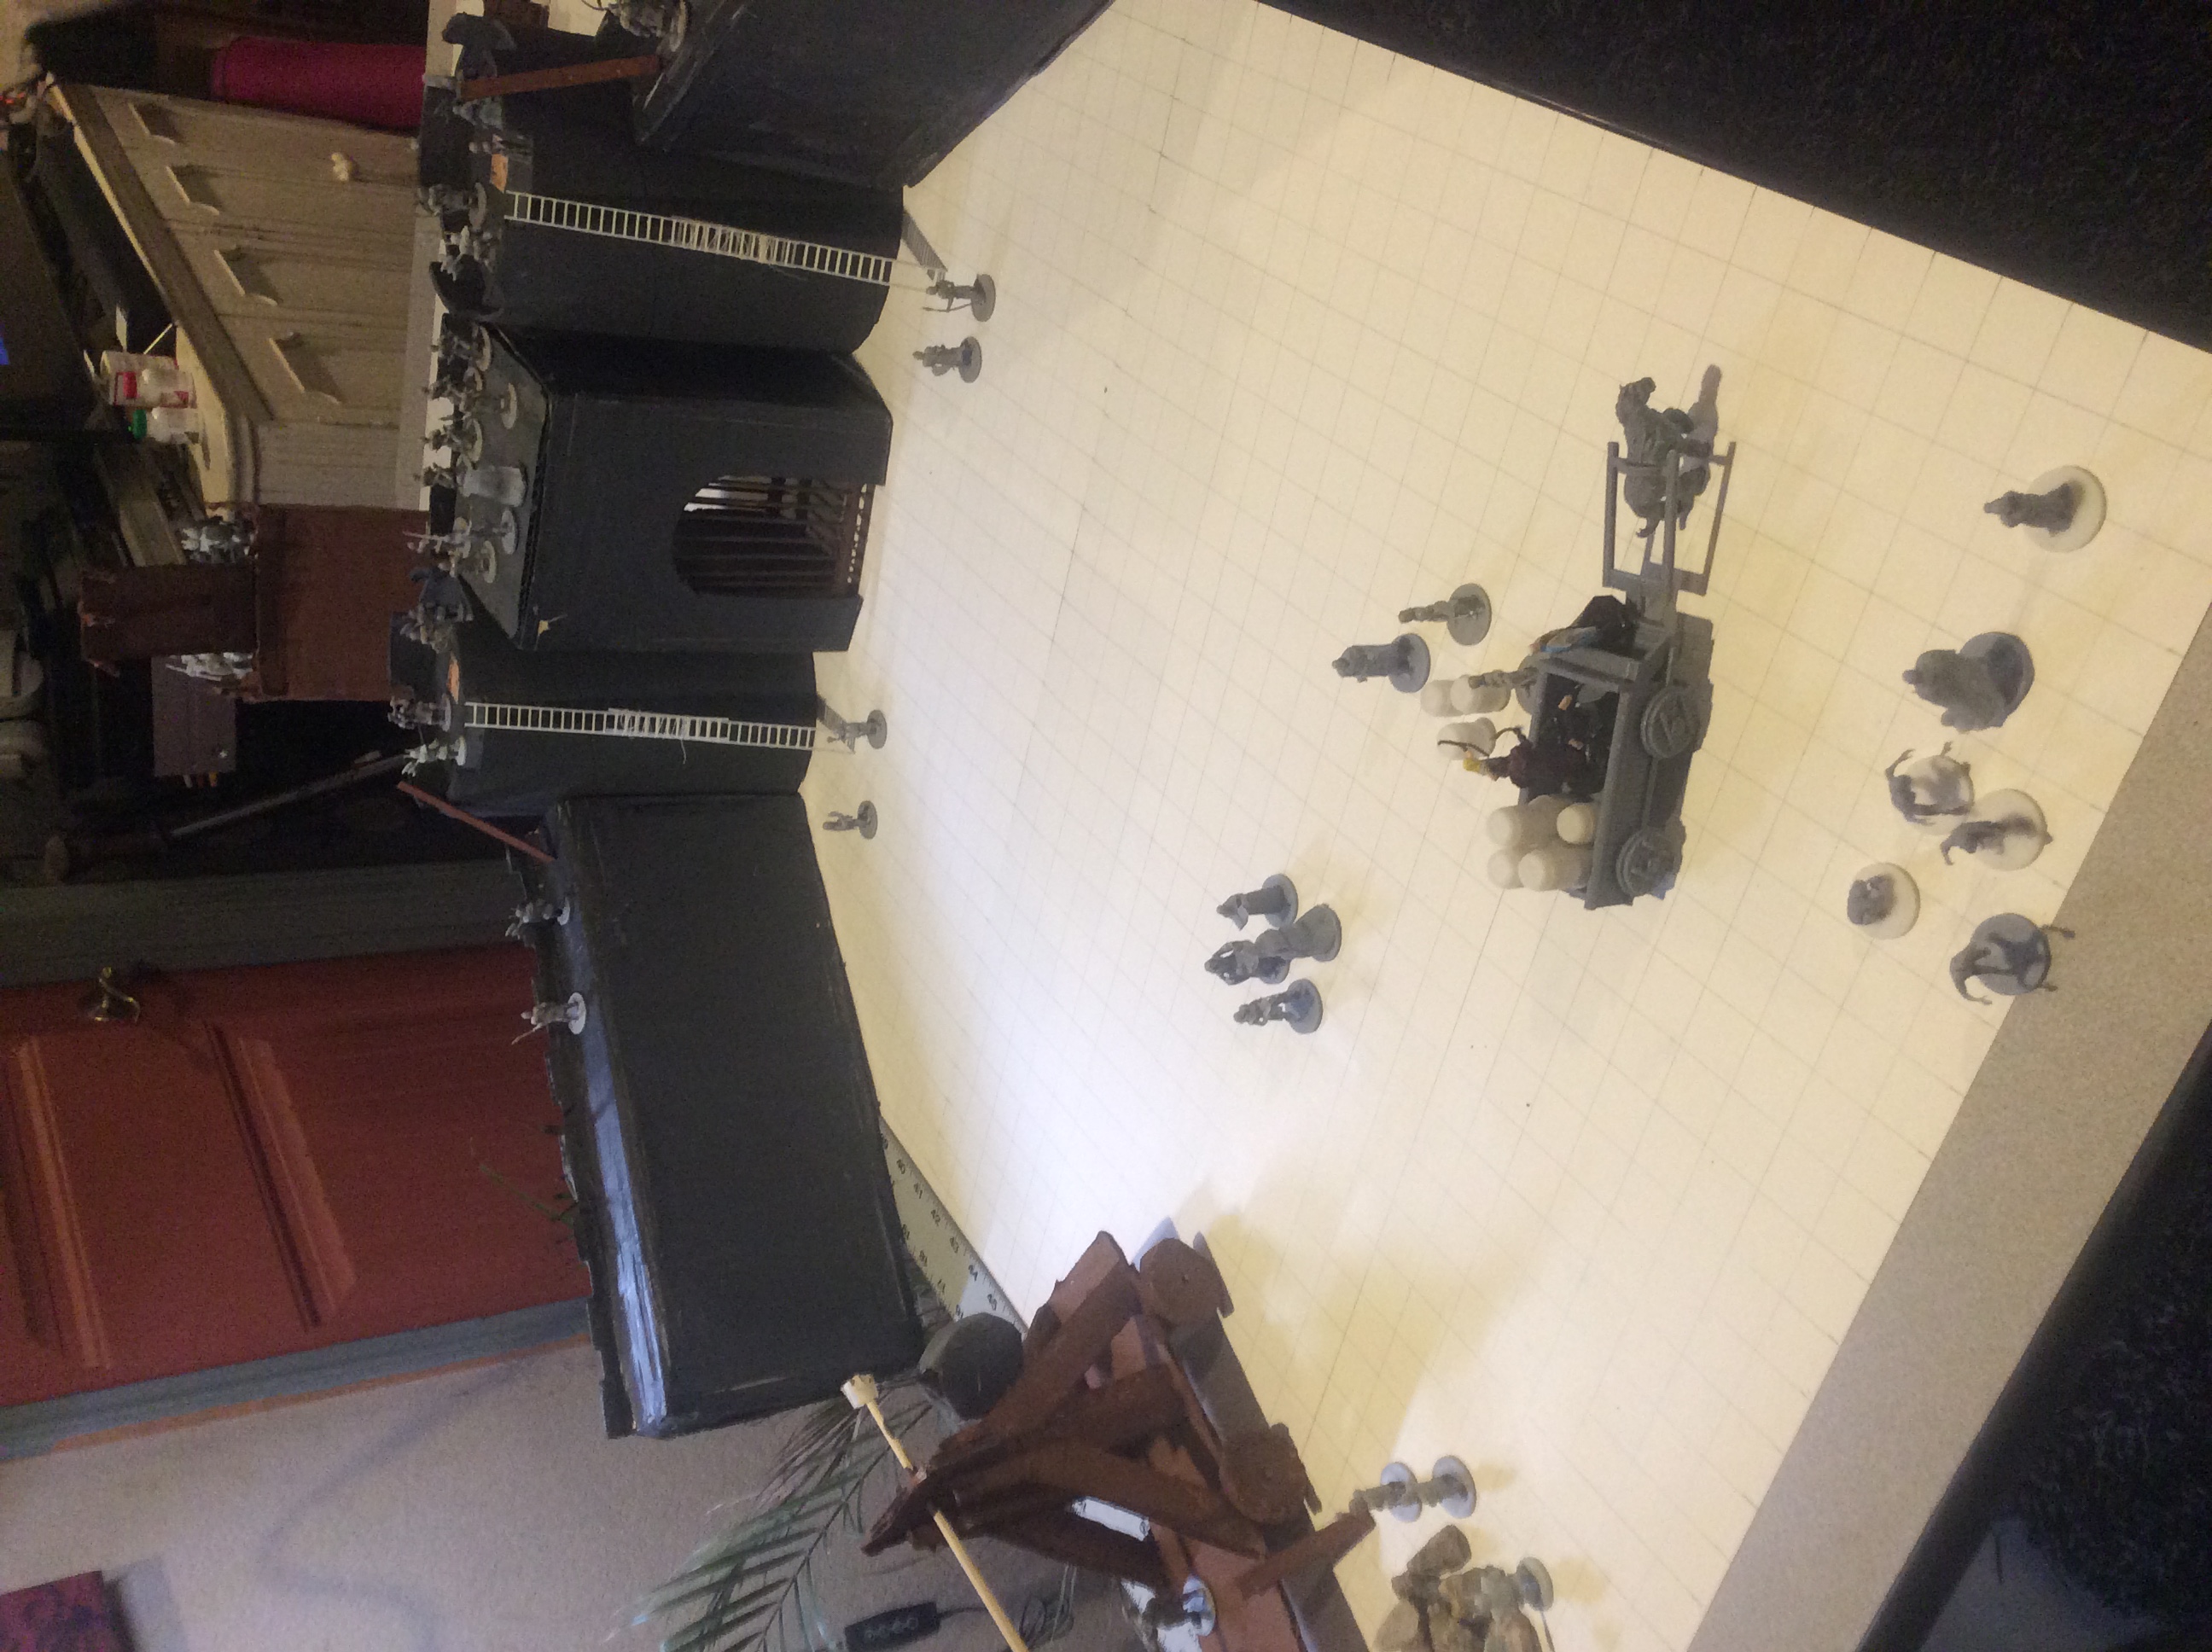
Deep in the Hamakhaave Desert,
Rhael the Fire Giant has brought his two hill giants, Rulos and Eclith, and over a thousand goblinoids
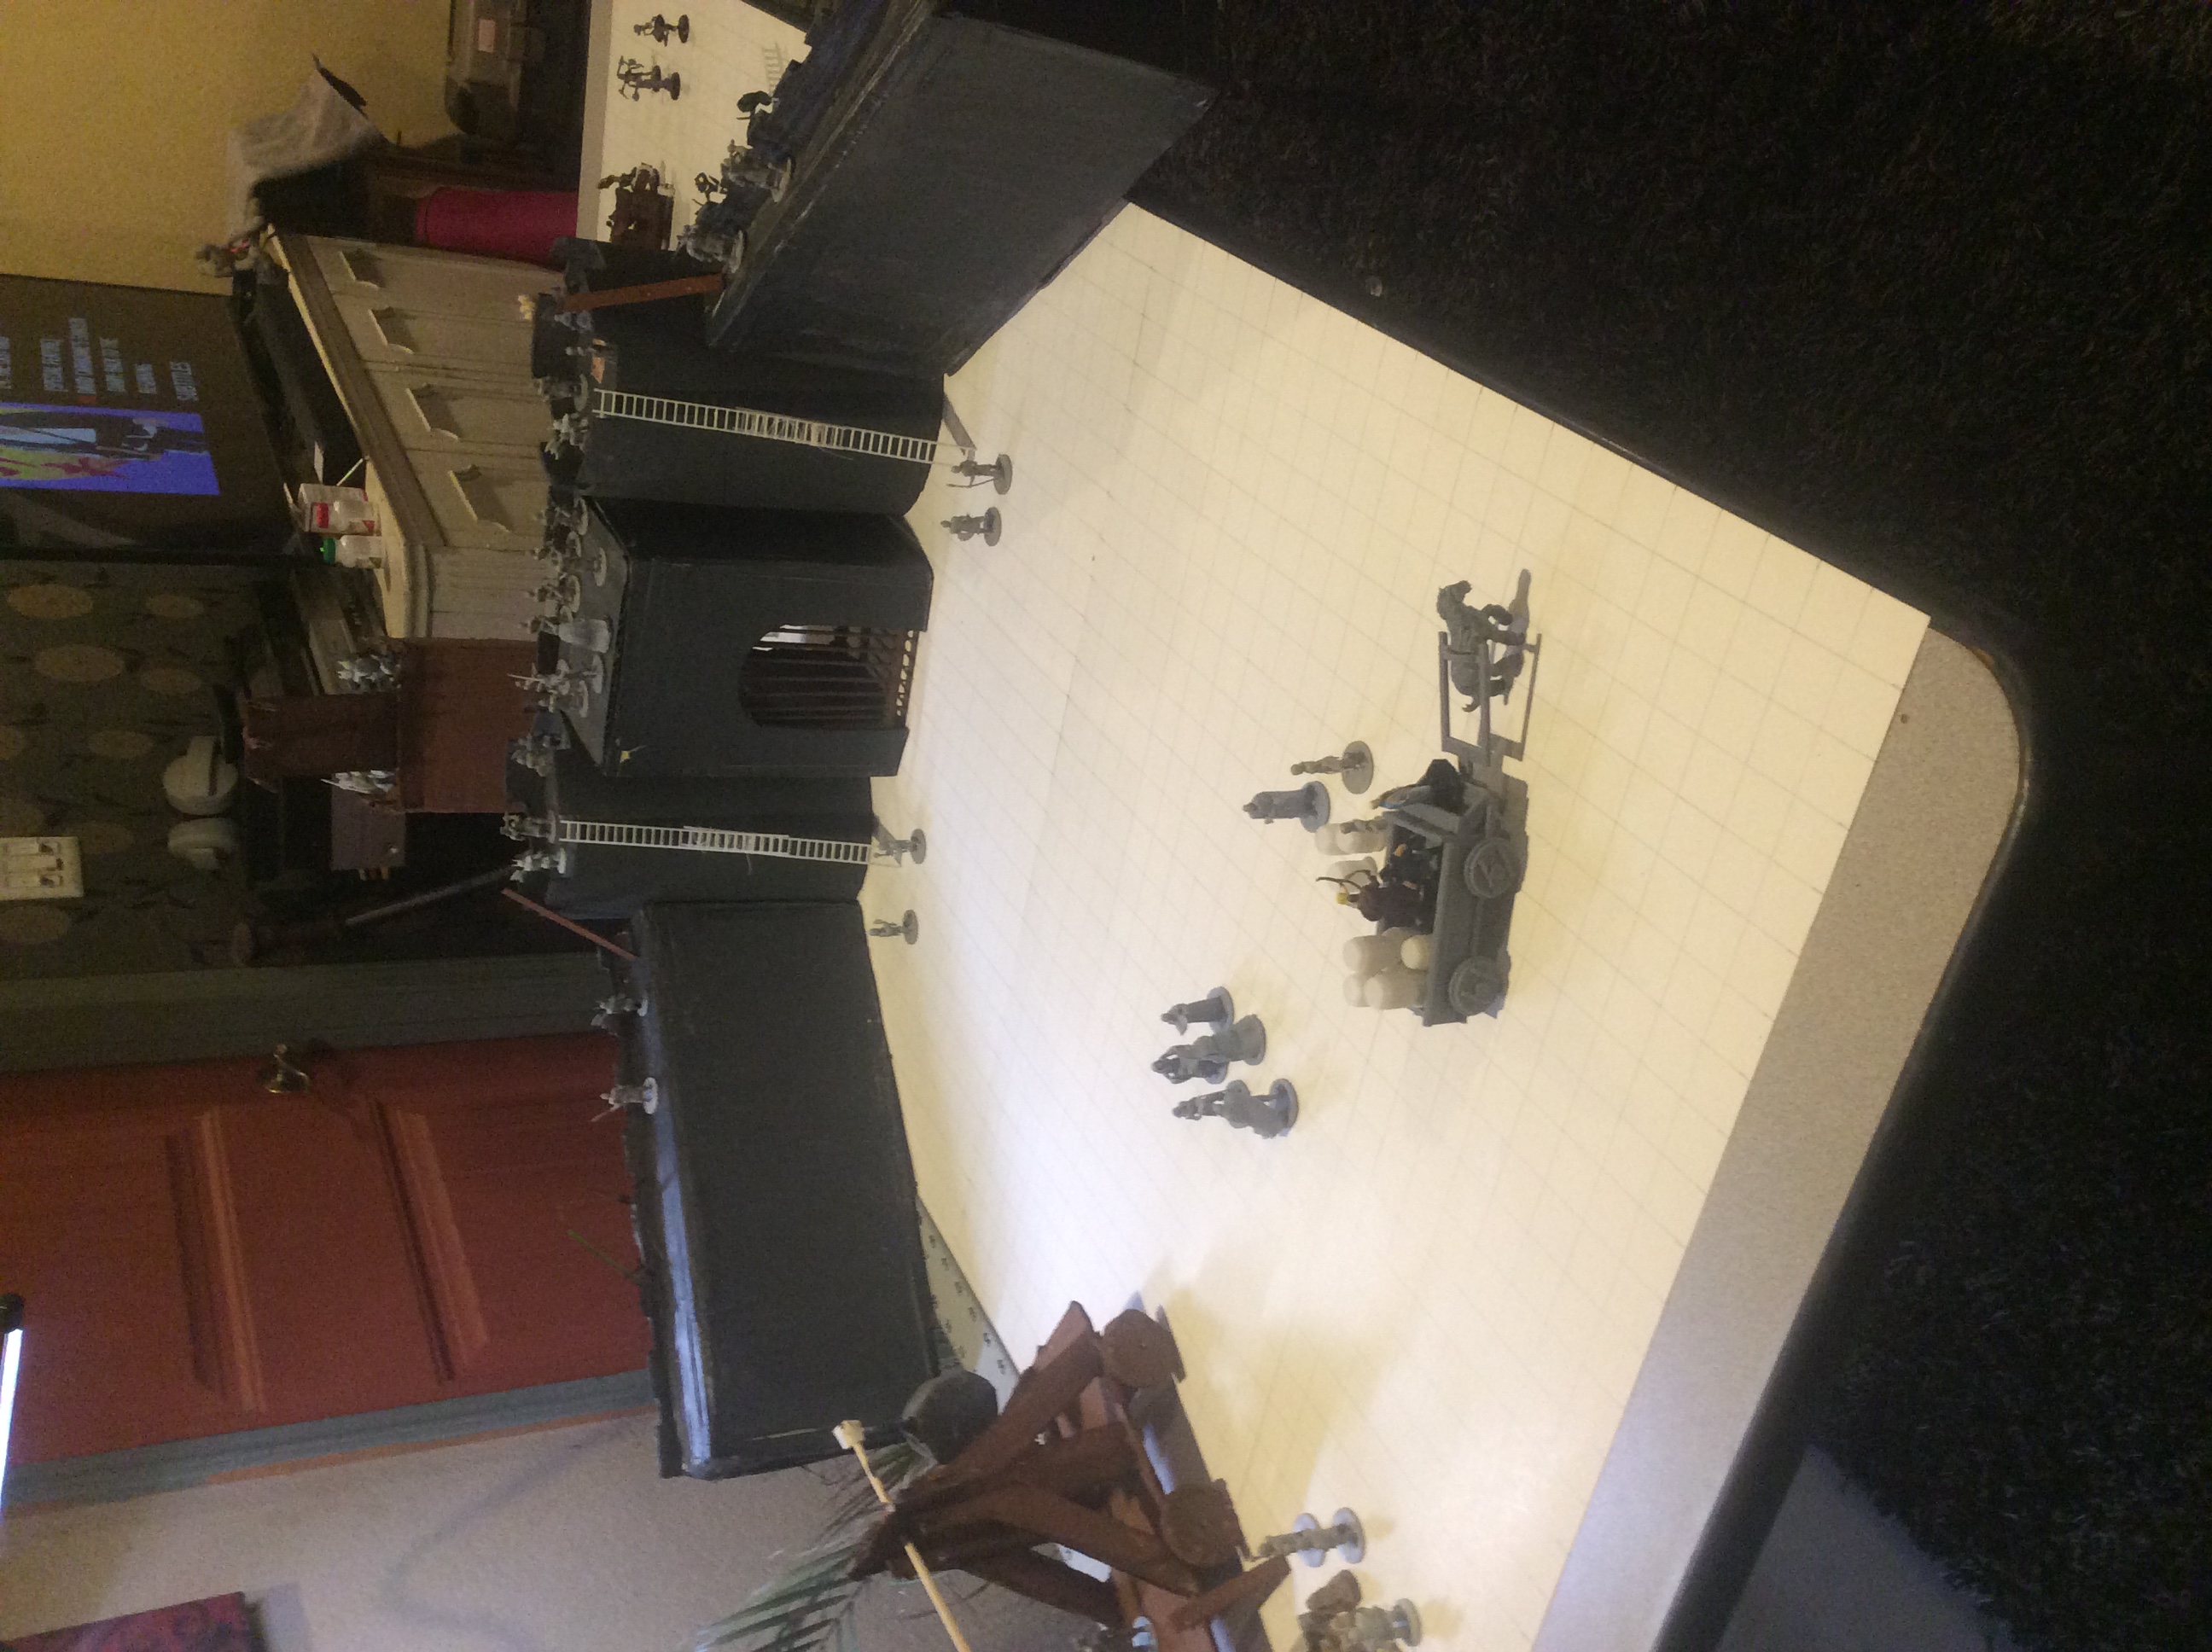
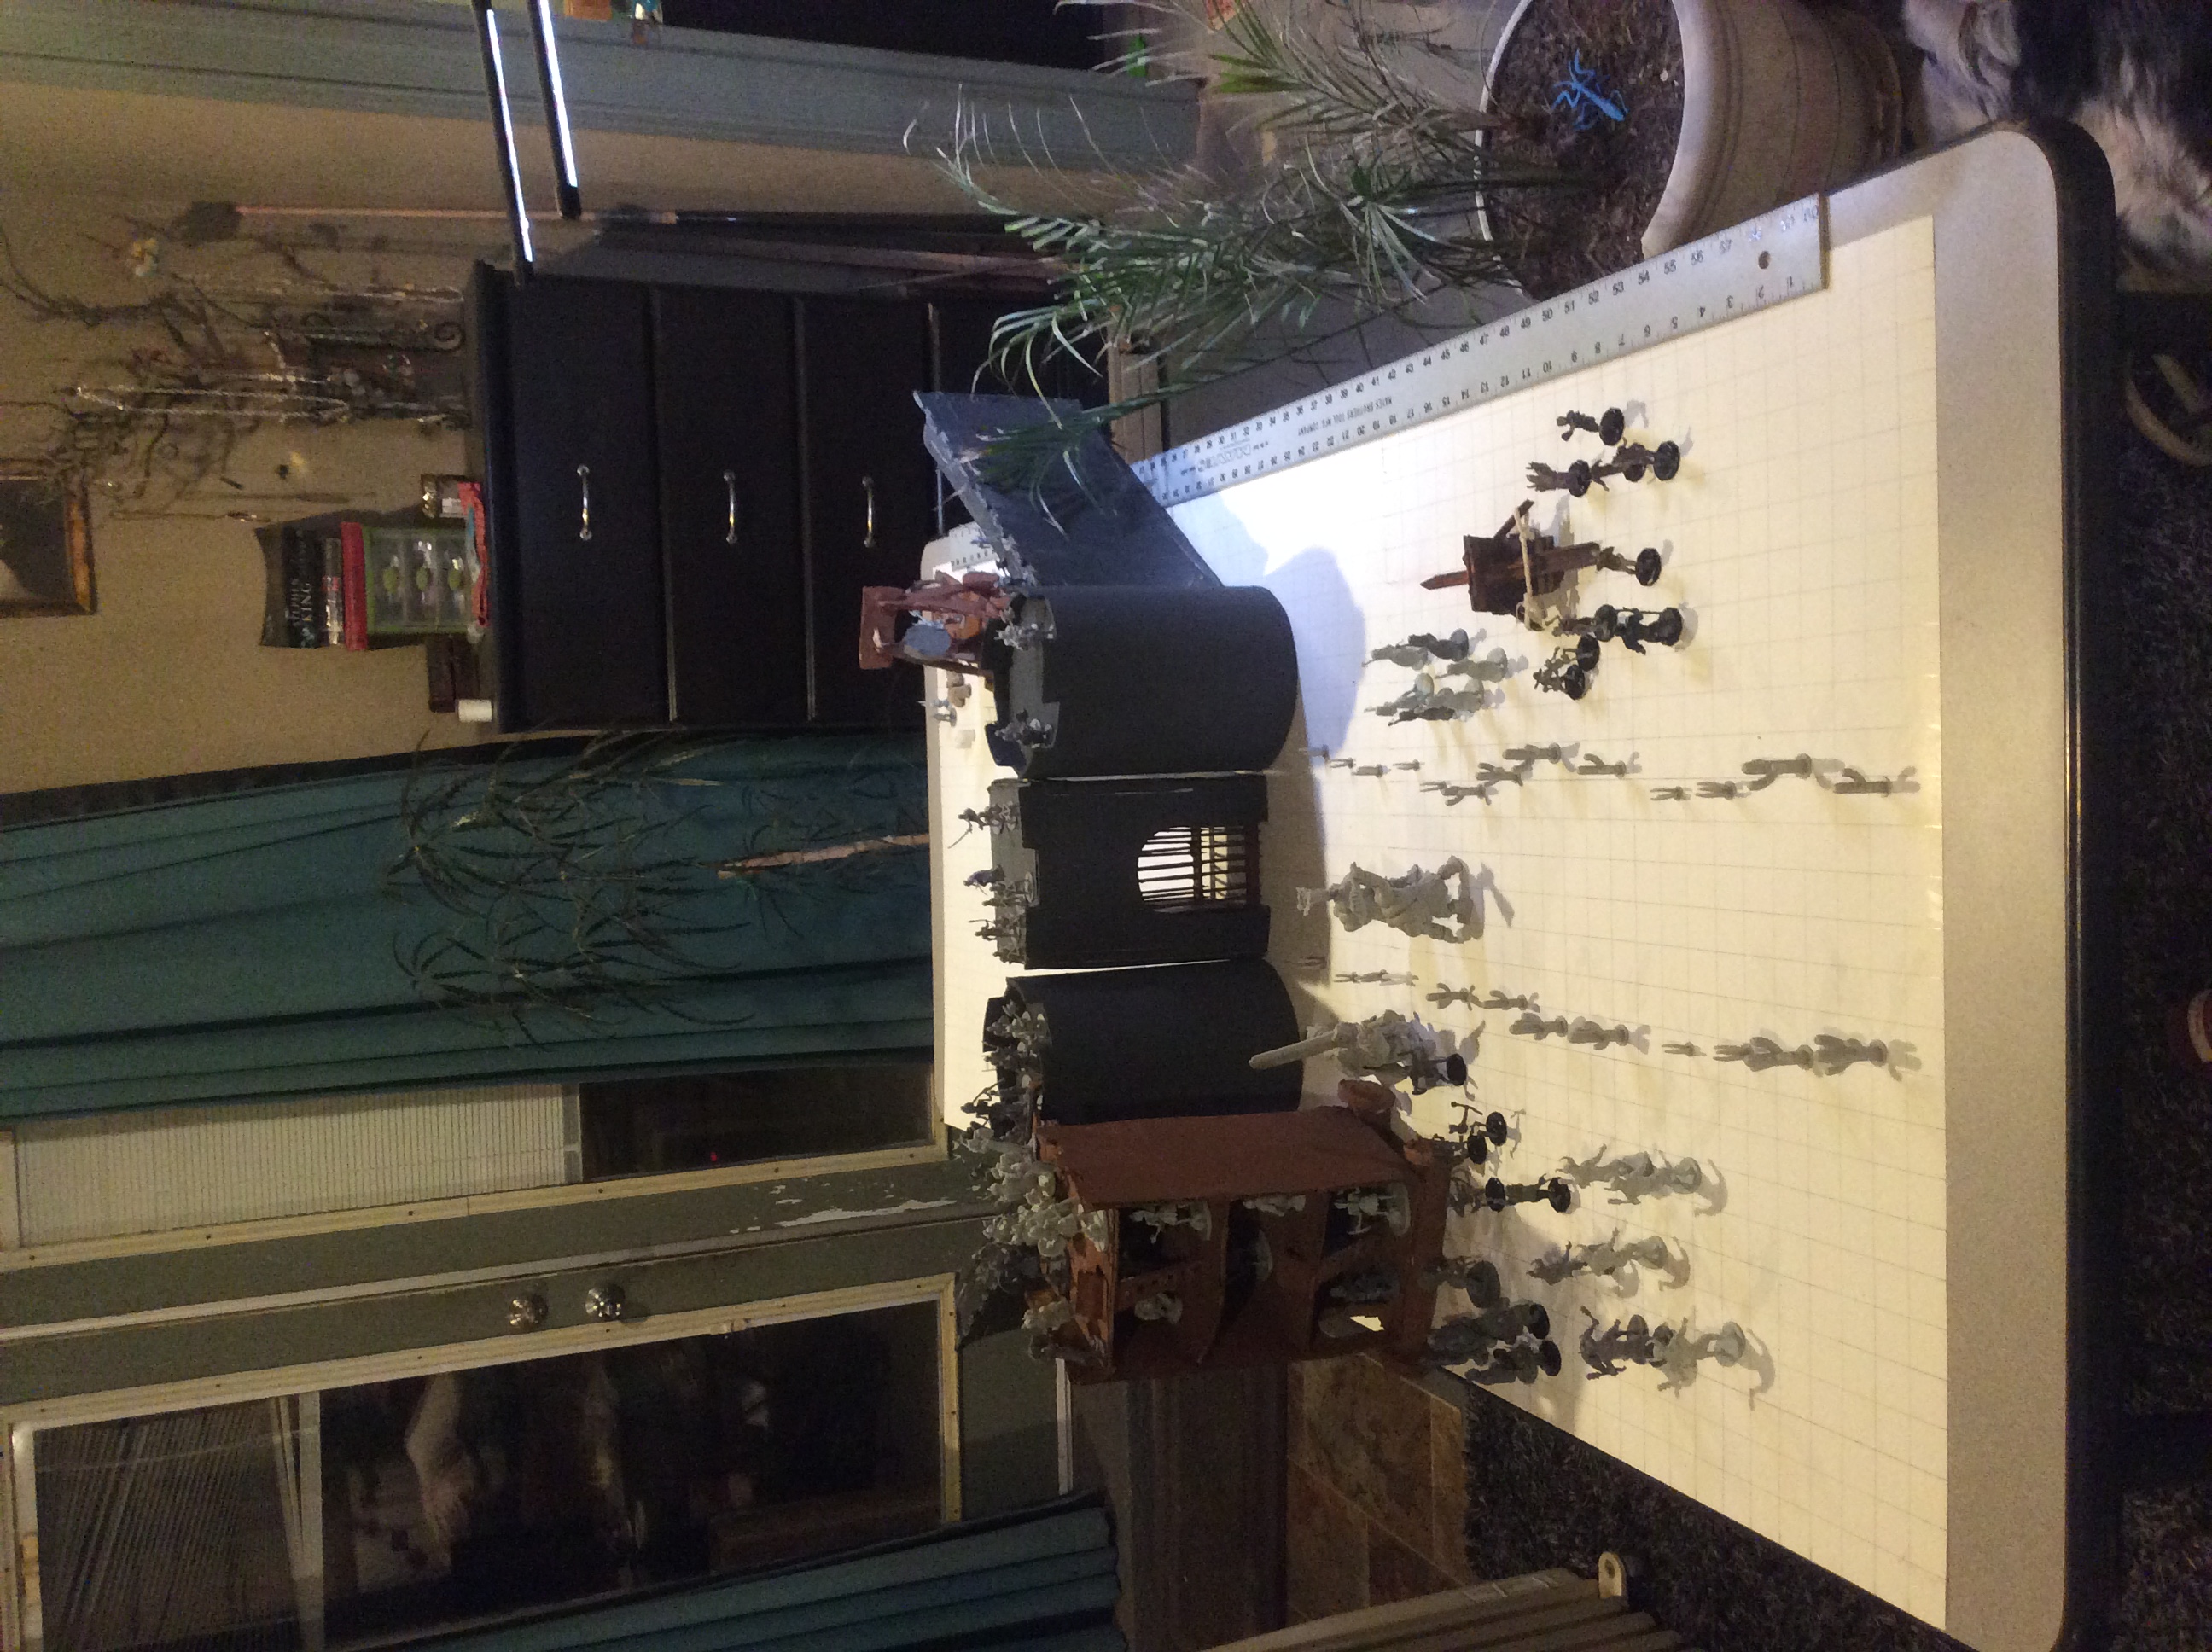
to attack and destroy the desert fortress named Kahar. Kahar, one of three desert fortresses that guard
the great
King's Road that cuts through the Hamakhaave Desert. Nearly 30,000 feet of 10 foot wide
sun hardened brick wall encloses over 25 square miles of a giant desert oasis. Nine towers, 45 feet tall,
are positioned over a mile apart along the enclosing wall. Kahar houses 1500 people, out
of which, since it is a fortress of war, over a third of that number are enlisted into a standing army. Nine hamlets,
with square buildings made of the same sun dried brick, not only house the inhabitants but also provide work, entertainment,
and nourishment. The hamlets are full of simple desert buildings arranged to keep the worst of the sand filled wind out
and are spaced out along the edges of the oasis. Each hamlet is ruled by a Knight or Dame, except Mbili and Tatu,
they are governed by real Lords, but the other hamlets are governed by a panel, including religious leaders and
prominent freemen and business men all presided over by the Knight or Dame. It is a clunky system with some
flaws, and of course everyone is subject to both the Marquis and the Crown, but the governing system works
especially well when the people get along. Inside the west part of the fortress are the great barn to the south
and to the north are the stables. The High Plains Farm houses the many watchers (spear armed cowboys) that care for the
many animals, cattle and livestock. These are the ones that made the yearly 70 mile cattle drive from the hidden
village named Tisa, deep in Bitter Water Valley. Far in the northwest of the fortress, Chissum Ranch, with the Stone
Stacked Stables, houses the cavalry with their many horses, donkeys, mules, and camels.
The entire fortress has been preparing for war for many weeks, and by night fall the enemy will stop hiding
from the blazing sun and the attack will commmence. For the last two weeks, grandparents, teens, adolescents,
and children have all been evacuated to Tisa village hidden away in Bitter Water Valley north in the desert mountains.
Kahar has a standing army of 501 soldiers. Twenty-four soldiers are assigned to each of the nine towers.
Each hamlet enlists 14 soldiers as guards. A standing military police force of 45 soldiers are assigned 5 to
each hamlet. Two officers lead 112 soldiers on horseback that makes one of the best cavalrys this side of
the Aljana River. In addition, not only do the Marquis and Lady have 8 knights each as thier own dedicated
body guards but also Kahar houses two noble lords of Royal Blood: the dwarf Fahred Ahmandi, son of the Lord of the Hunter's of
Bitter Water Valley, and the elf Nalasteron Nazeri, Lady of the Sand Seers. Each has a contingent of 25 well trained
soldiers.
Kahar's army is second to none, they are a mixture of
soldiers and
heros quite capable of defending the fortress against any threat. Leaders and
prominent citizens are all ready for war in their assigned positions. If your party are soldiers, then you will be
assigned to one of the nine Towers, or on a Fire Team ordered to operate a trebuchet or mangonel, or in the cavalry, or as
a police man patrolling the hamlets, or any of a great number of other things specific to the military. If your party
are not soldiers (as this guide will be written with that premise in mind) they were given the choice to evacuate and they did not,
so now they will be expected to aid military groups by evacuating wounded, relaying important information and letters, resupplying
ammunition and rations and, especially, water. An official will have names called out in a roll call, and your party
will be grouped together as a team and given a cart, a donkey, a team name and number, and sent to the west side
of the fortress and put in a line with many other cart and donkey teams at Braek's Munitions Dump, and there you'll await orders.
Life in the desert is unique, particularly in the summer. Temperatures can become so extreme that
you will suffer heat exhaustion for every hour you are out in the open sun. In Kahar, therefore, everyone gets used to
switching to the night shift. Every Tower, every Hamlet, every business, school, animal facility, everyone
switches to the night shift during the summer months. Most importantly, the attacking goblinoids hide from the blazing desert
sun inside tents, covered wagons, and covered carts and don't show their heads until the sun sets. Consequently, there
are only a couple of hours of light left when your adventure begins. Darkness will soon cover everything.
i. The War
Integrating PC Backgrounds
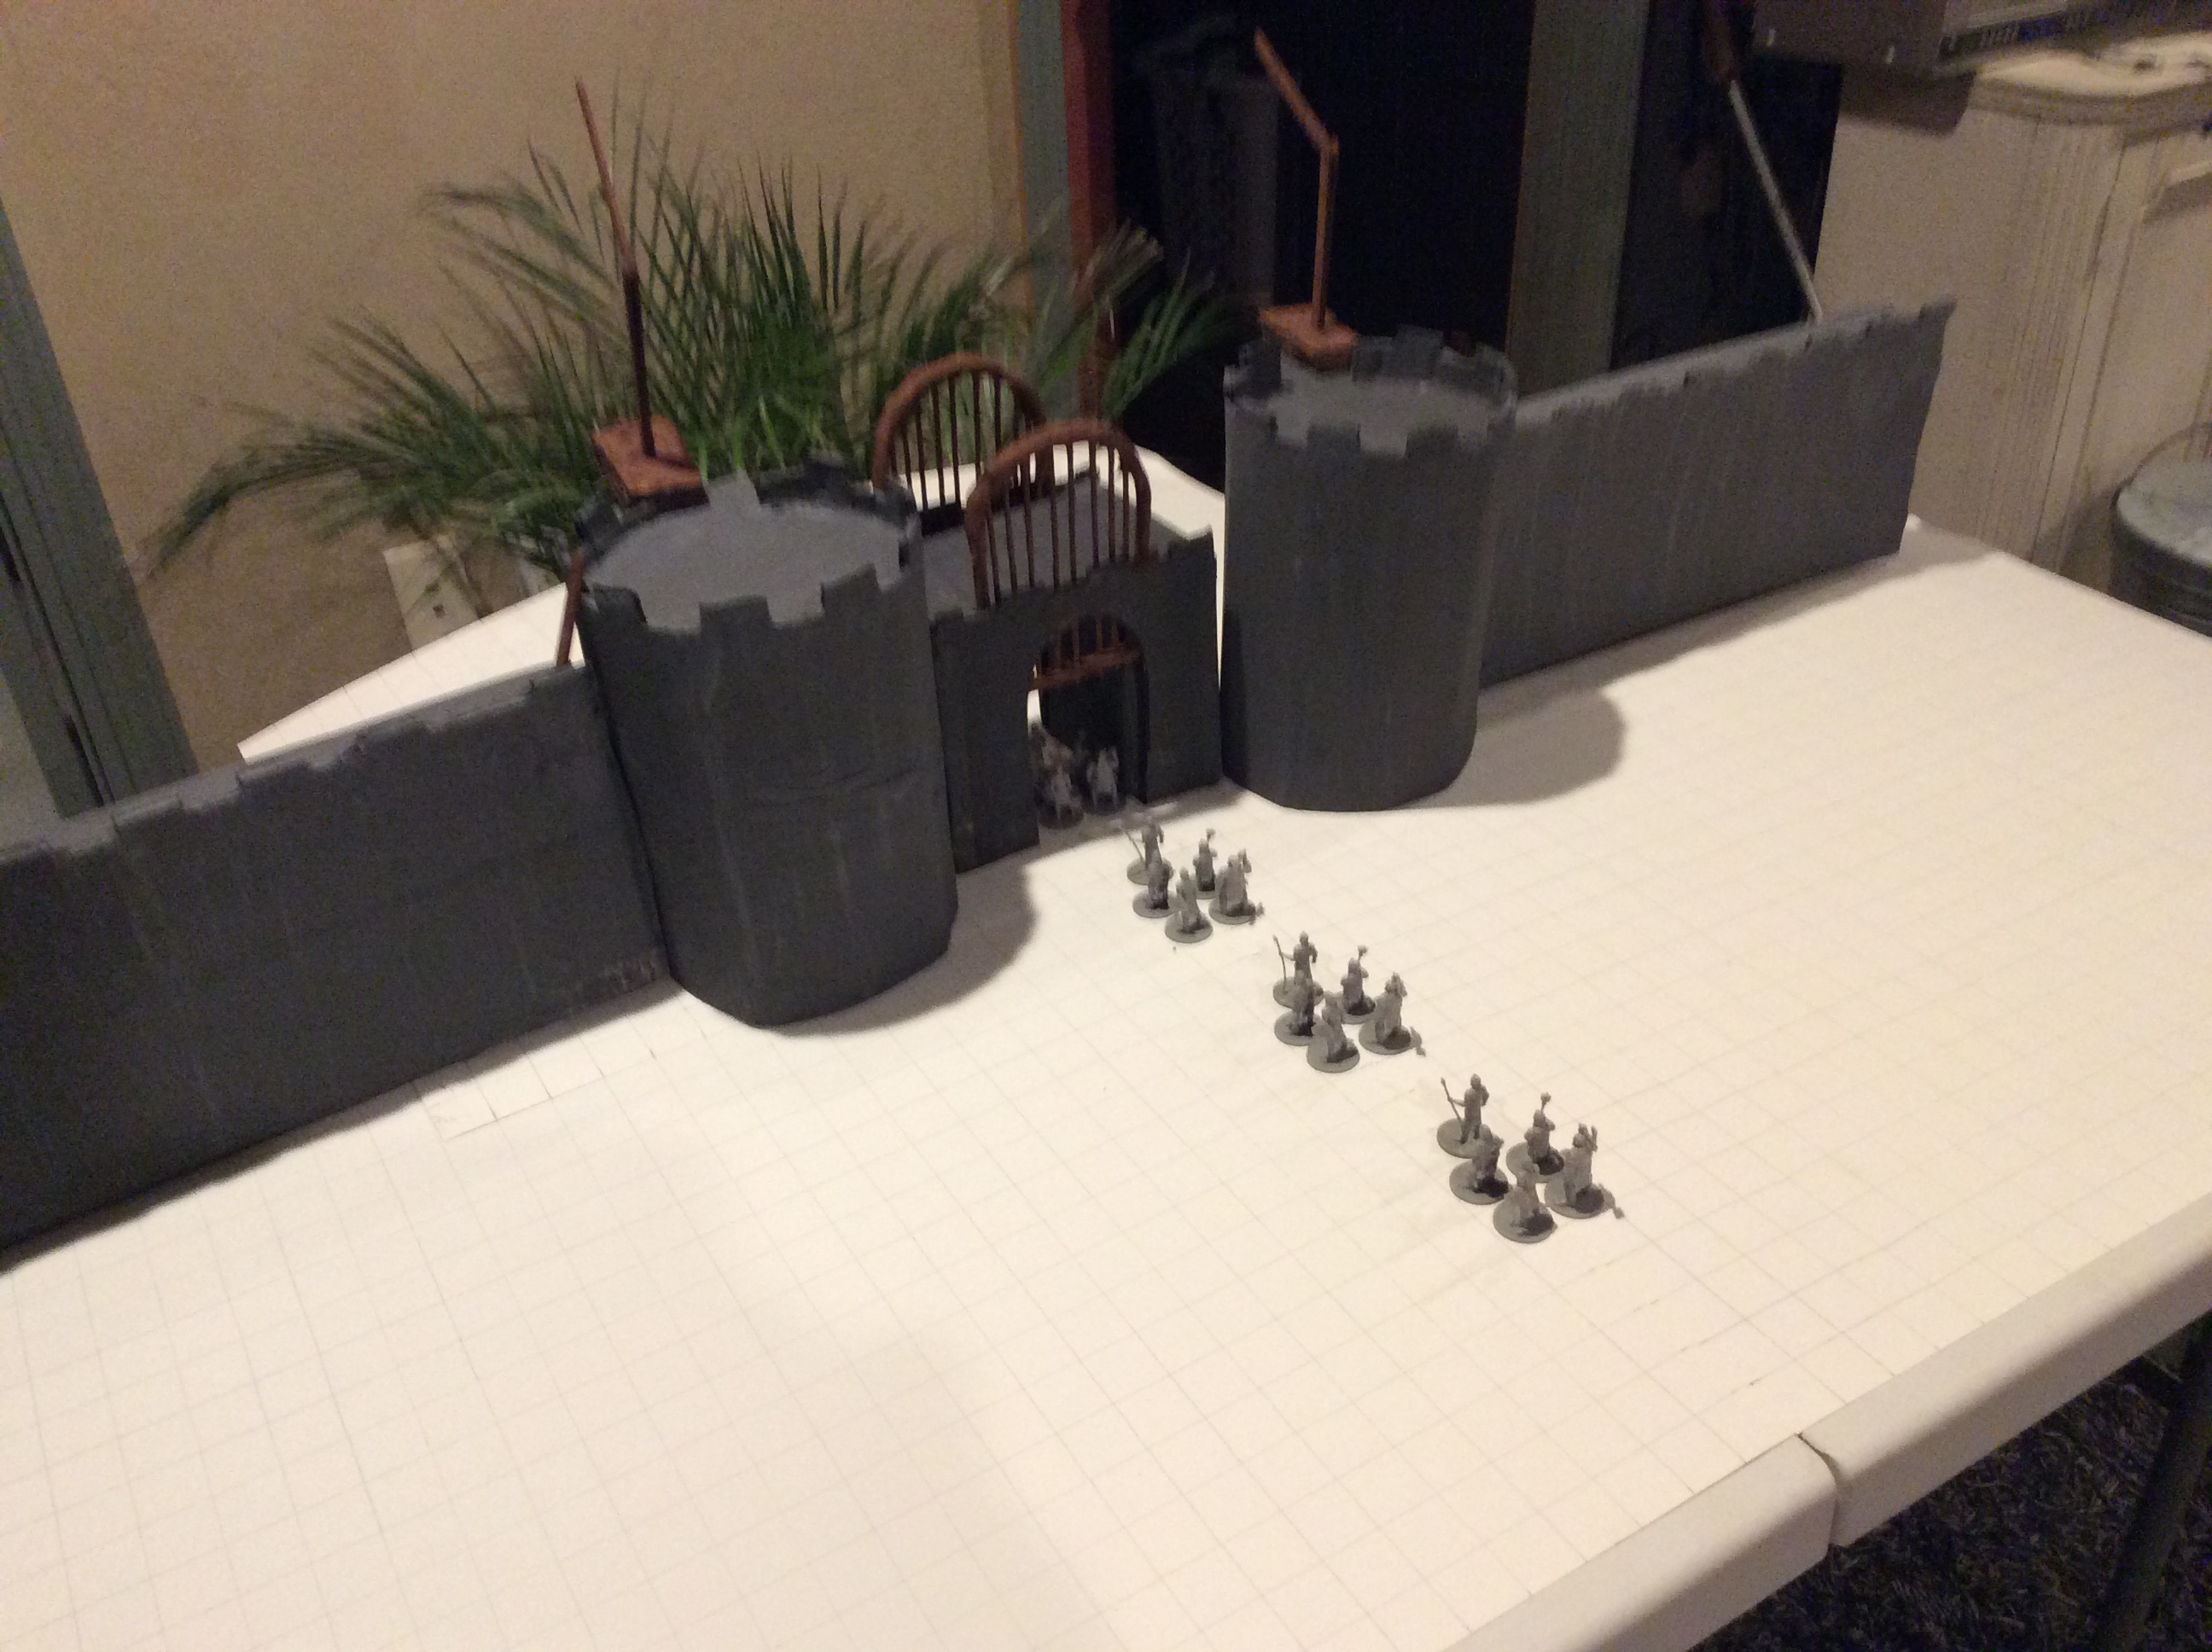
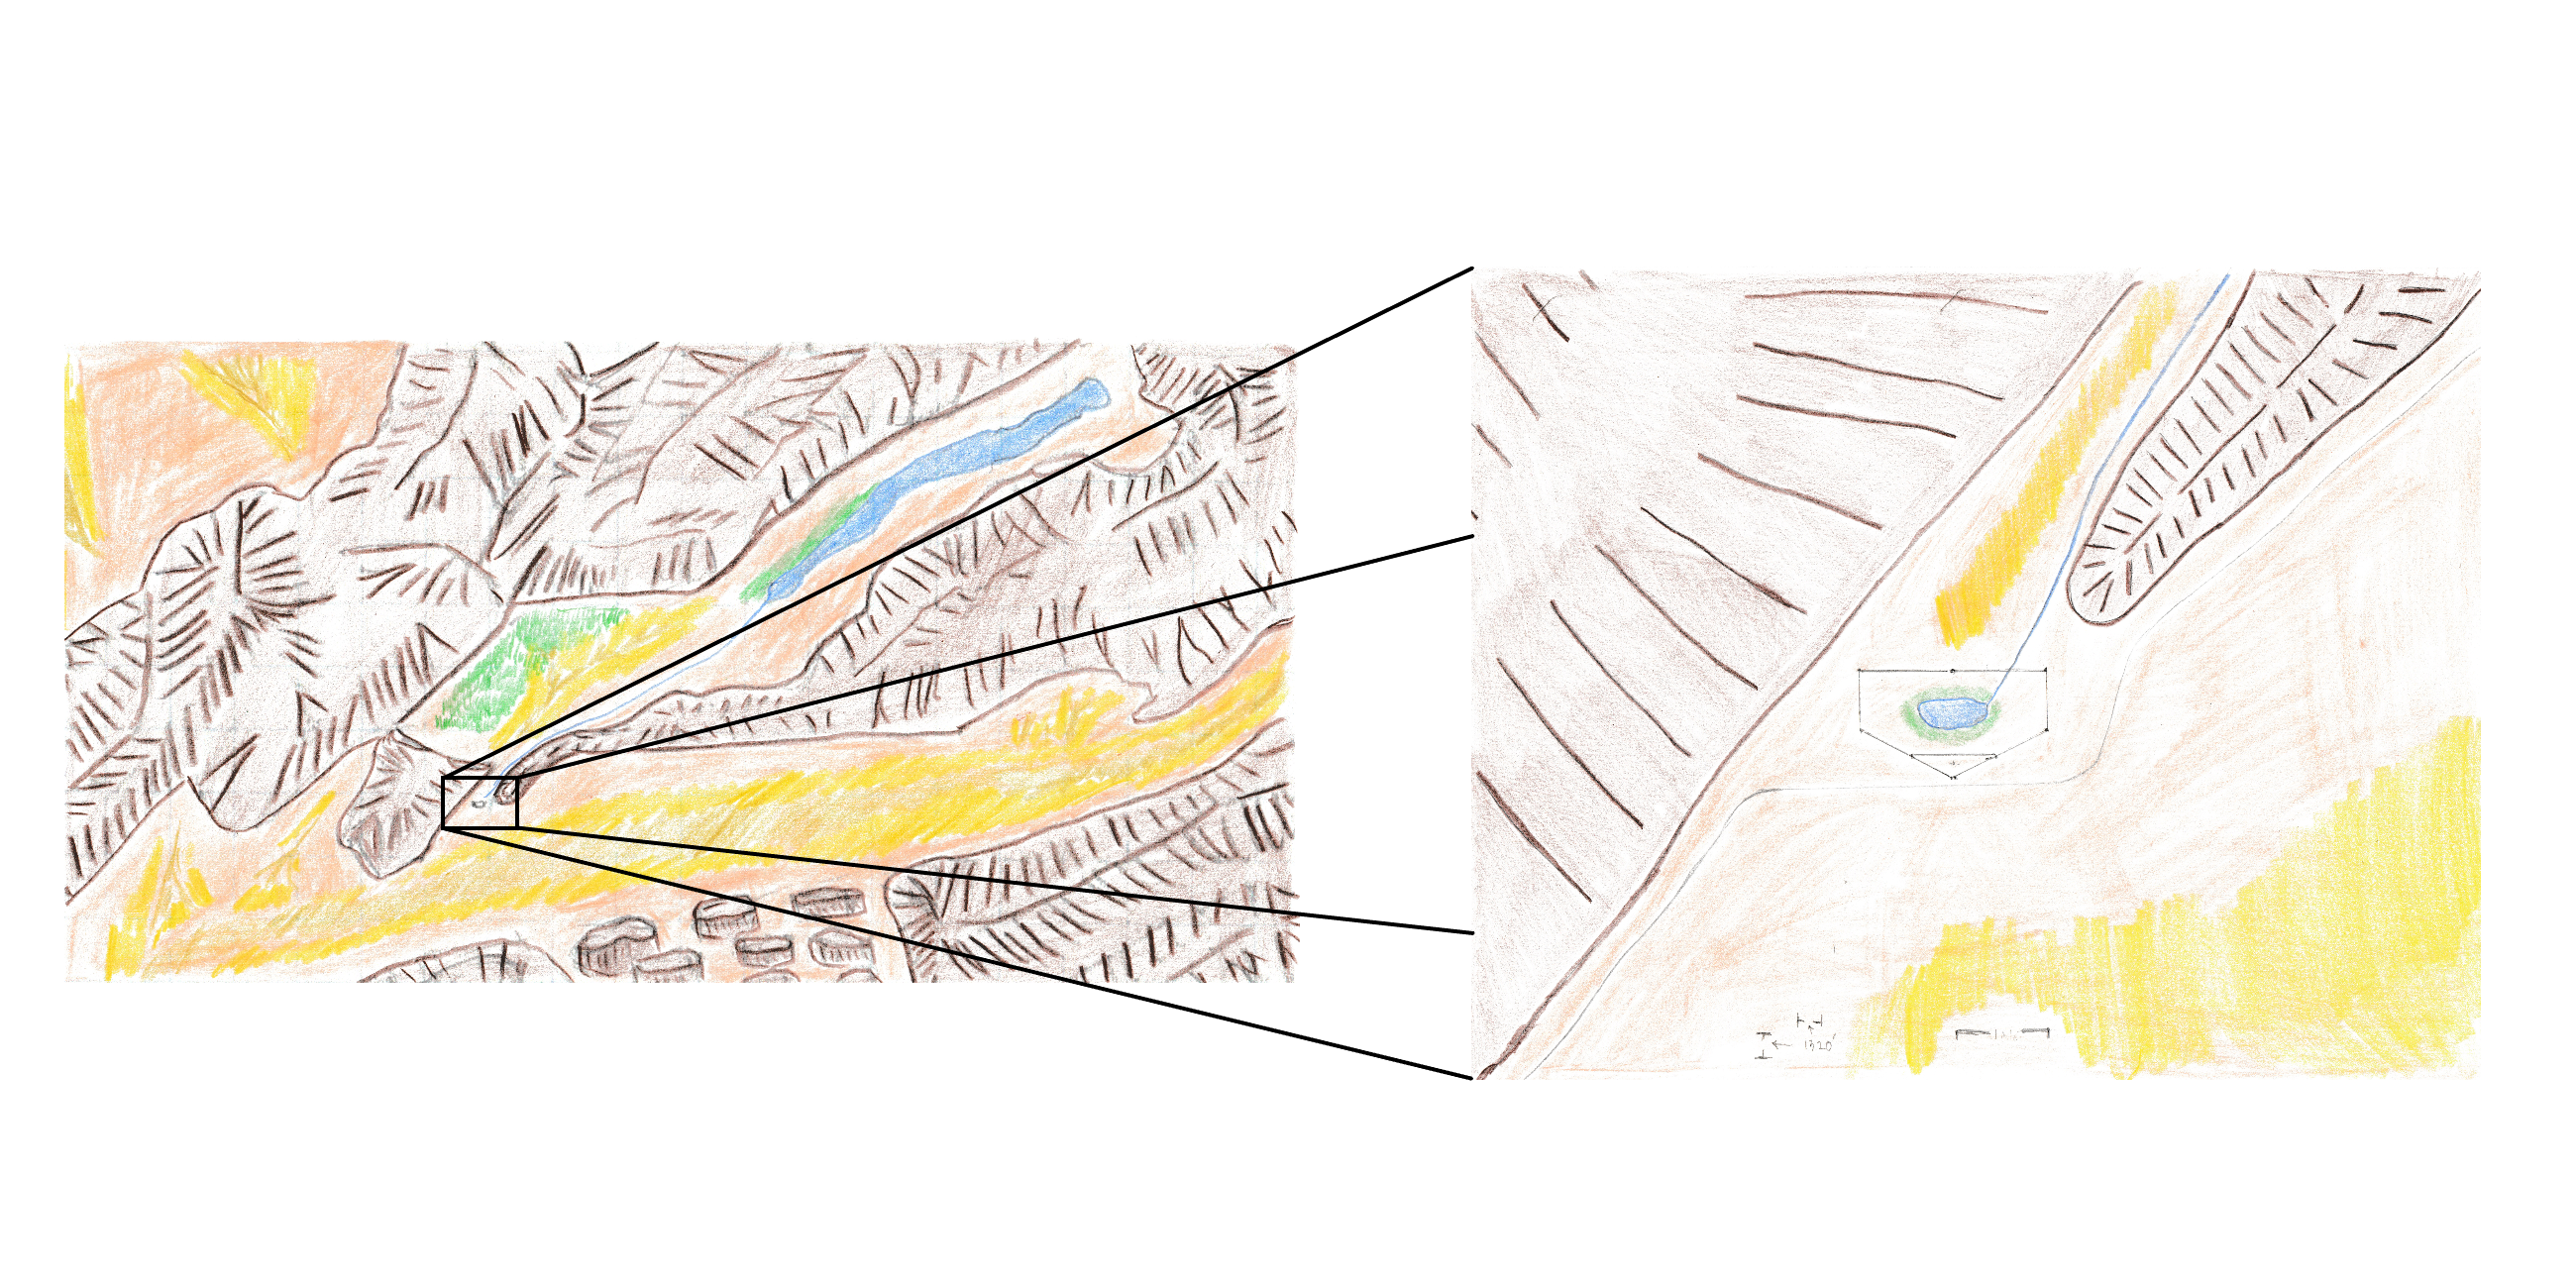
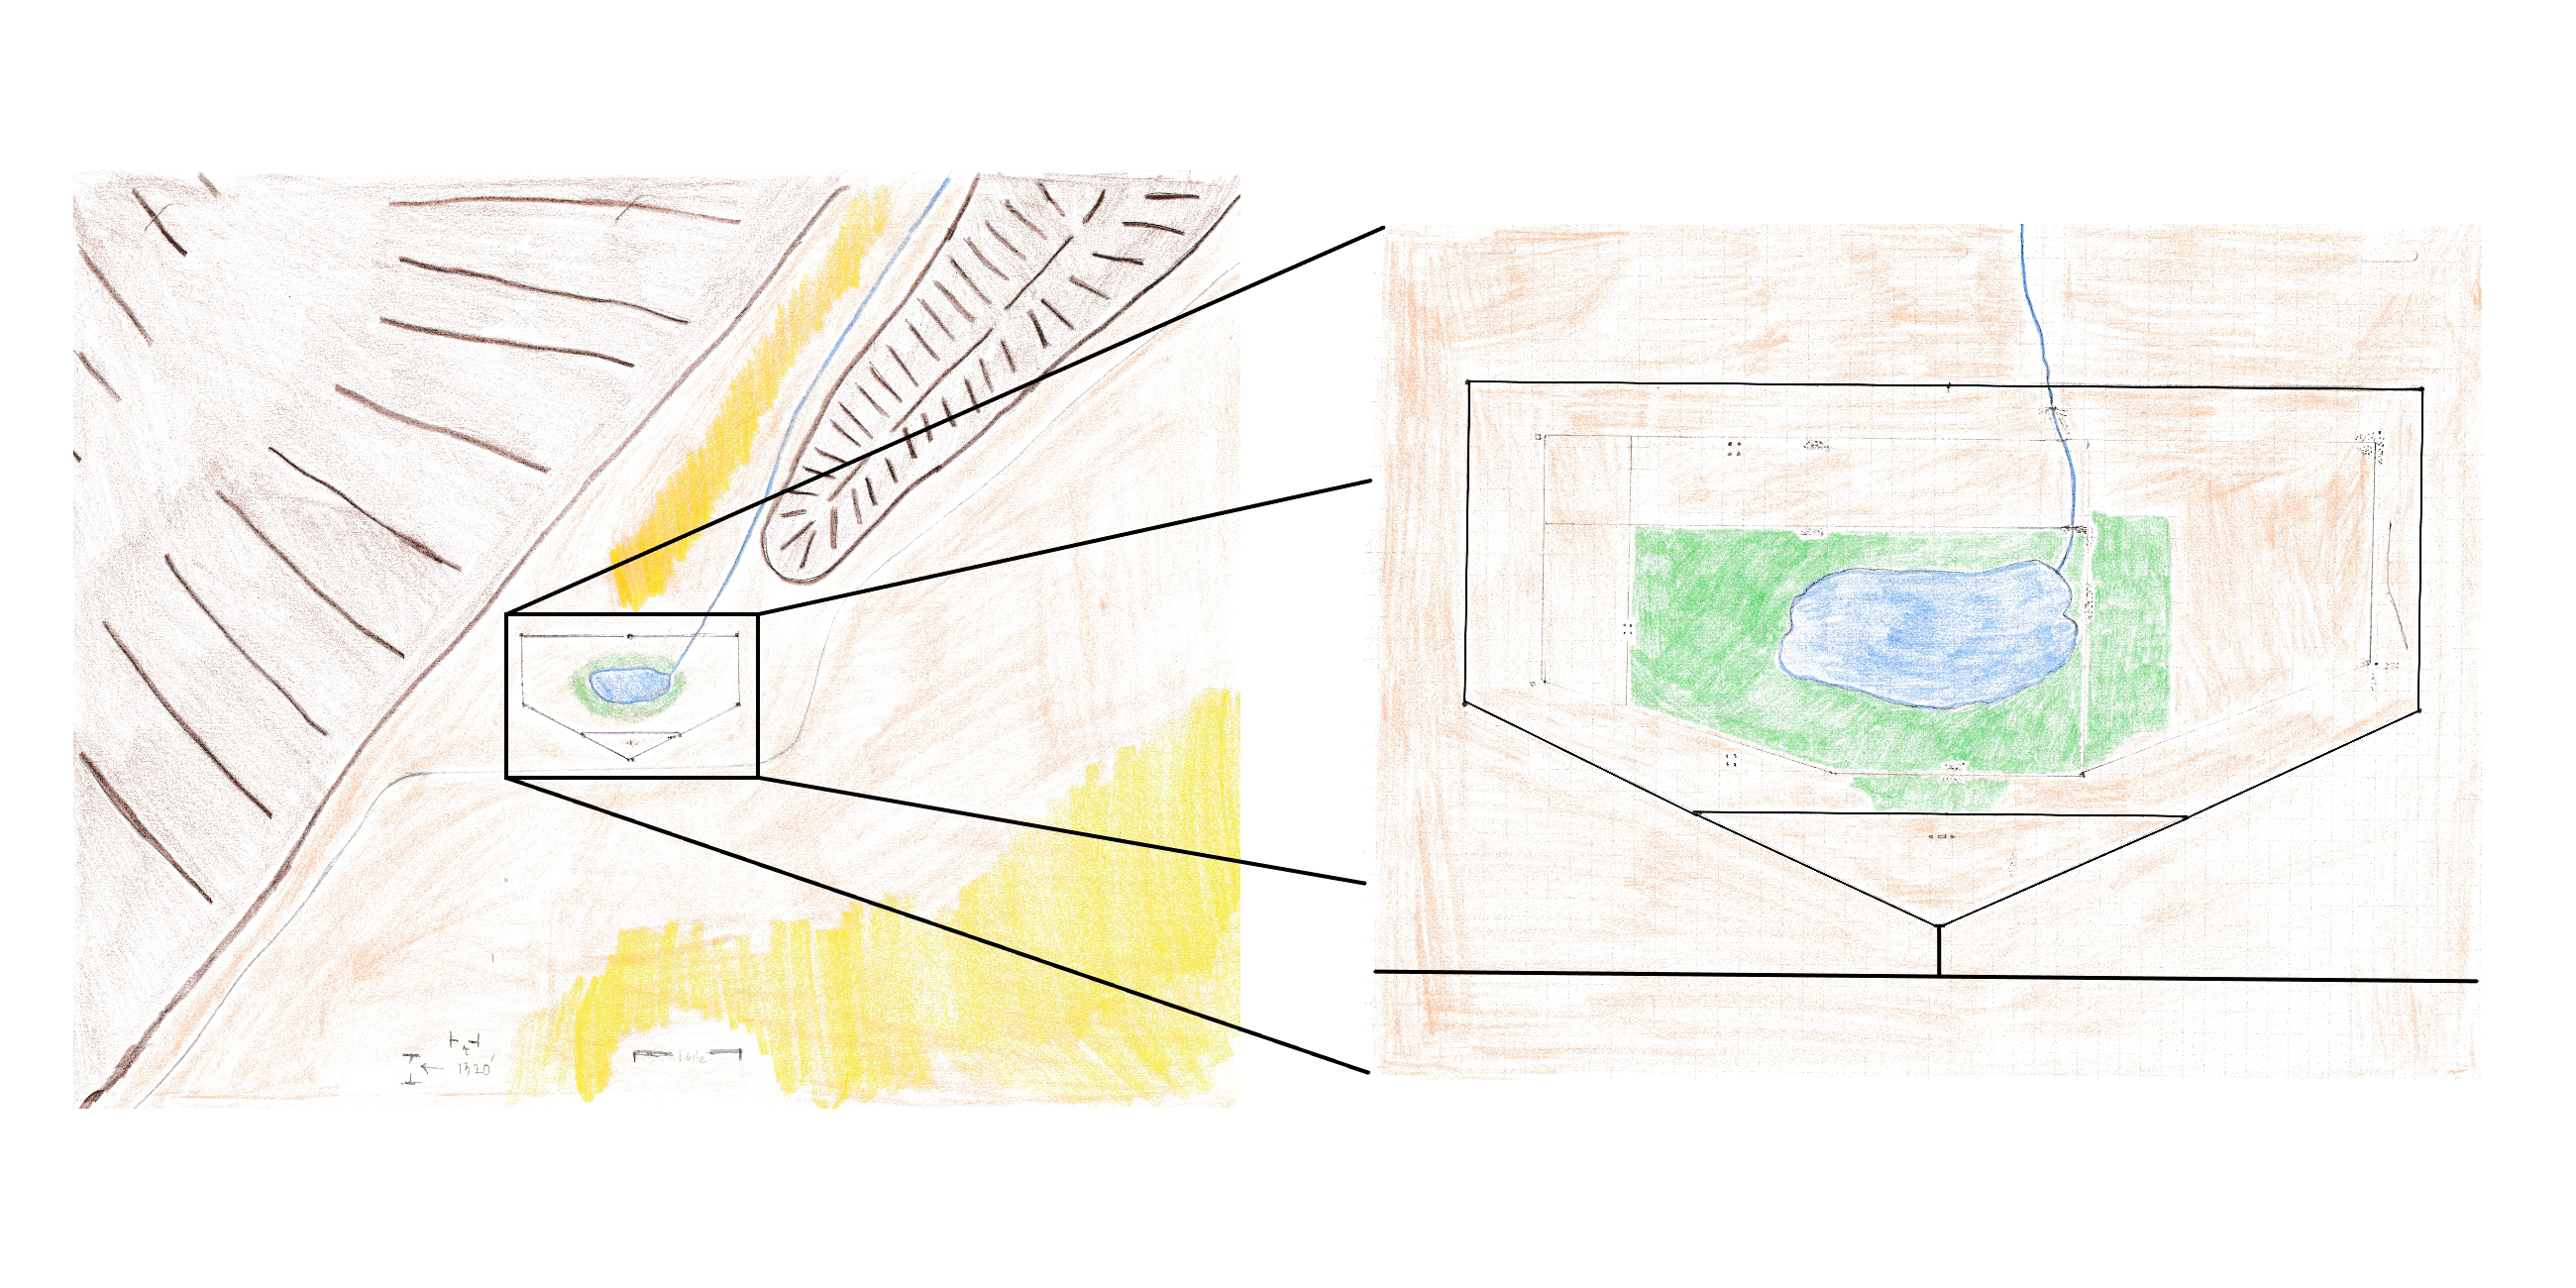
PCs will start in or around the desert fortress. Nine Towers, 45 feet tall and 30 feet in diameter, are
attached by the ten feet wide, thirty feet tall wall. The towers are made of 4 feet thick hard sun baked earth
bricks, and the walls are ten feet thick of the same hard earth material. The walls and towers are spread out
at the opening of Bitter Water Canyon which is over 6 miles wide. The walls and towers enclose 18 3/4 miles
2,
wherein lies the great man made oasis. Surrounding the oasis and protected within the walls are the lake, the nine hamlets,
twelve barracks, the Ranch, the Barn, the Stables, and the Market District at the Rear Gate. A number of NPCs are
available to write in to any background as friends to help and lead PCs along as the war progresses. Each hamlet
averages about 50 to 60 buildings housing about 150 people. Generally split up into 50 adults, 20 grandparents,
20 teens, 30 adolescents, and 30 children including babies. Everyone except adults has been evacuated to the hidden
mountain village before the battle. Of the adults, each hamlet has 36 men in a corresponding tower, and they each have left
14 men in each hamlet. Most of these hamlets will come under peril during the attack. The Lady of Kahar will
give out letters that will make it to the PCs. In each letter, the Lady convinces the Leader of the Hamlet to abandon
their hamlets and join thier force of 14 men to the resistance
fighters gathering in the three east towers. In this way, the resistance fighters hope to bolster their numbers as
much as possible. But failure of saving the 14 men of each hamlet means the enemy will make more undead, and not
just undead, but zombies and skeletons mutated into monstrosities terrible to behold. So urge the PCs to save
the hamlets.
At anytime the PCs get in over their heads, as a DM, you can bail them out using either
Lord Ahmandi or Lady Nazeri both of whom dwell inside the fortress. Each of them lead 3 squads of 8 veterans hunting
evil inside the fortress. Use these NPCs sparingly, for these are the ones that will bail the party out of any TPK that might
happen for any reason. On their stat sheets, you'll have quite the arsonal to be able to subdue the PCs if needed,
but that will never be thier intention.
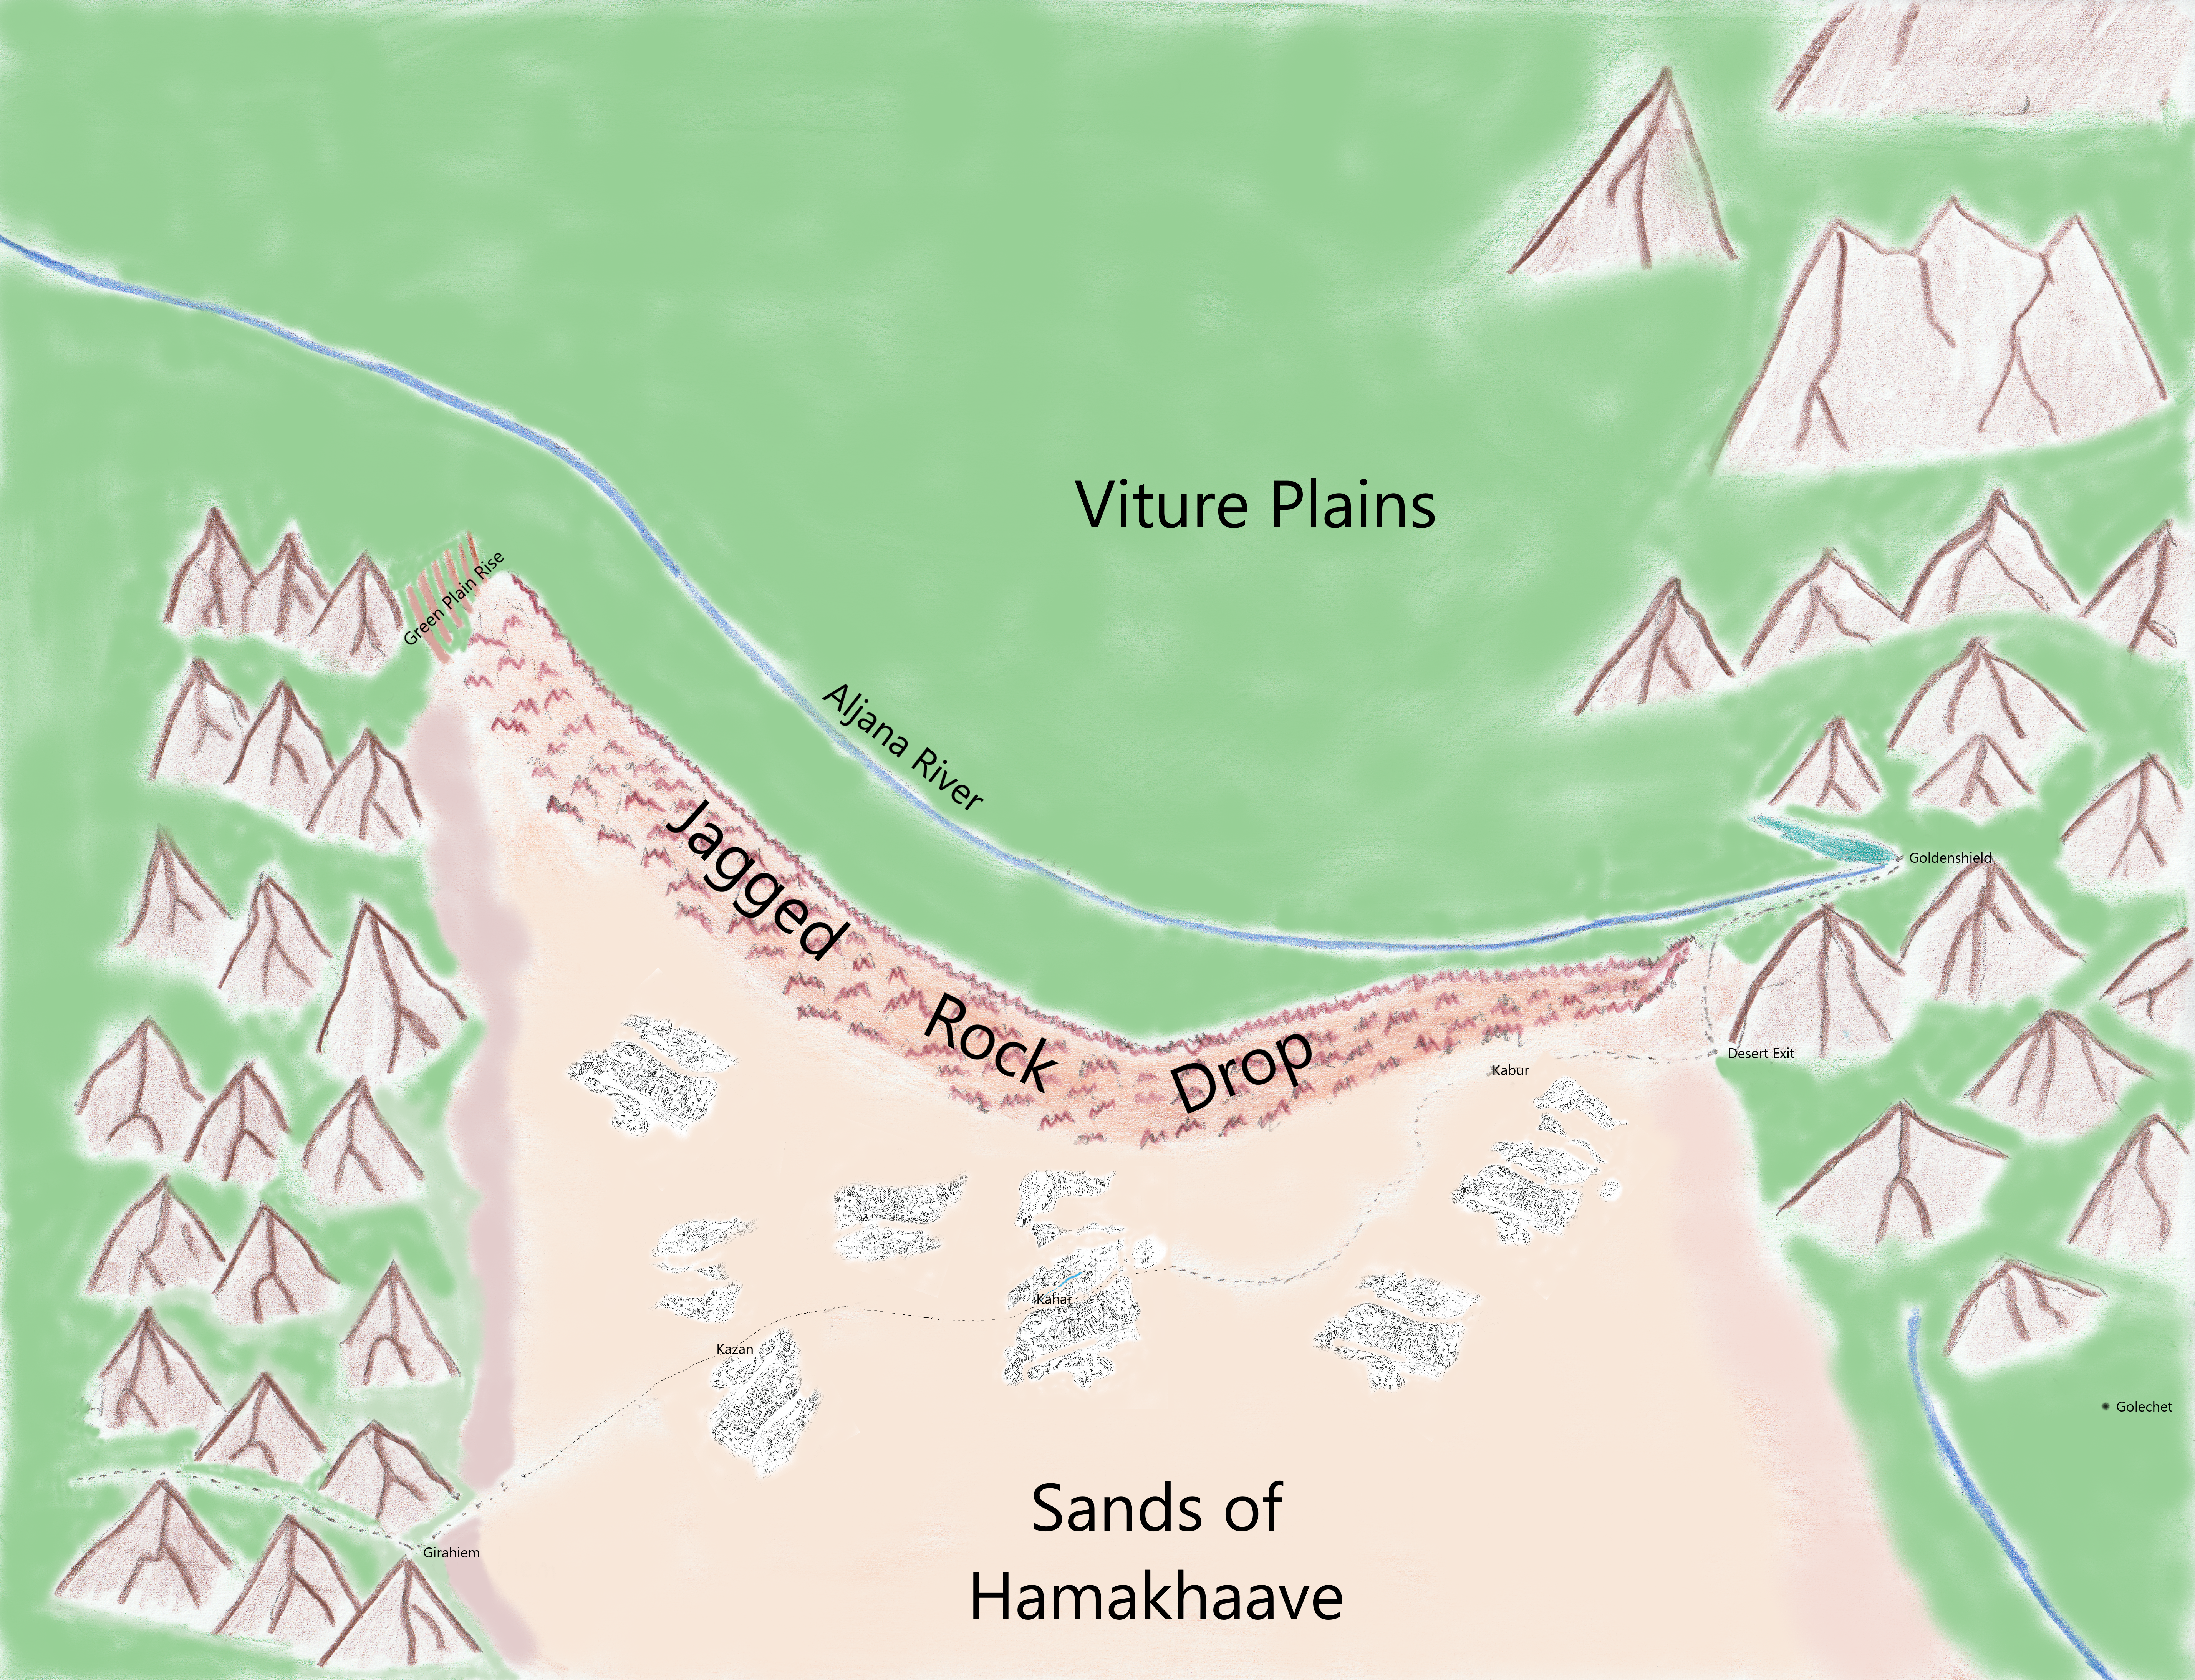
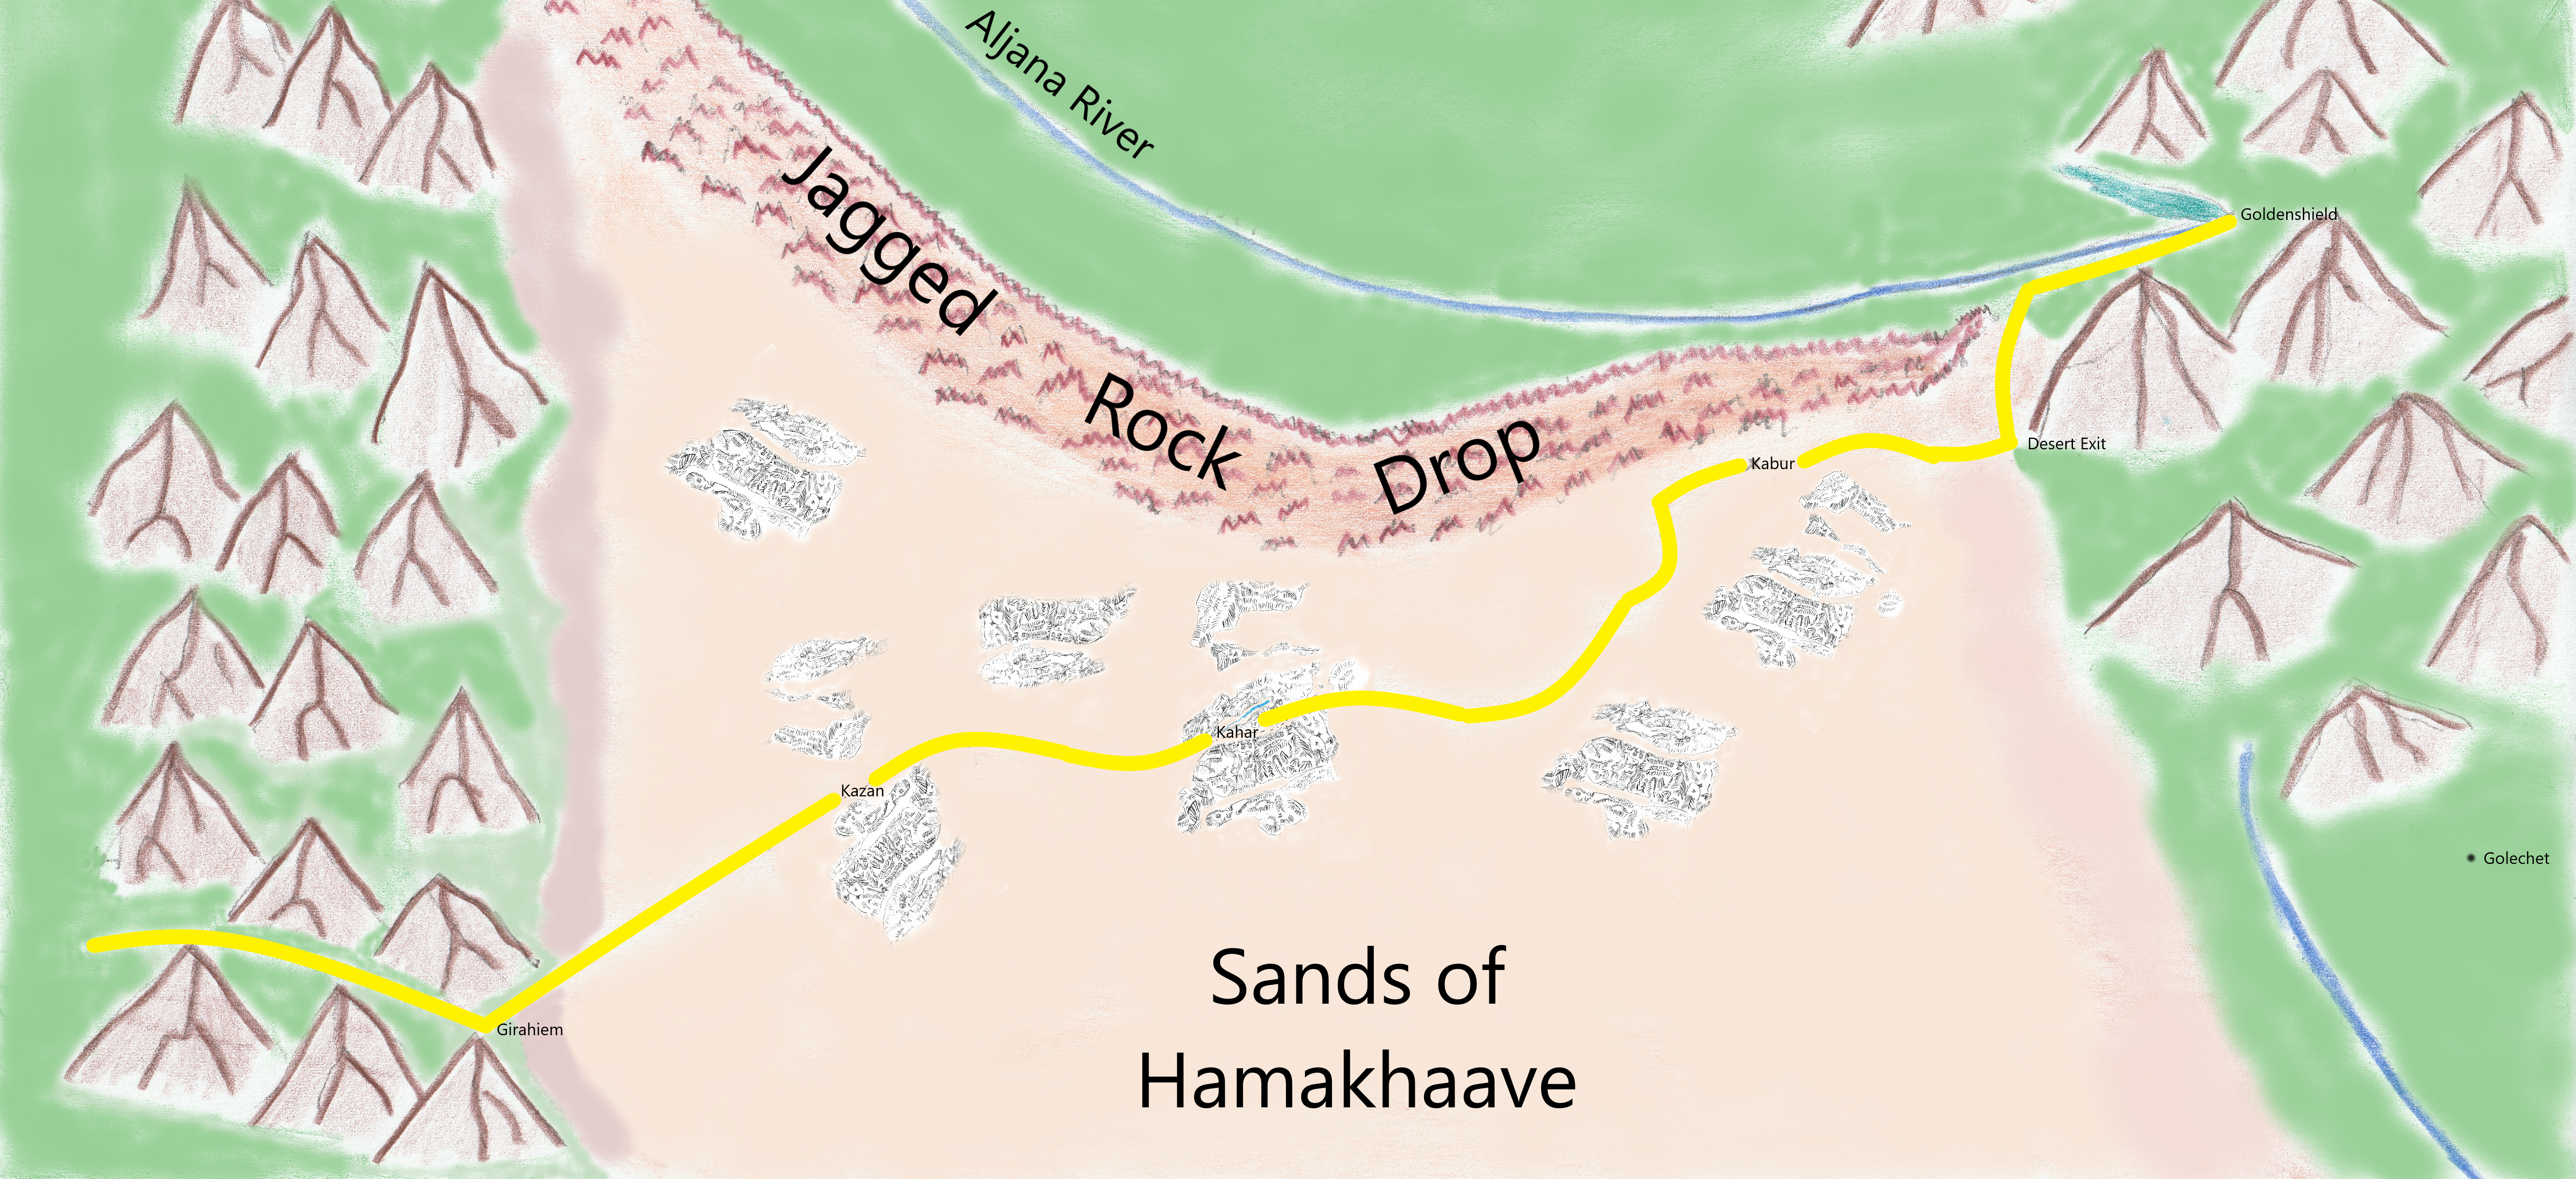
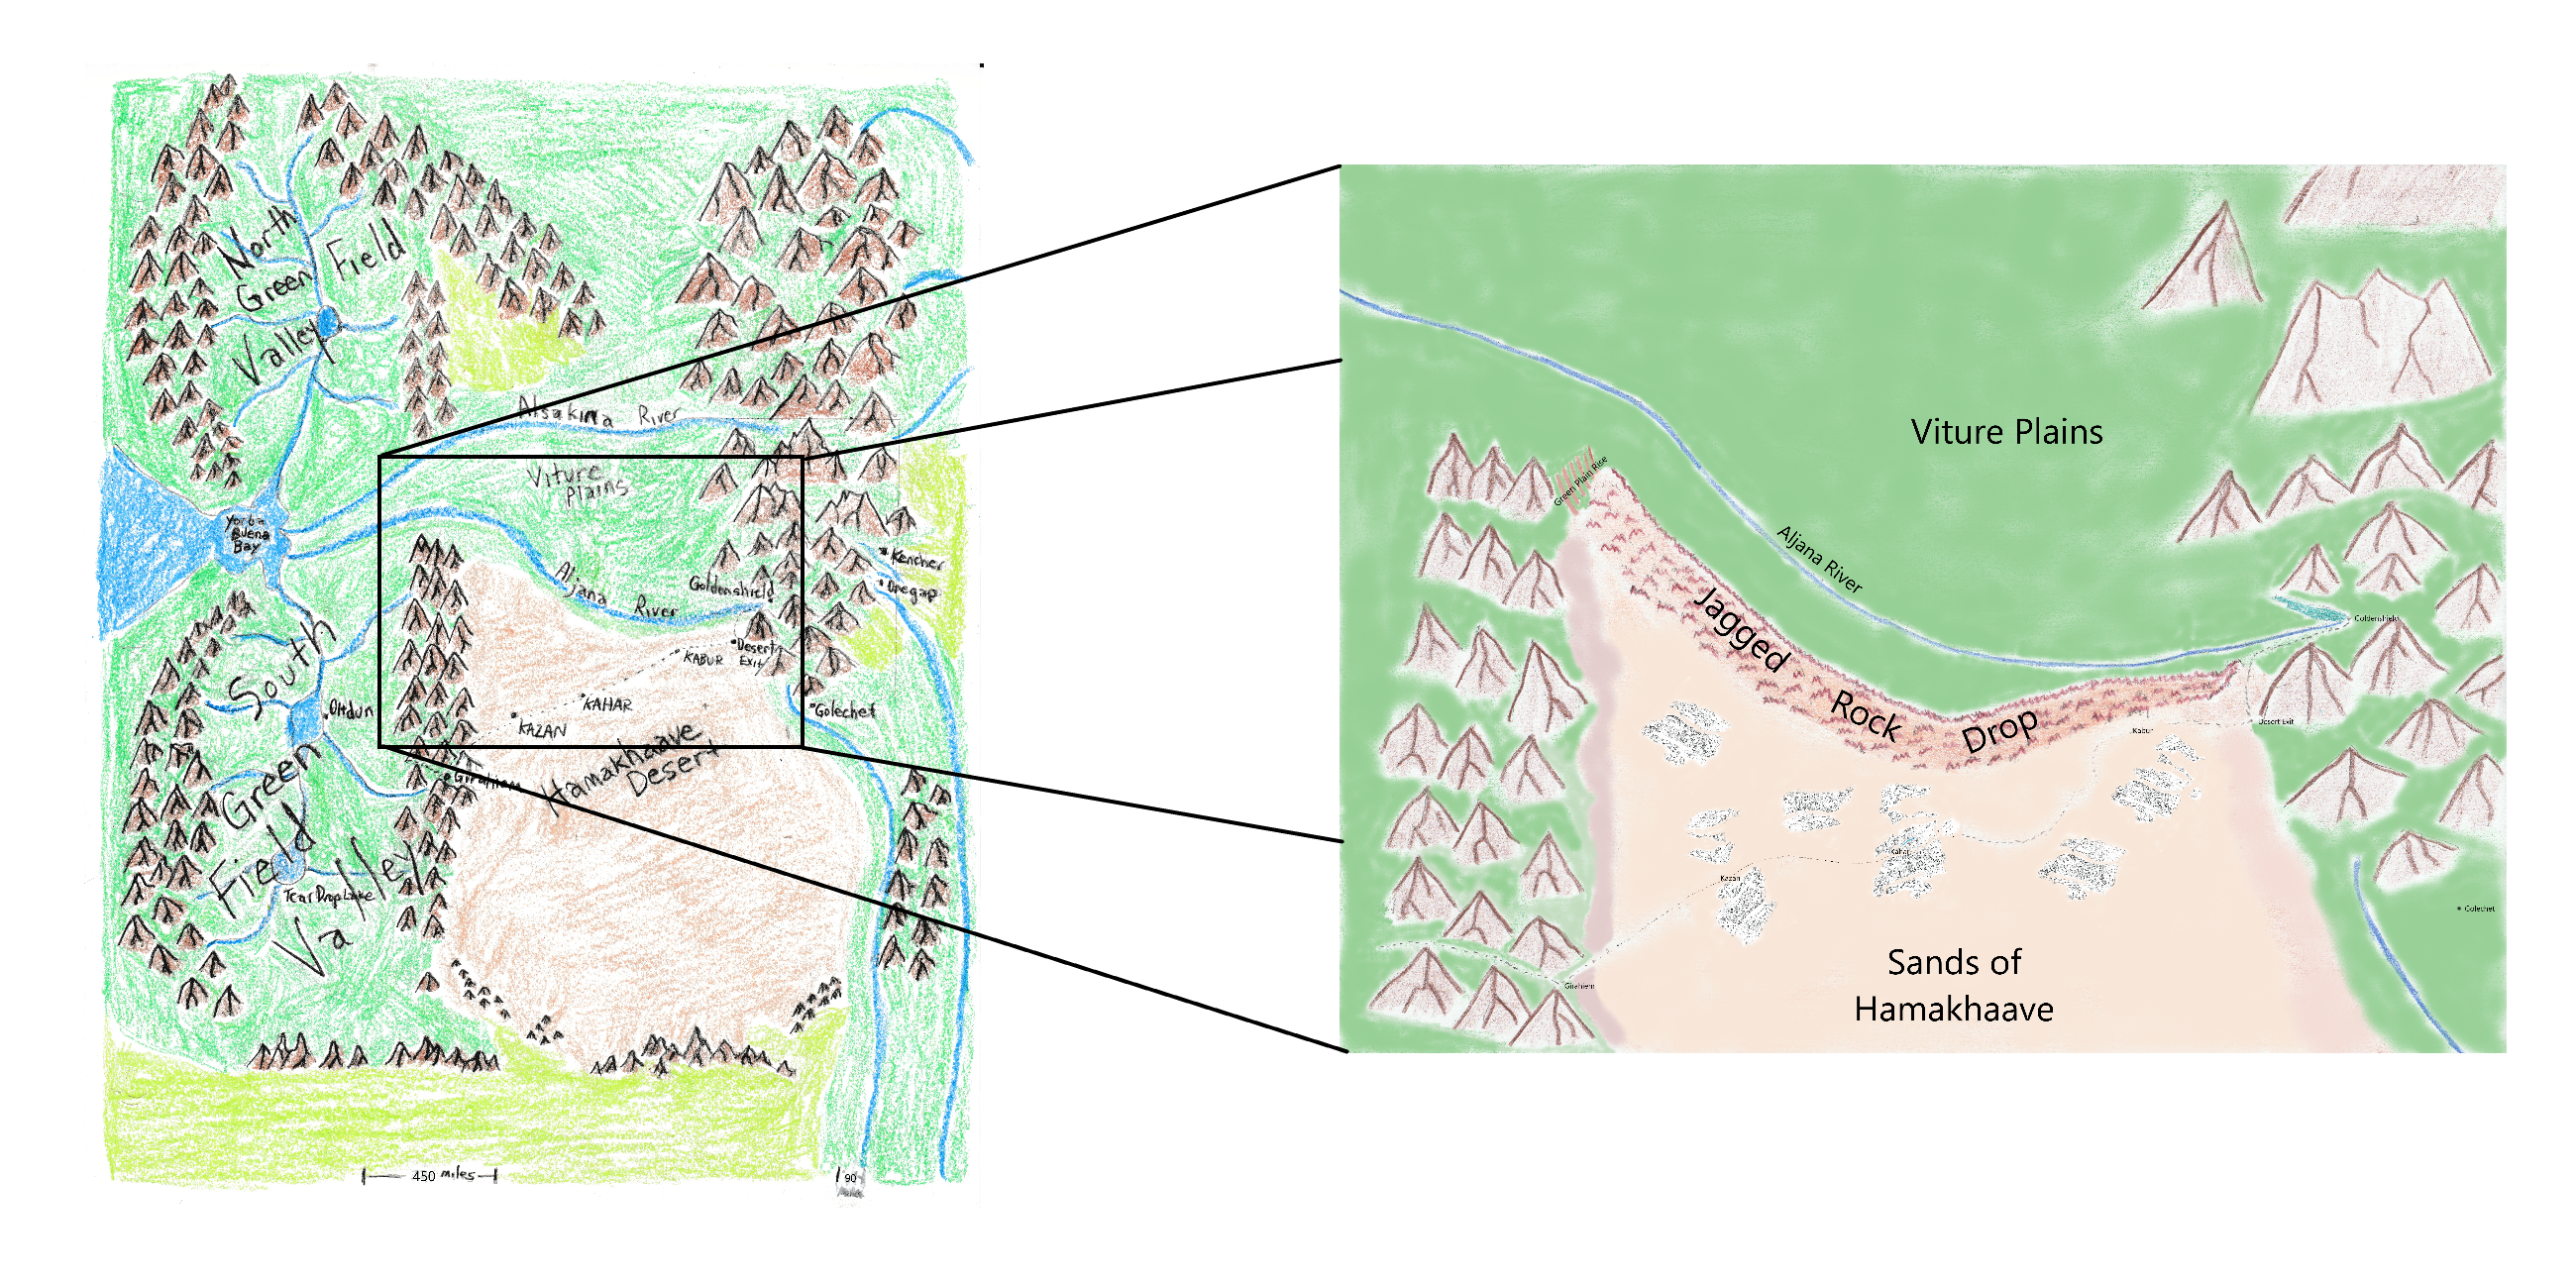
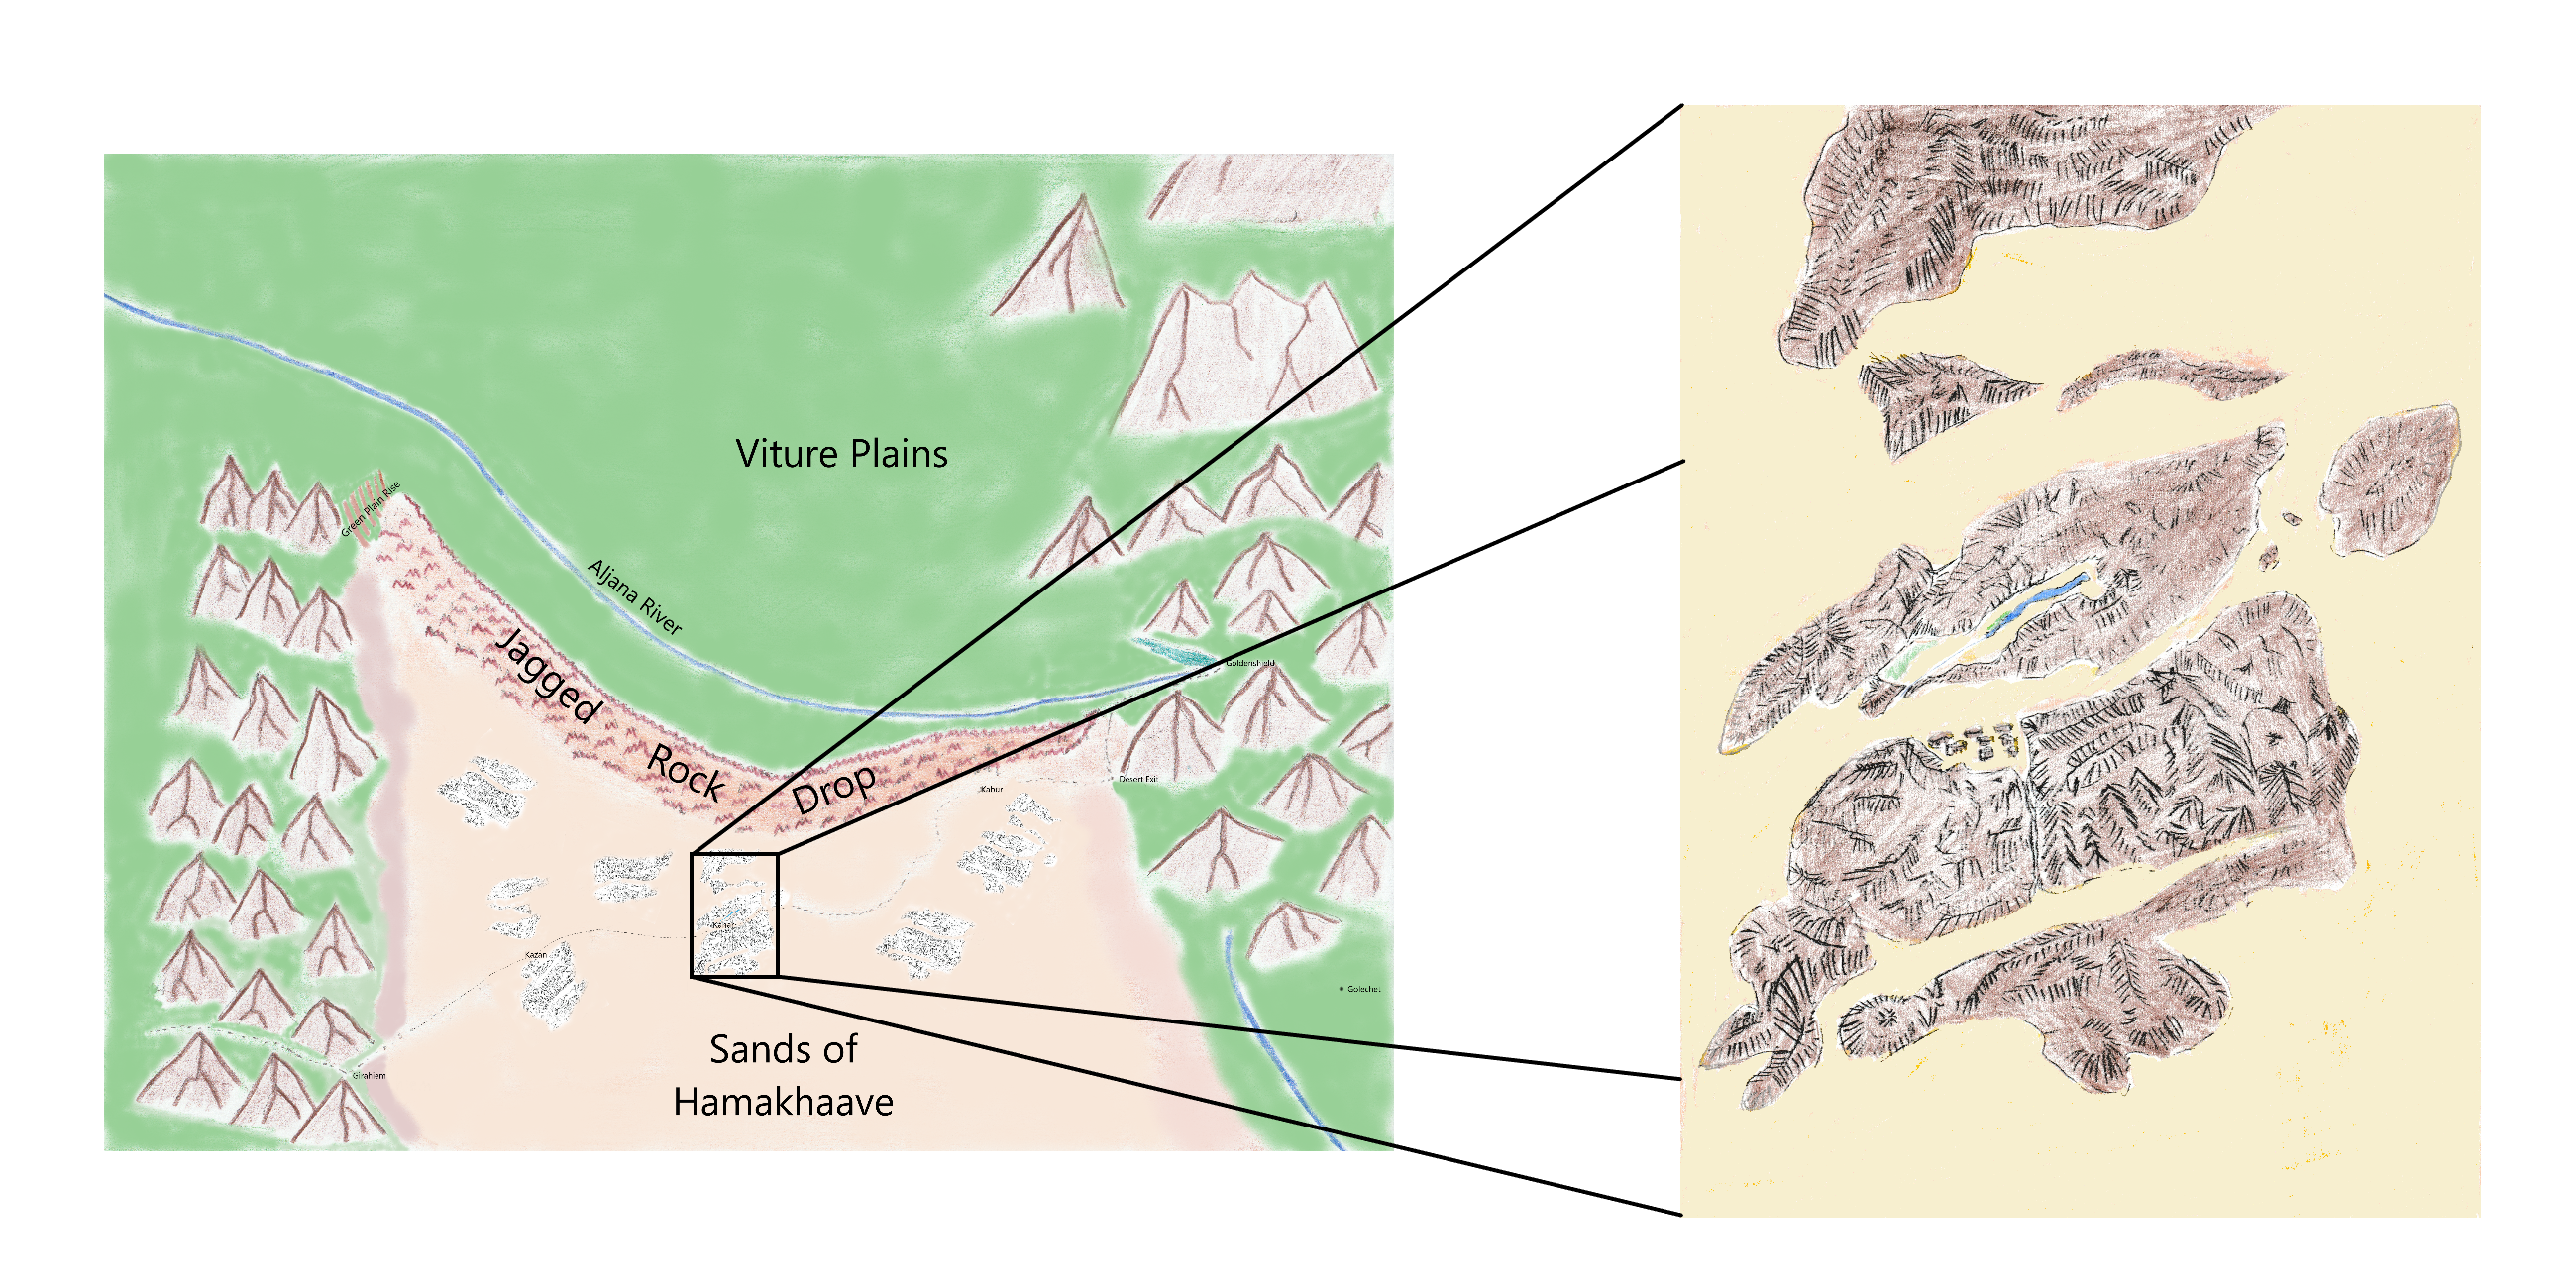
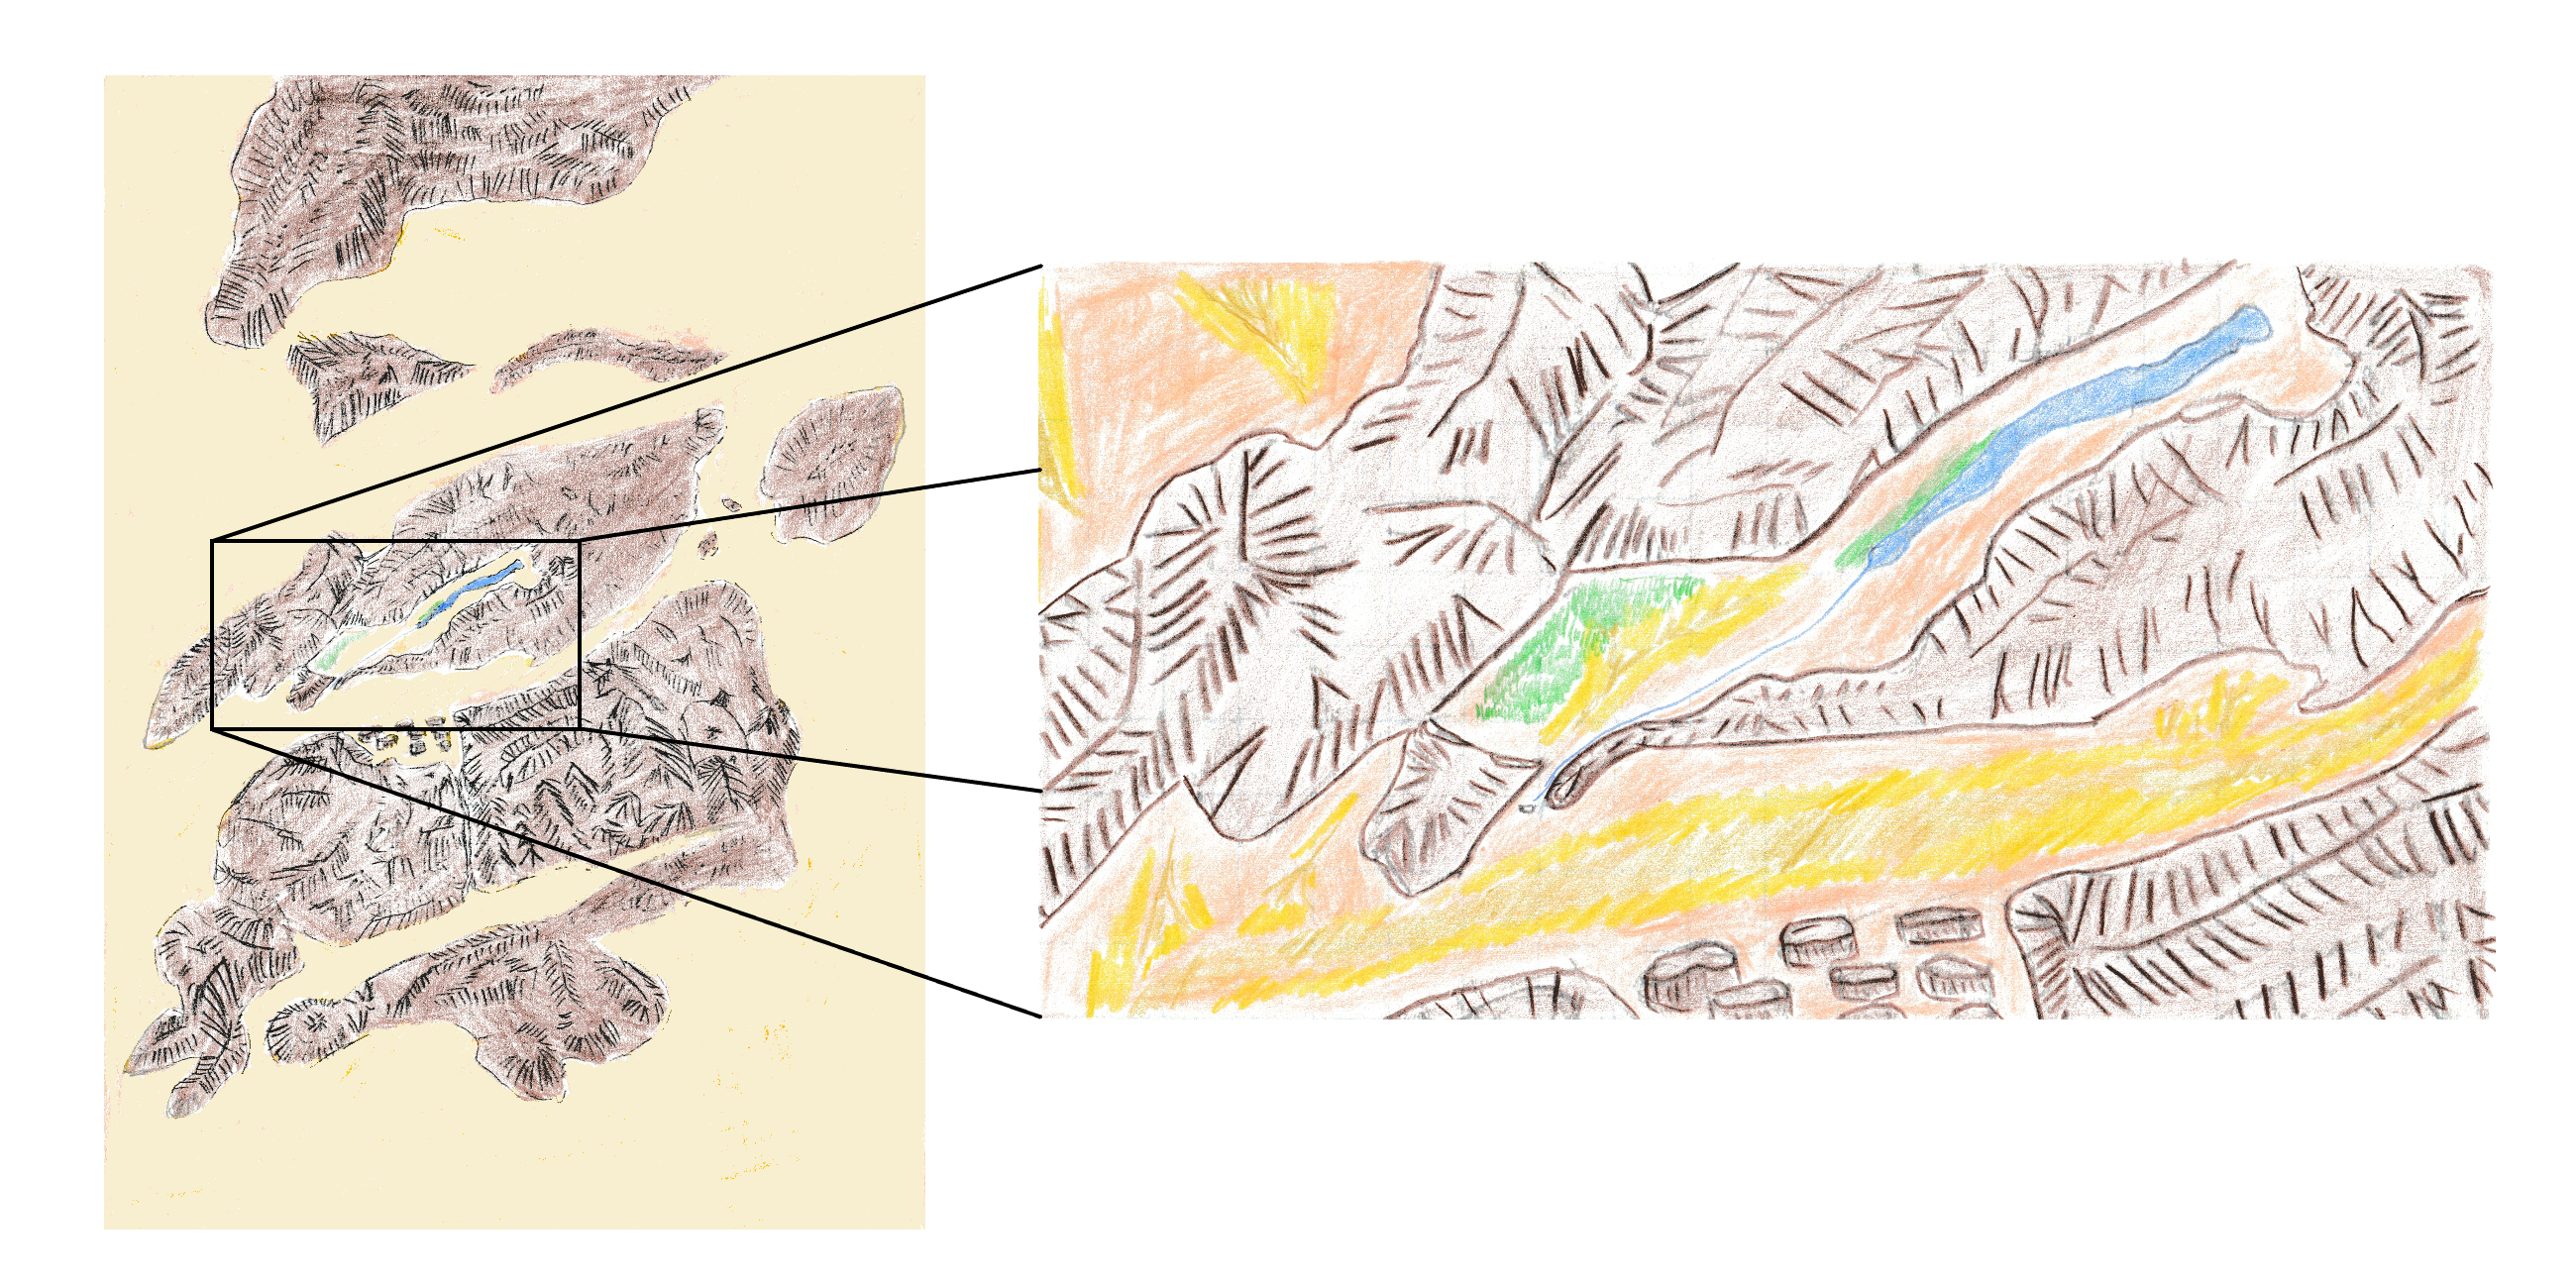
The Setting
Hamakhaave is the desert that houses these events. Bordered by the badlands named Jagged Rock Drop to the north, Goldenshield Kingdom to
the east, and South Green field Valley to the west, the Hamakhaave is a xeric desert in the rain shadow of the Sodondo Mountain
Range. In the youth of the Kingdom of Goldenshield, the Marquis of that land took it upon himself to build The King's Road
that would cross northern Hamakhaave and be guarded by three desert fortresses named Kabar, Kahar, and Kazan. Many generations
later those fortresses become self sustaining and the King's Road is one of the Wonders of the World. It is at Kahar
that these events take place.
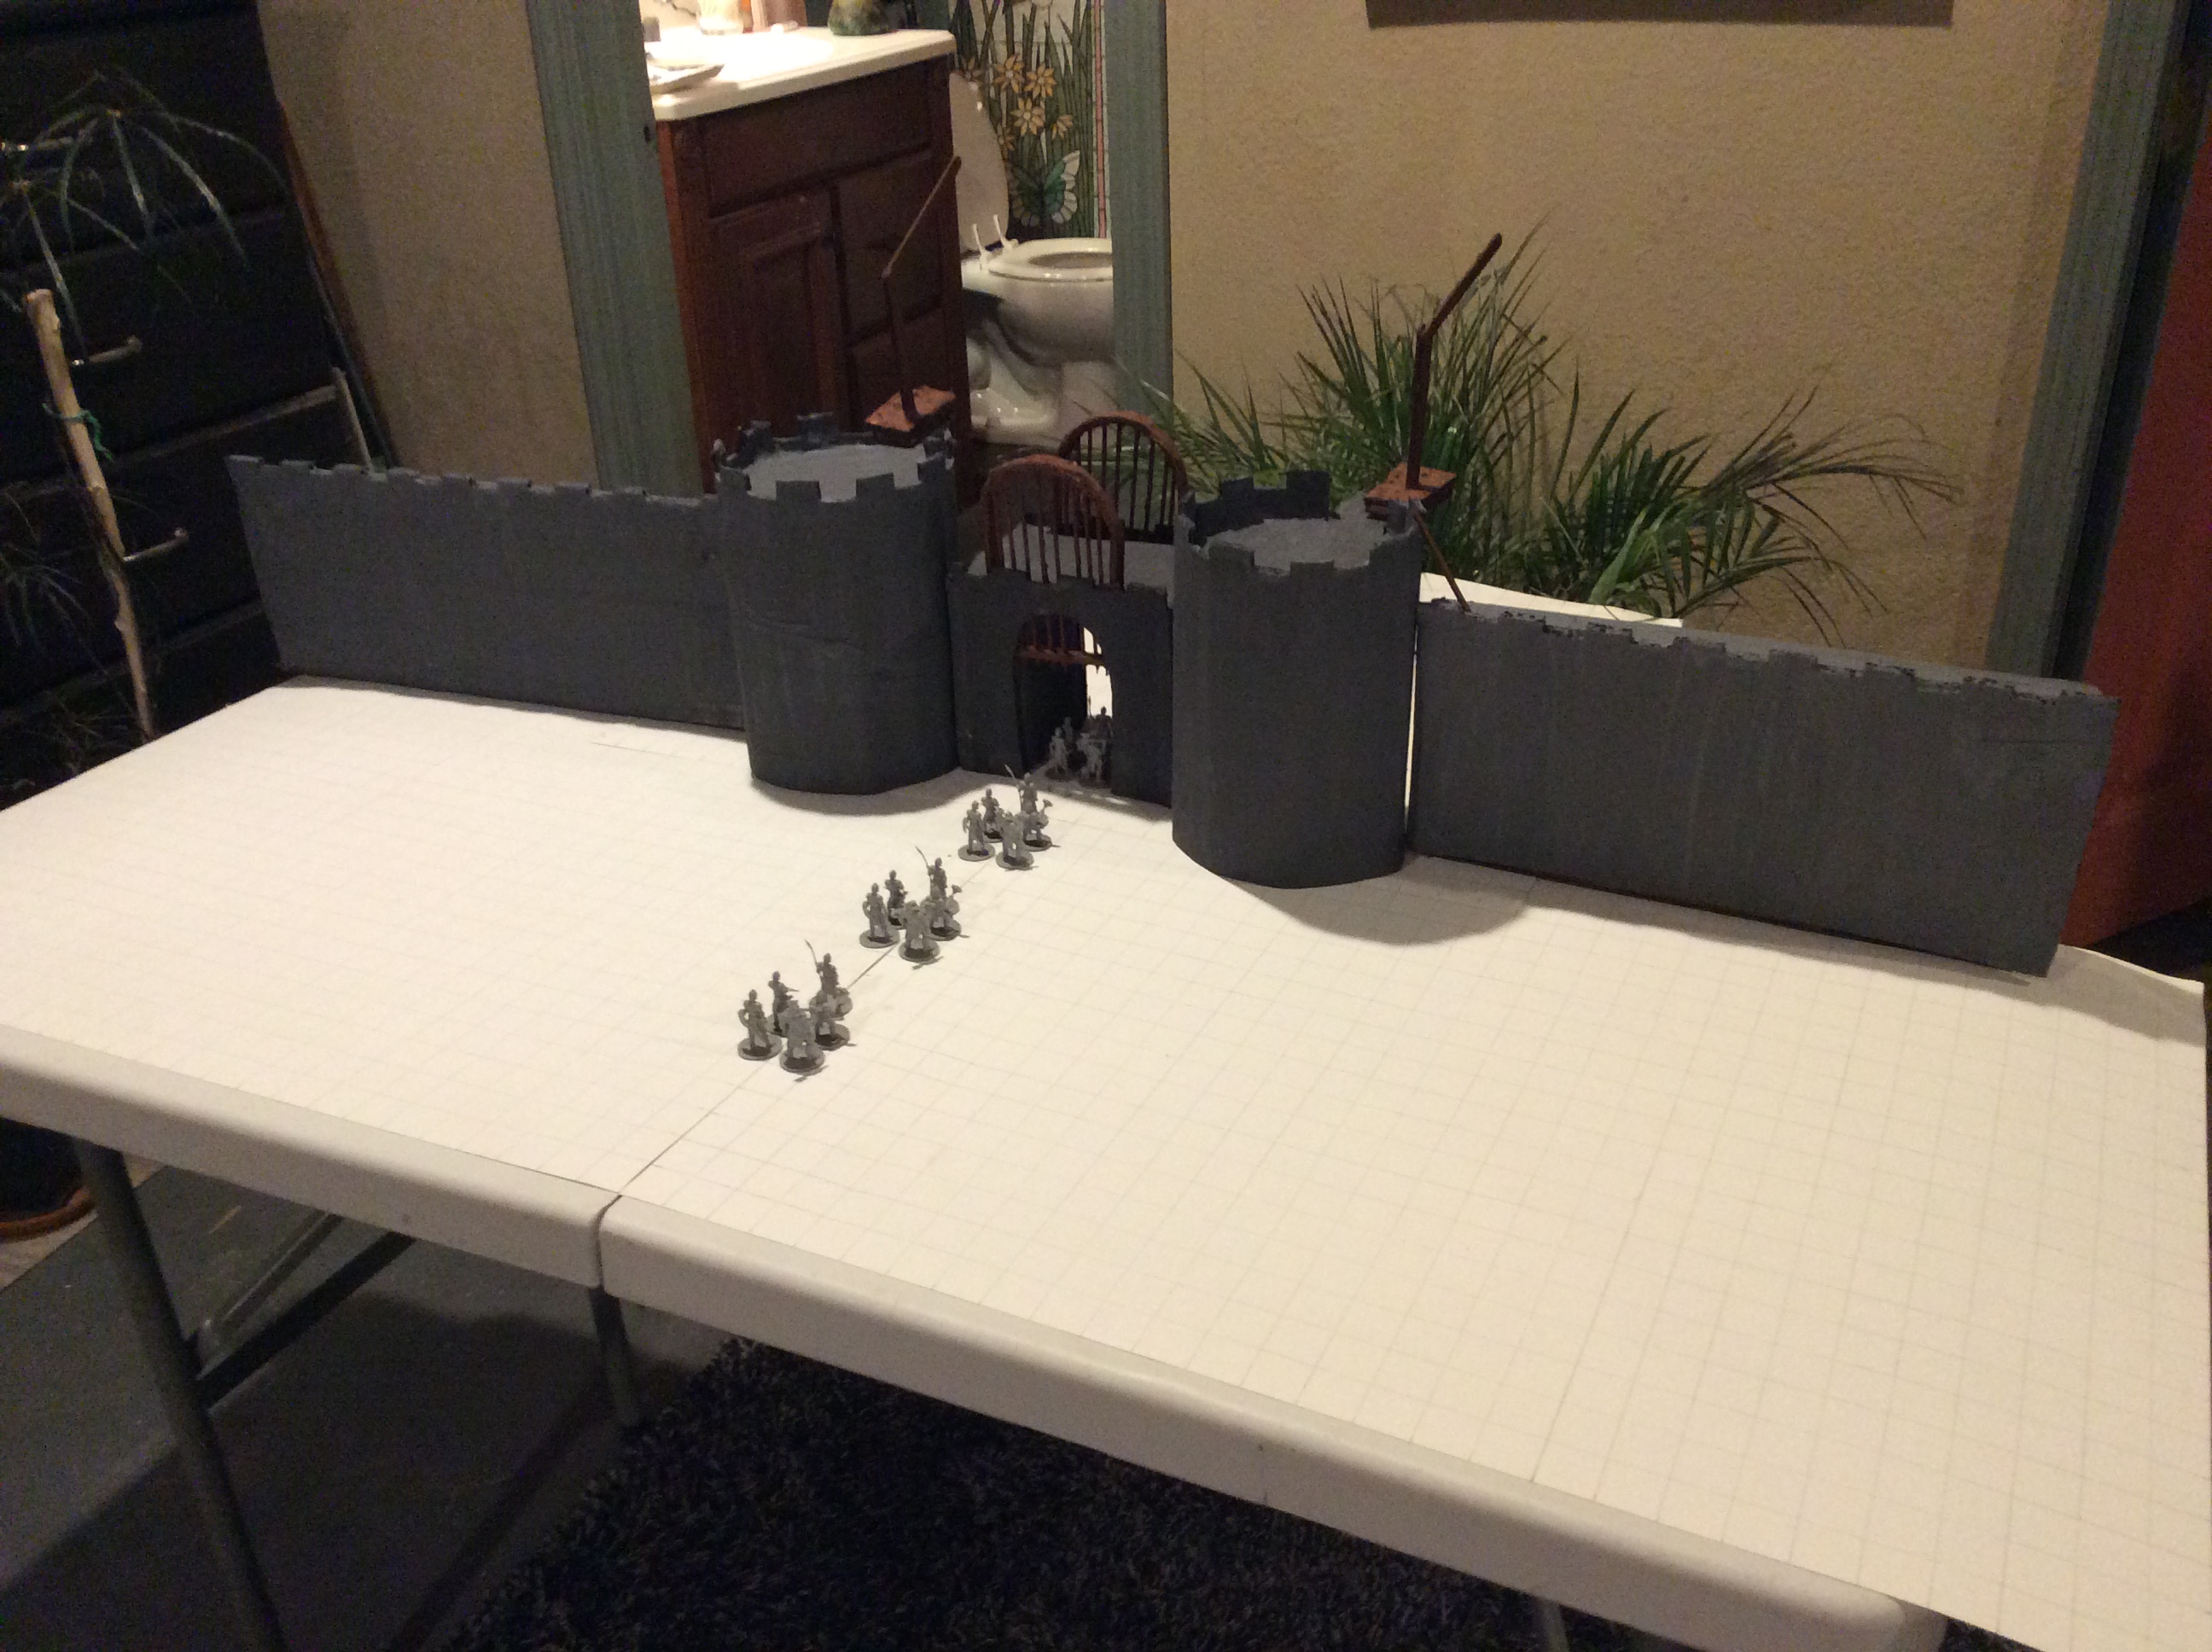
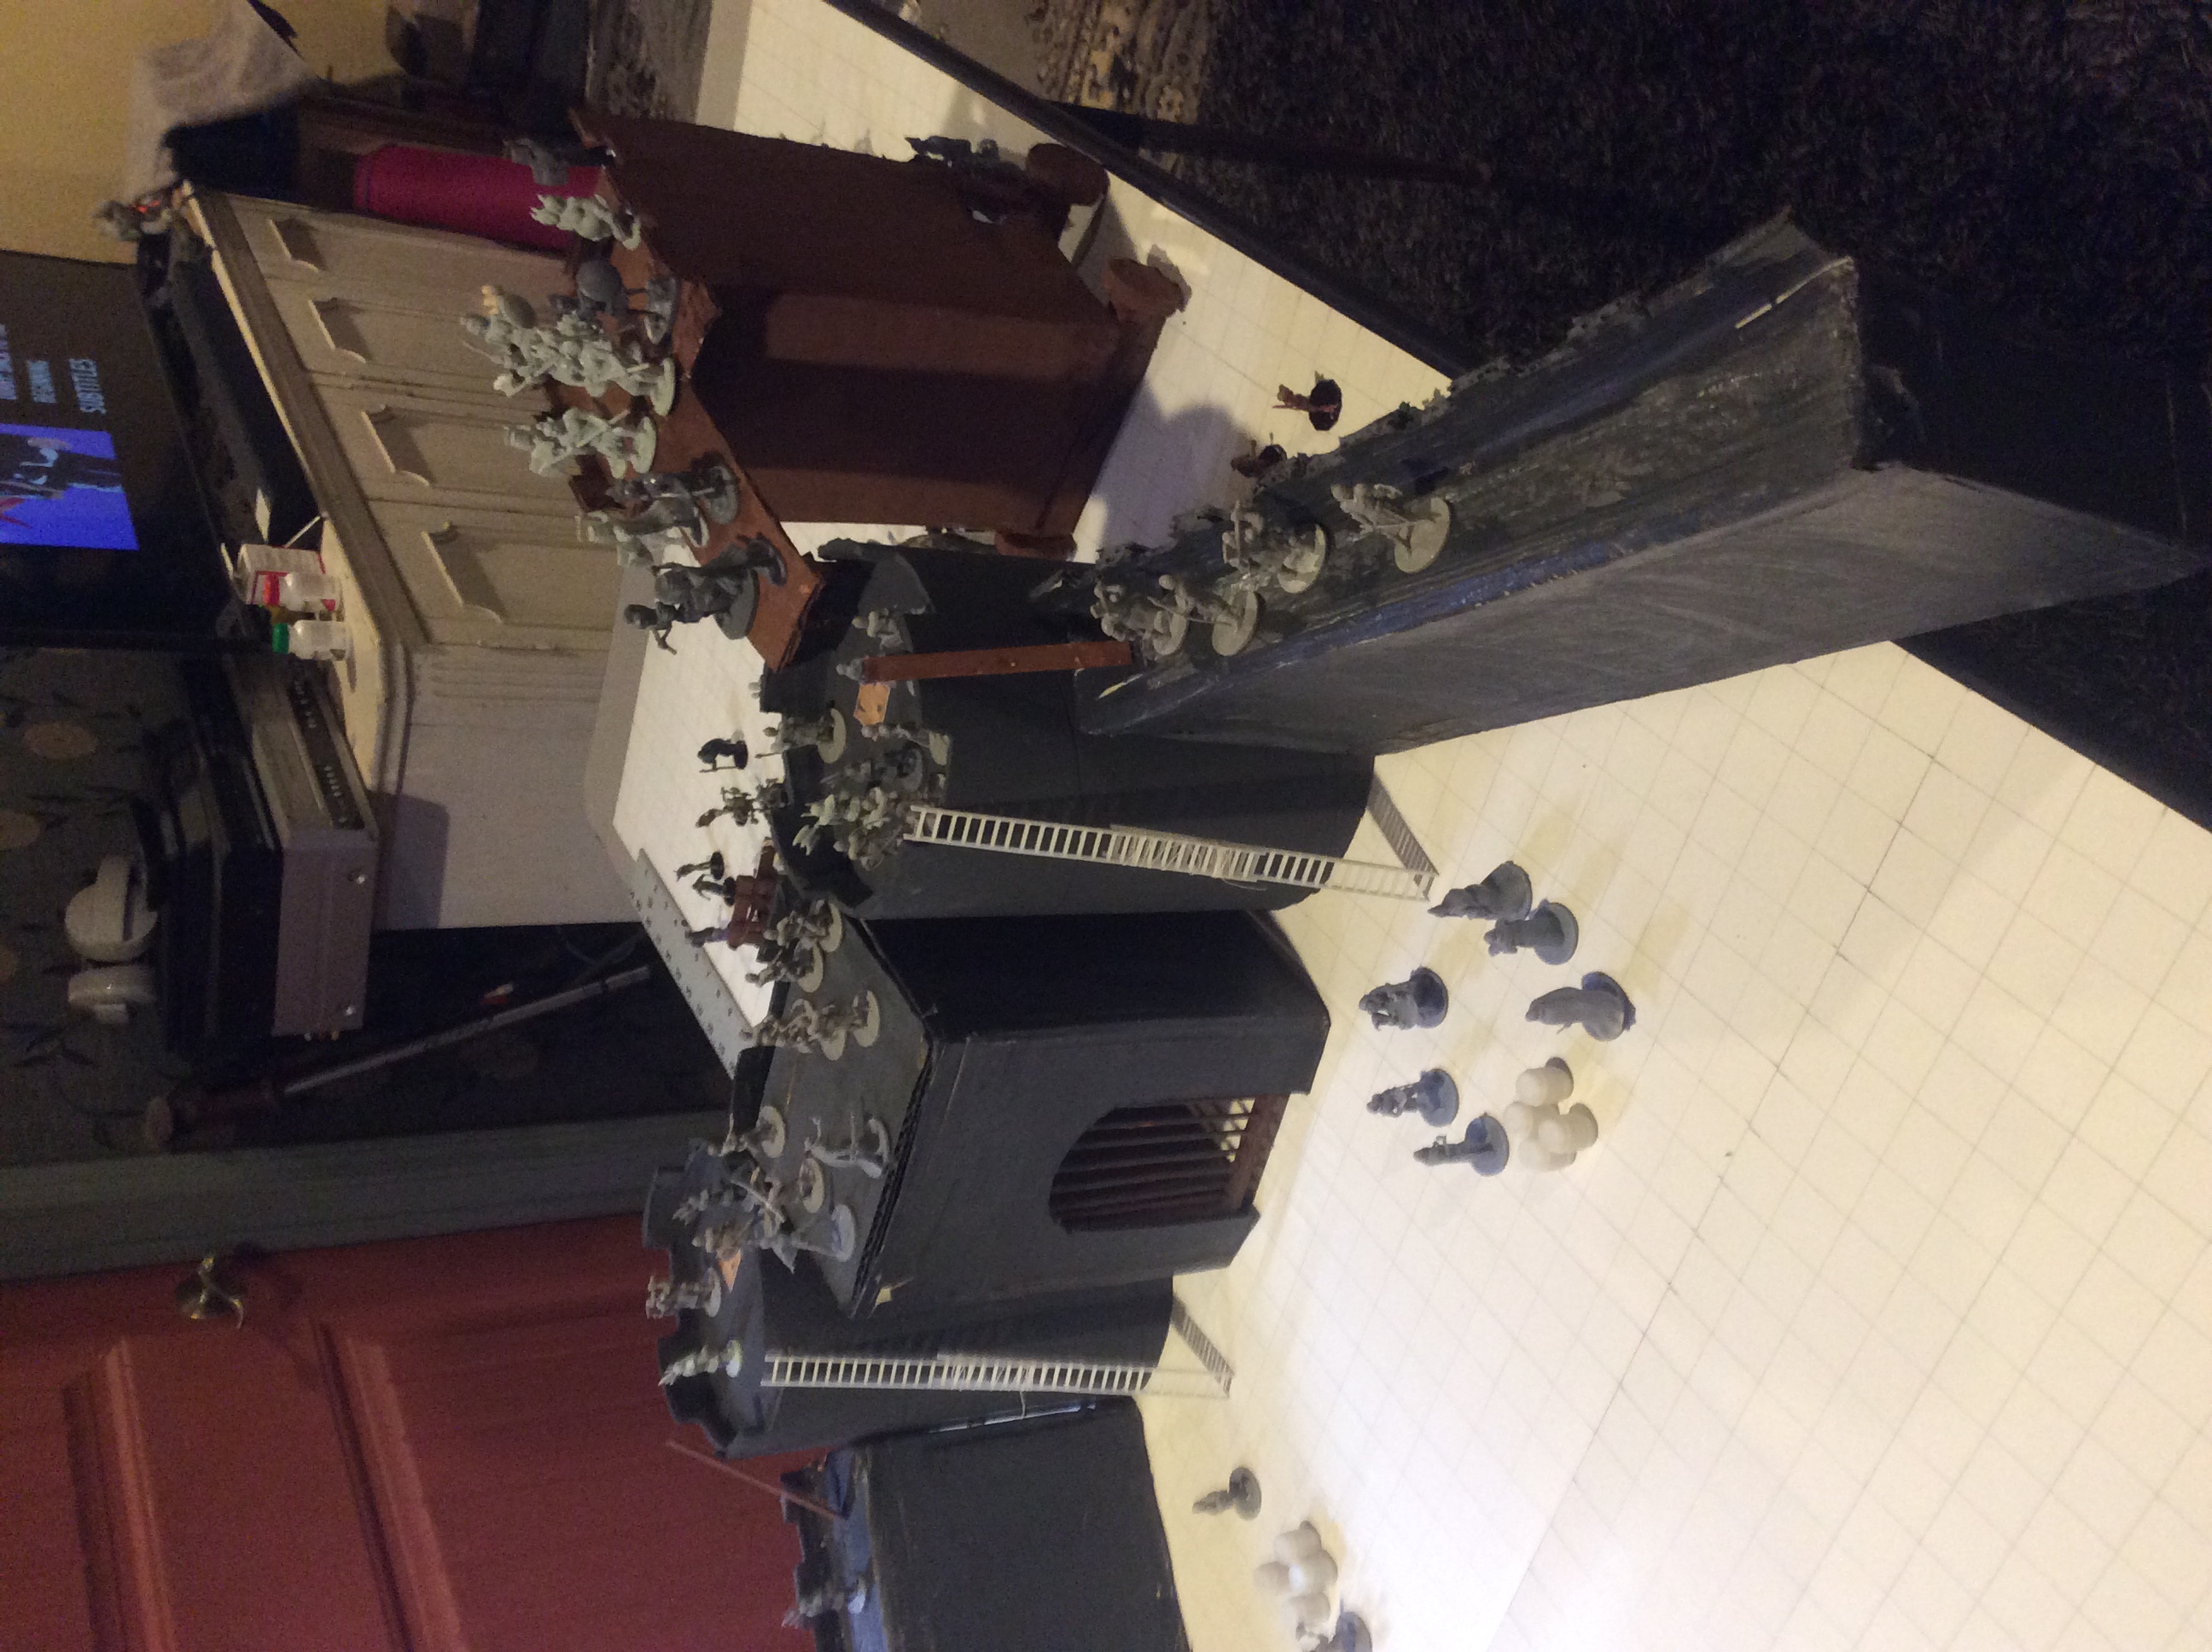
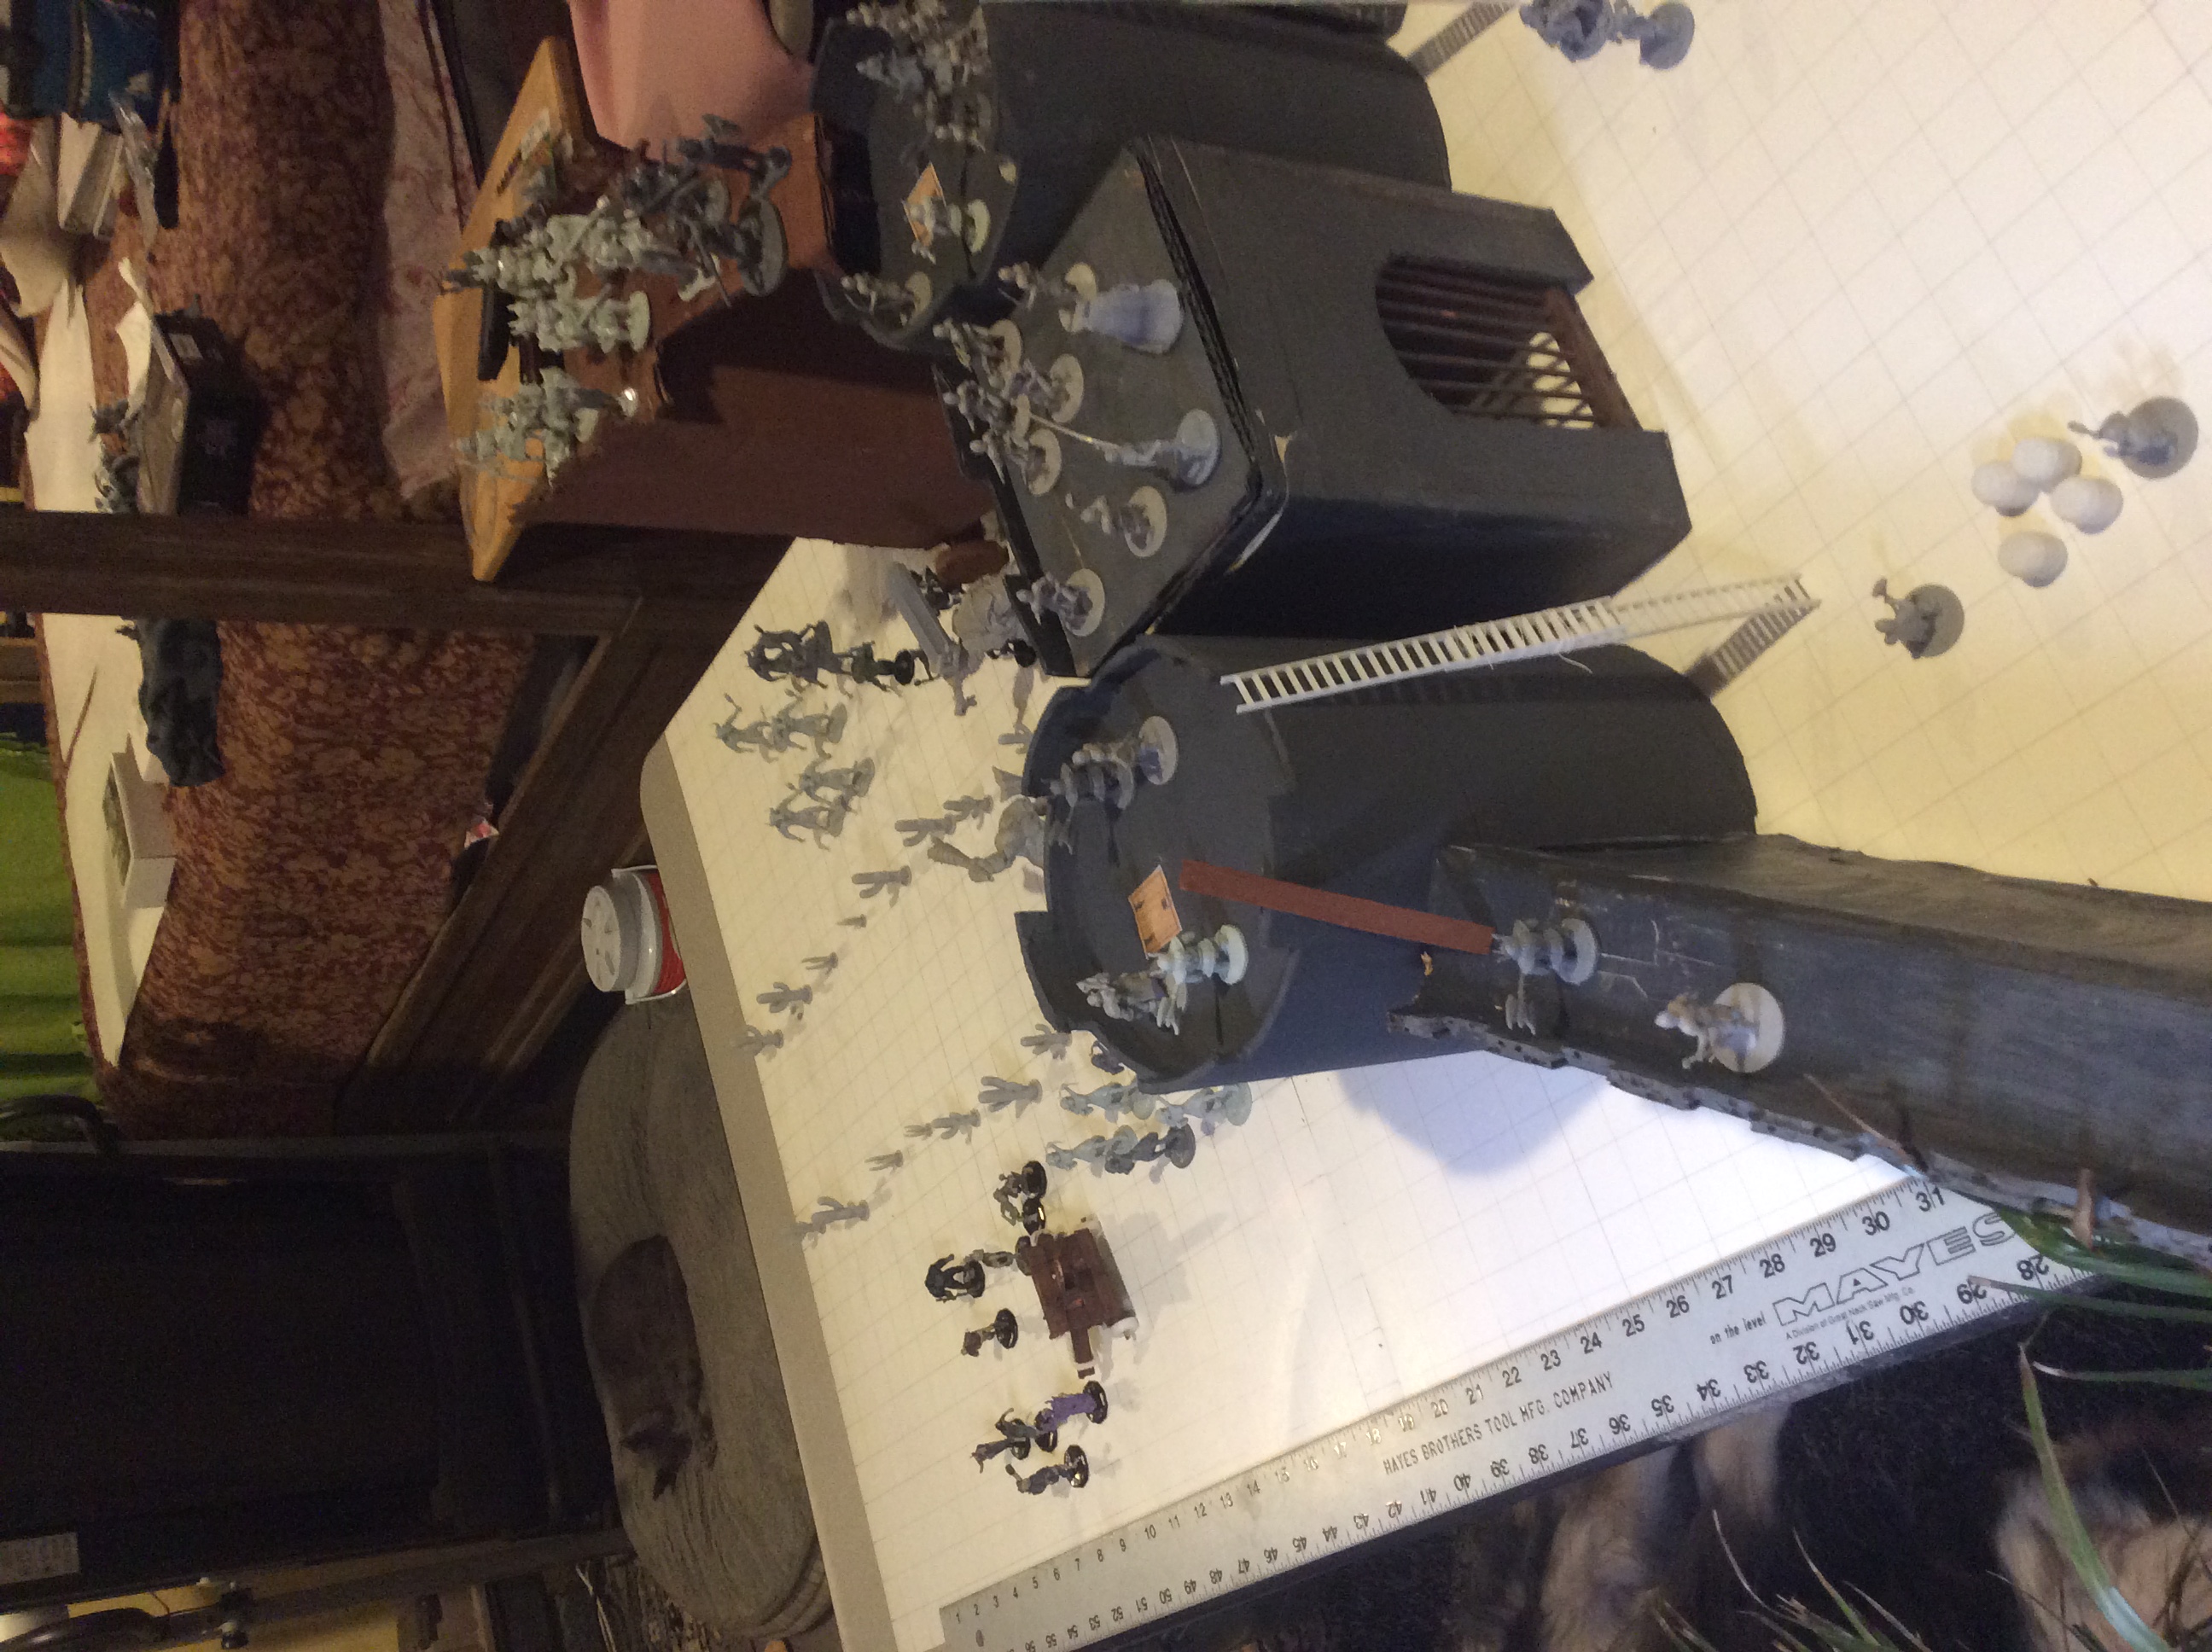
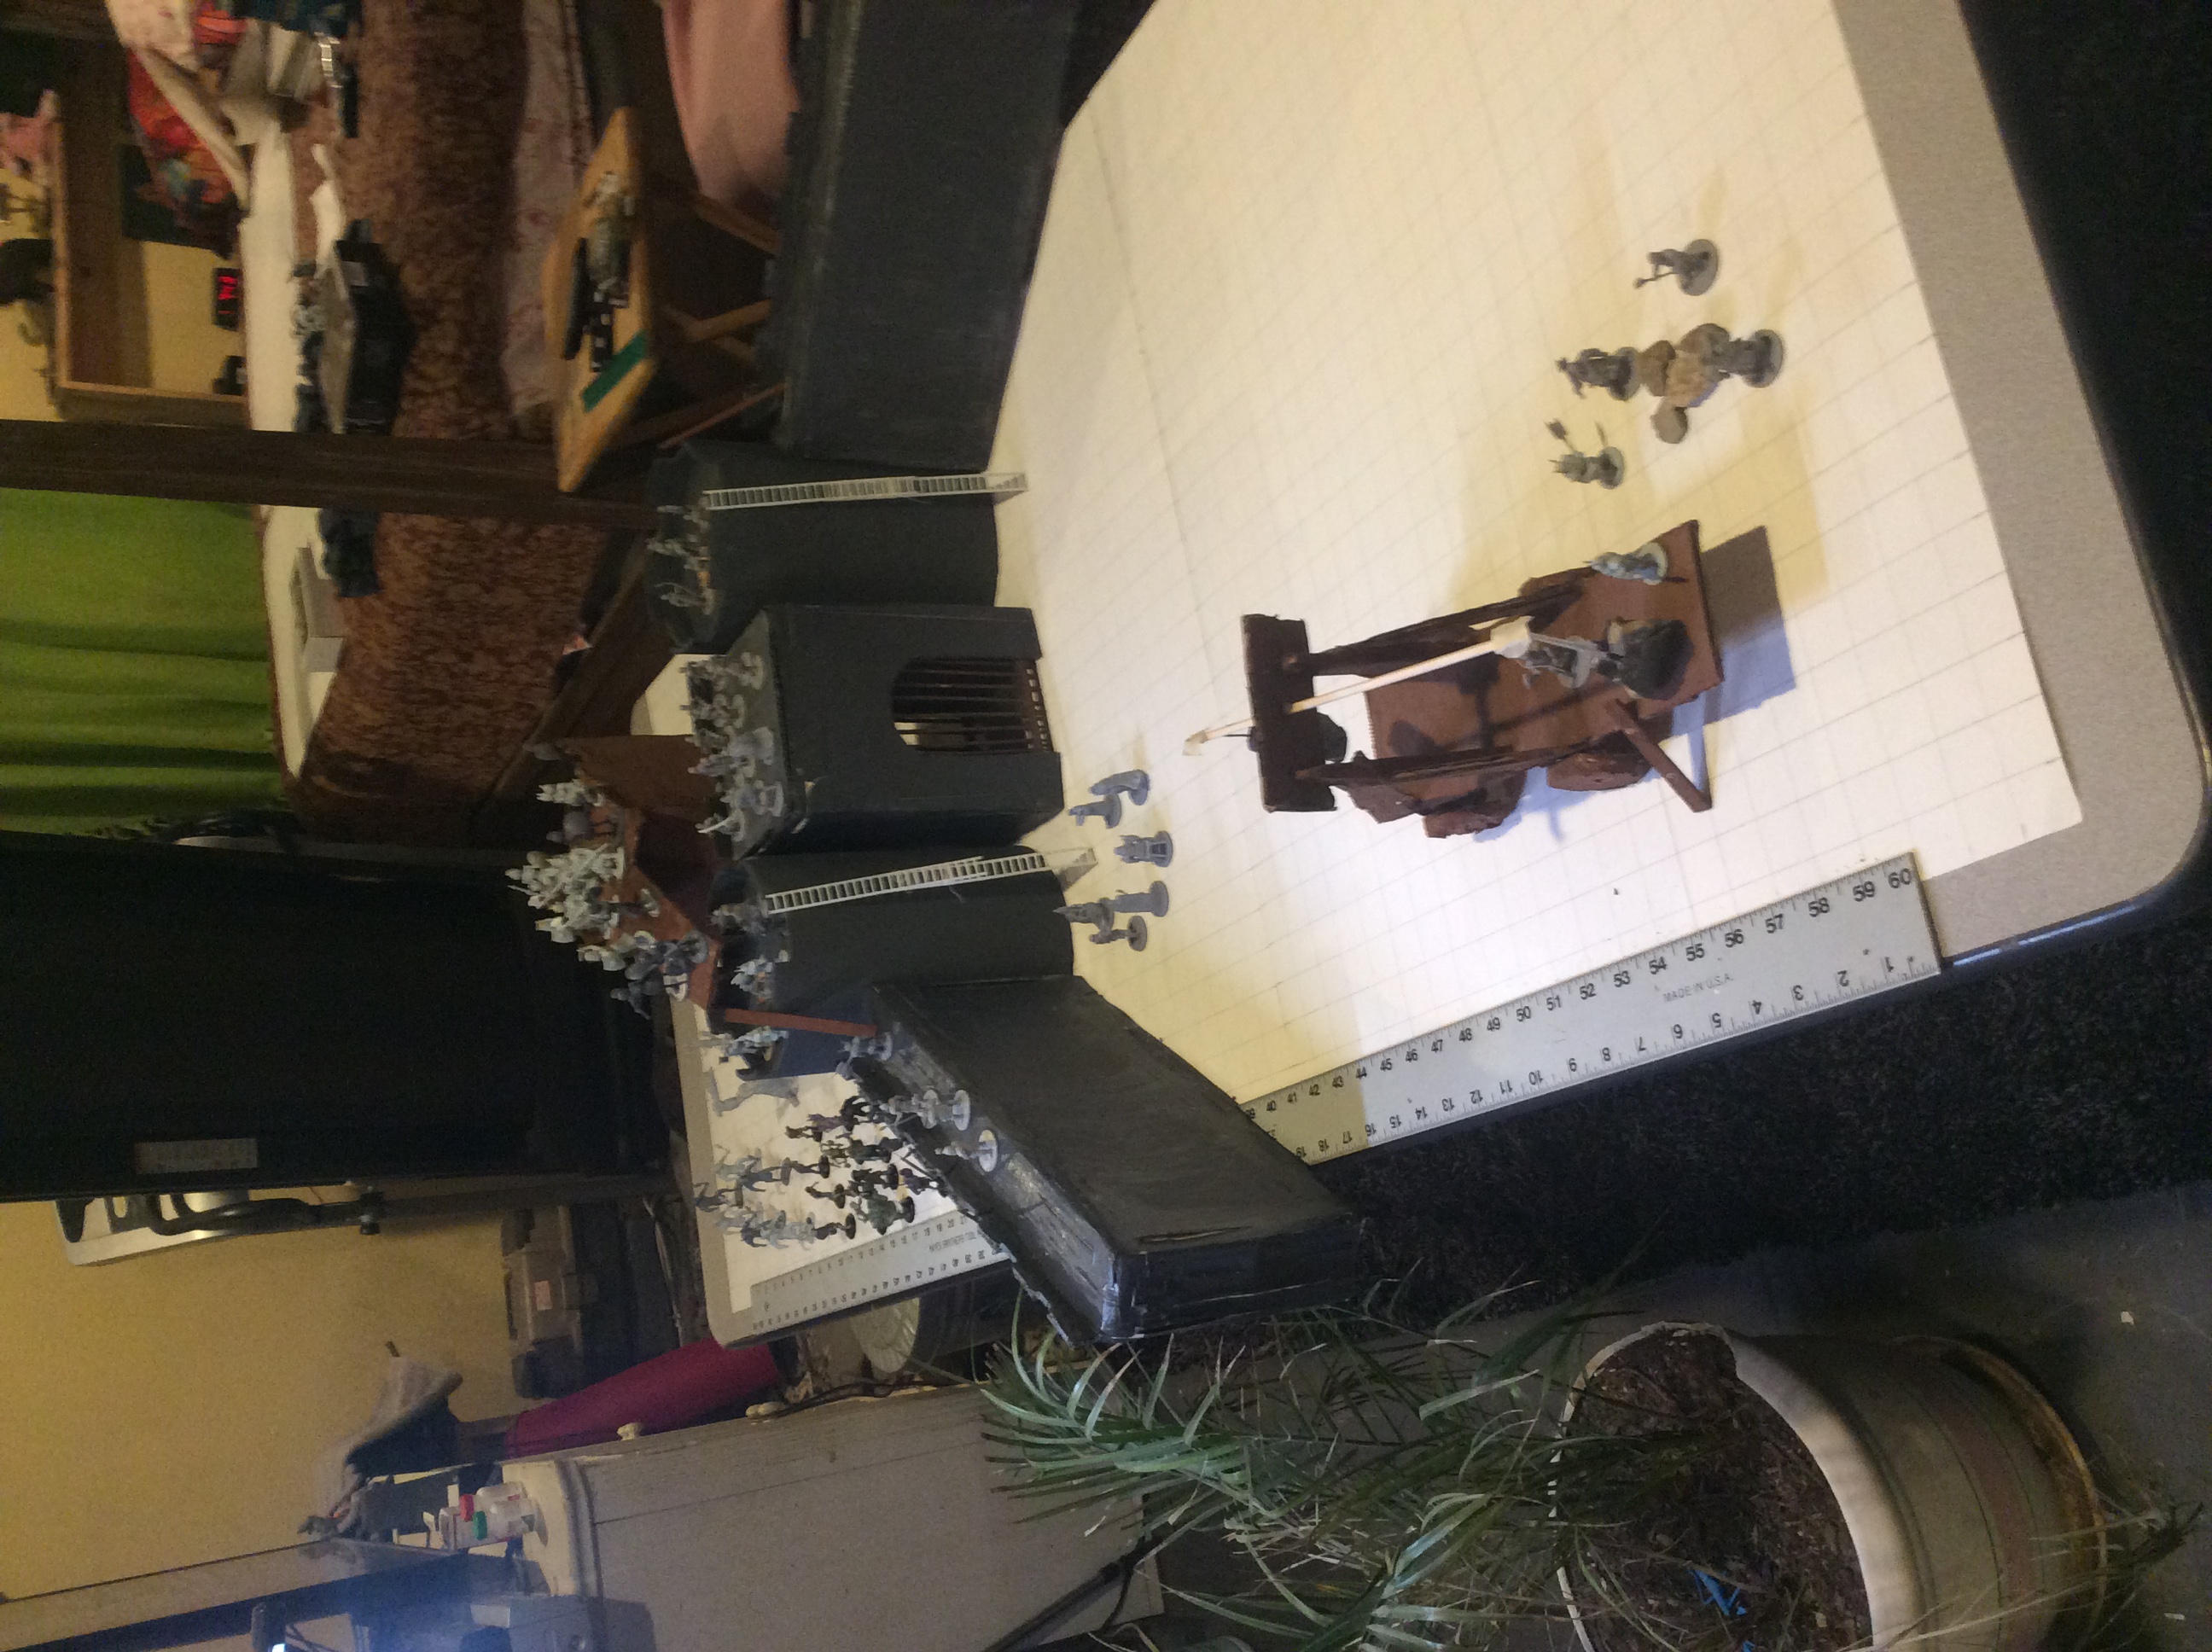
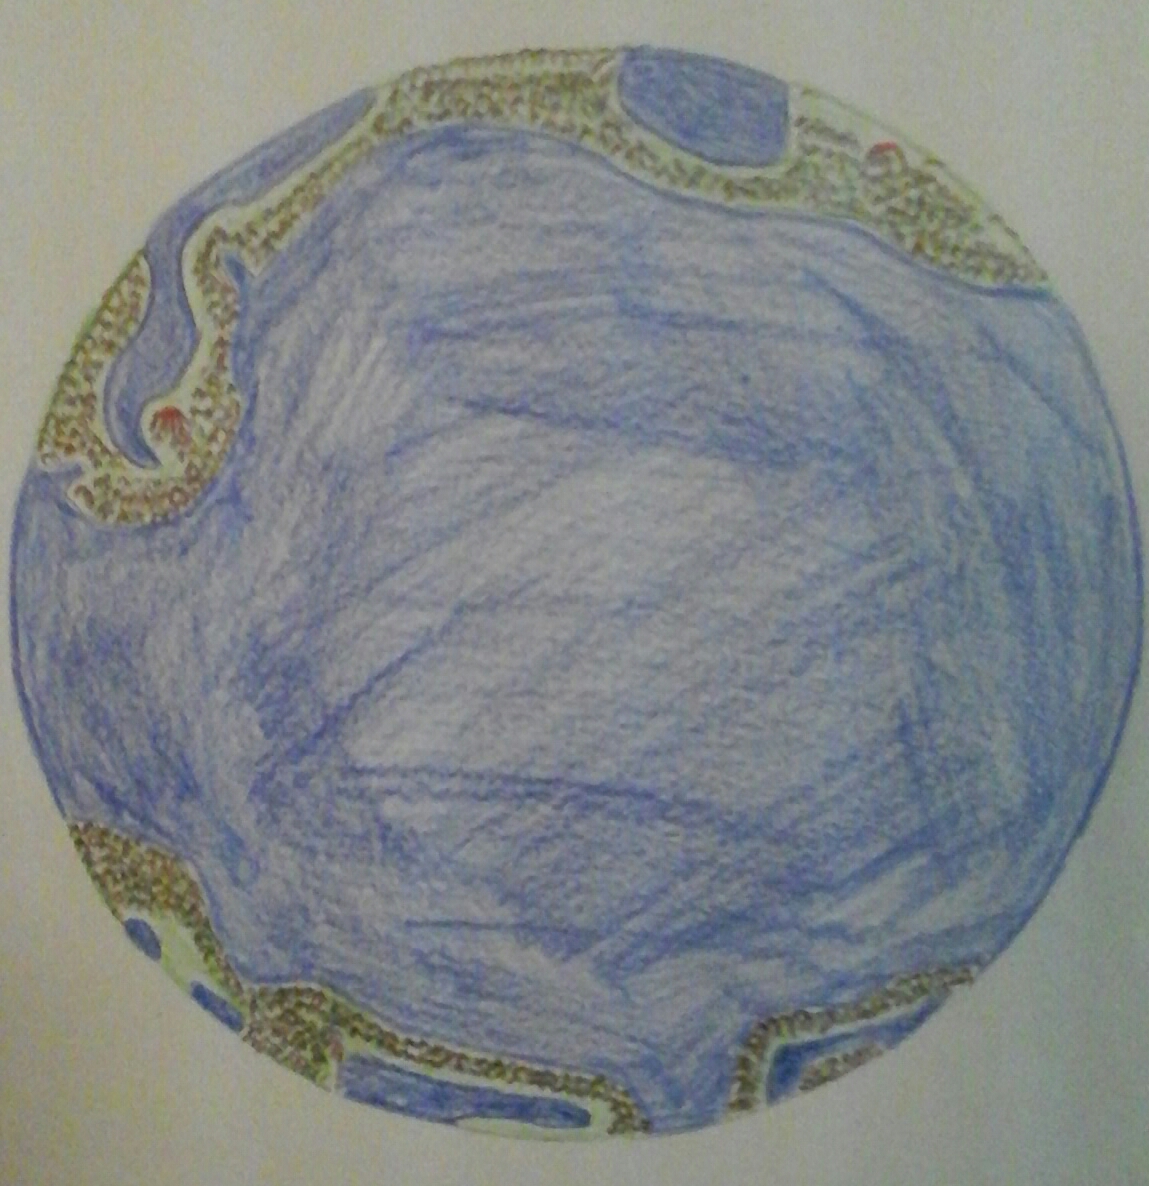
The Map
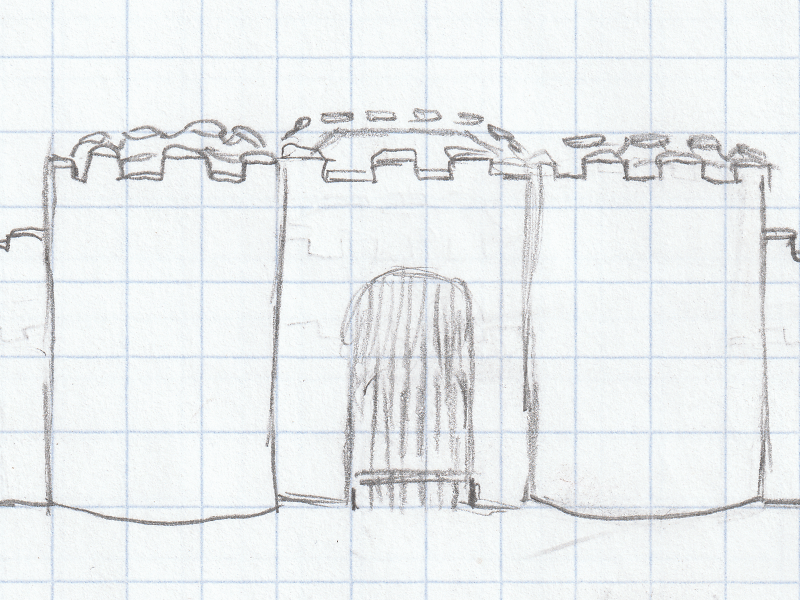
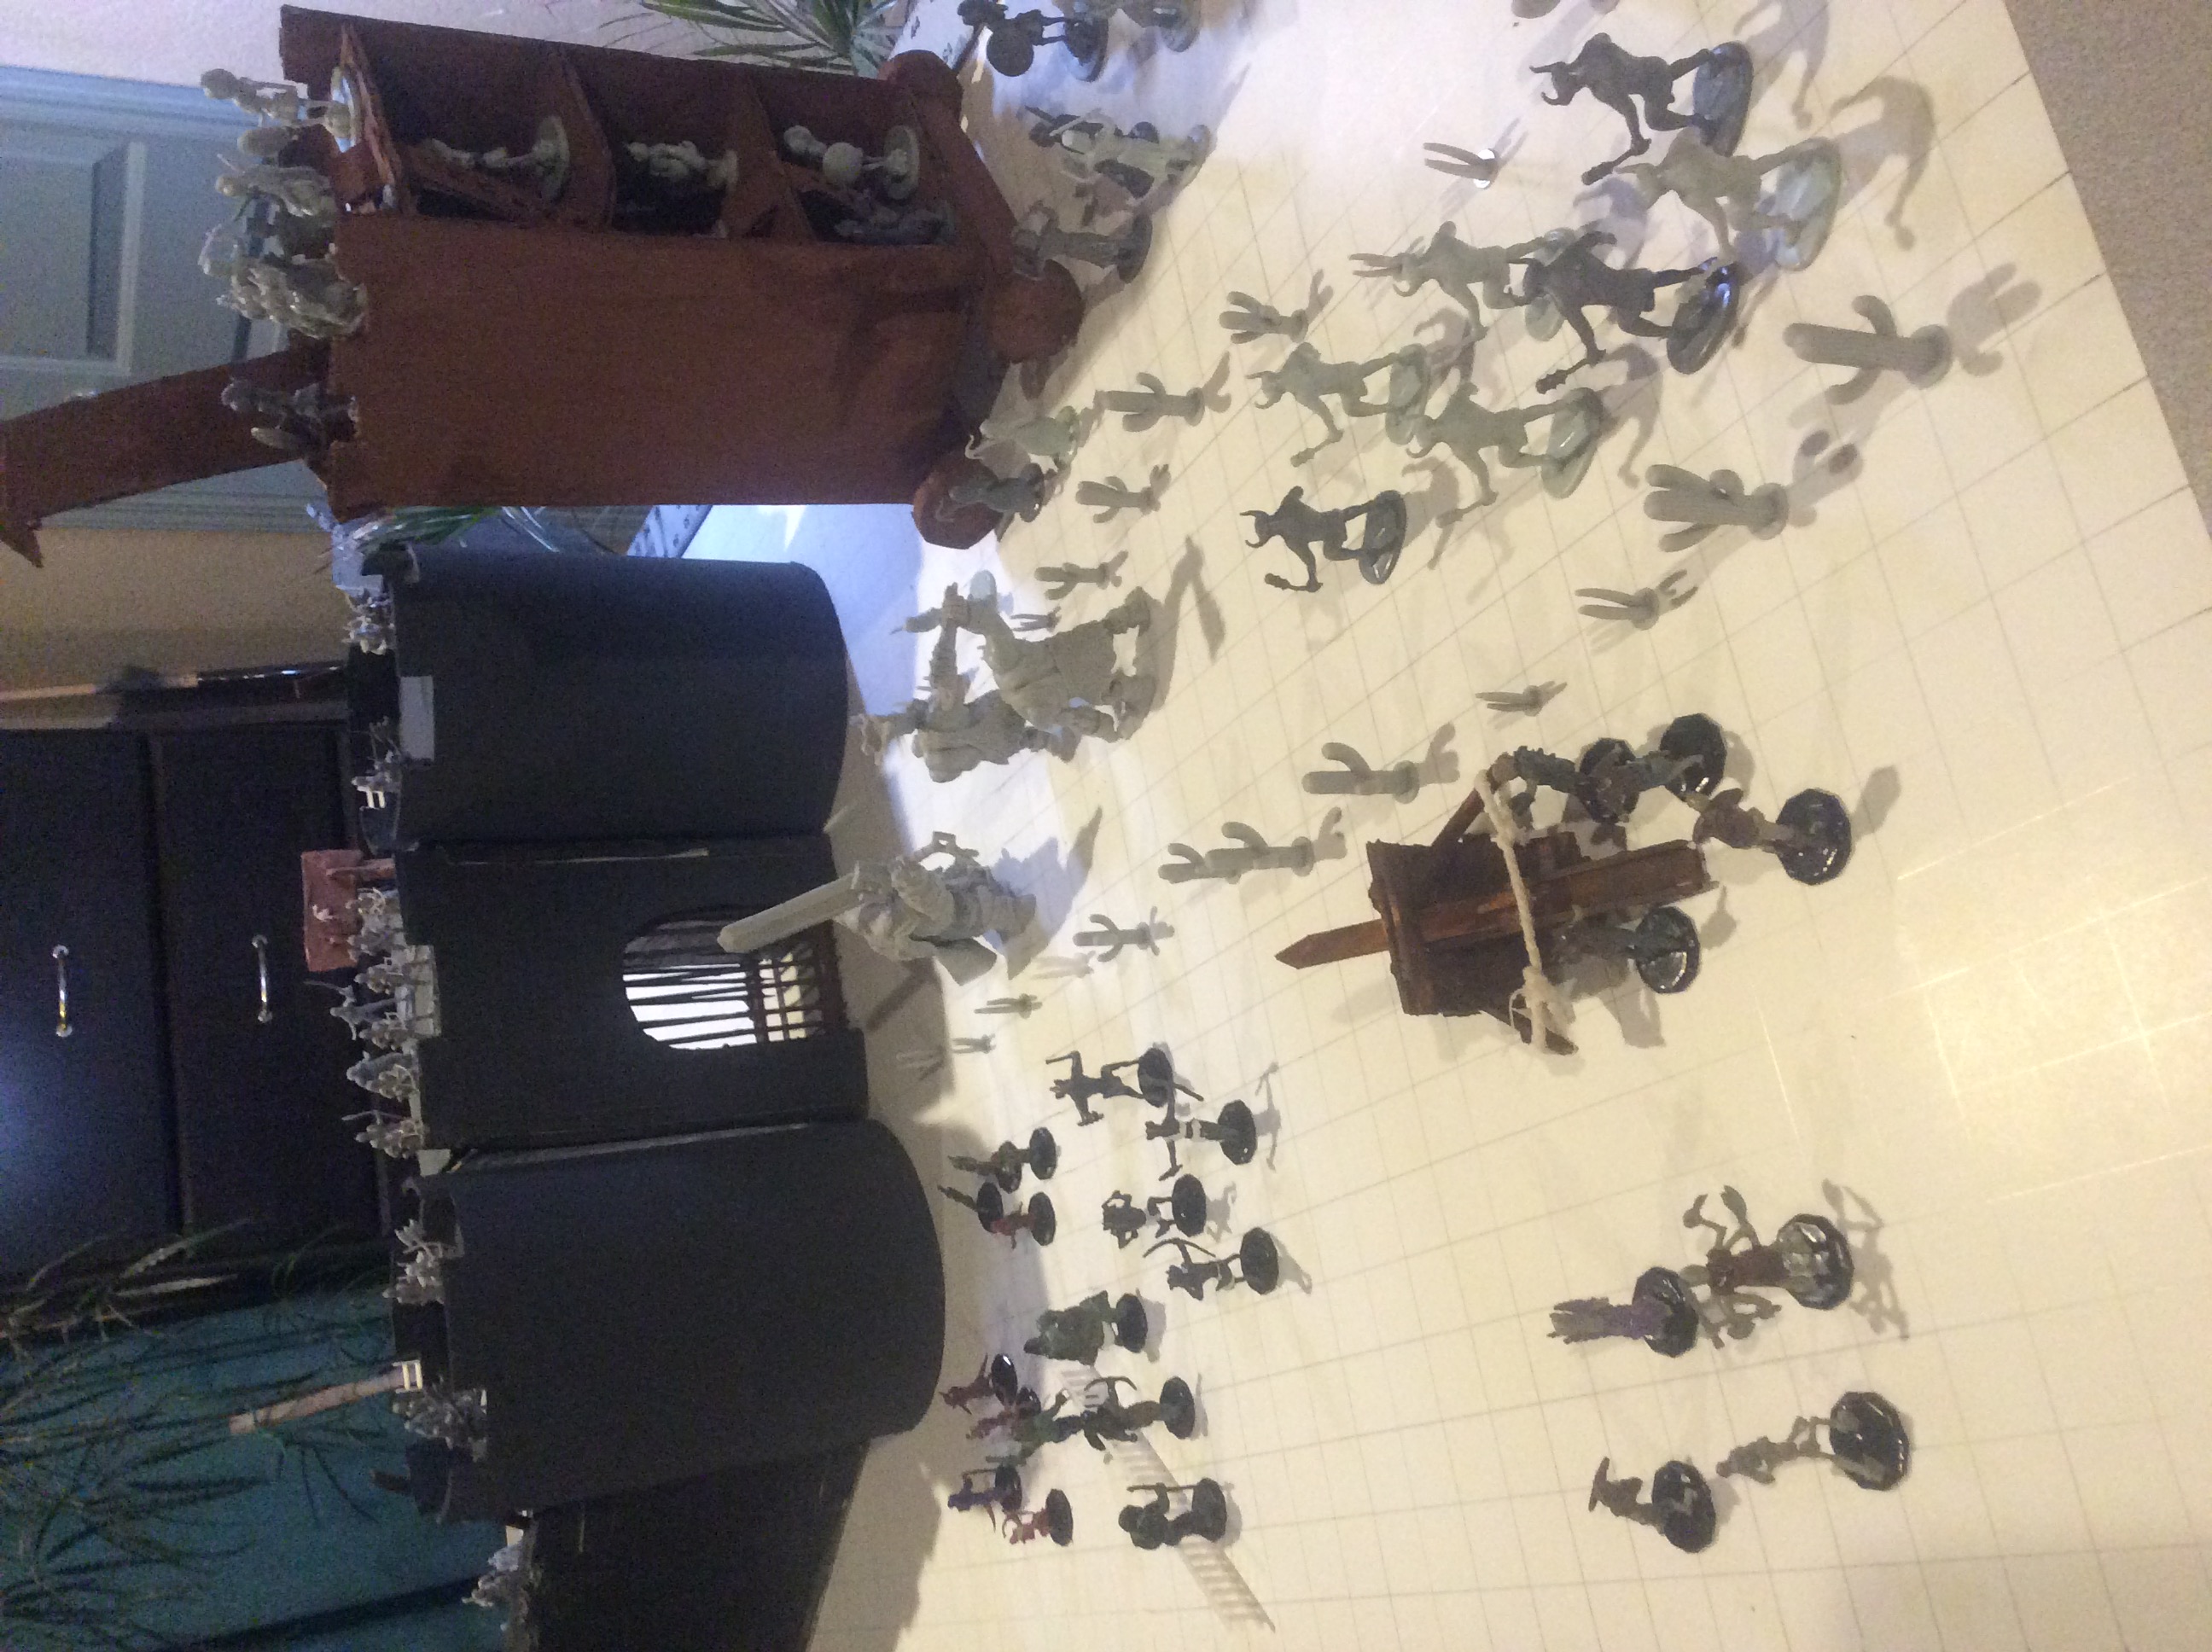
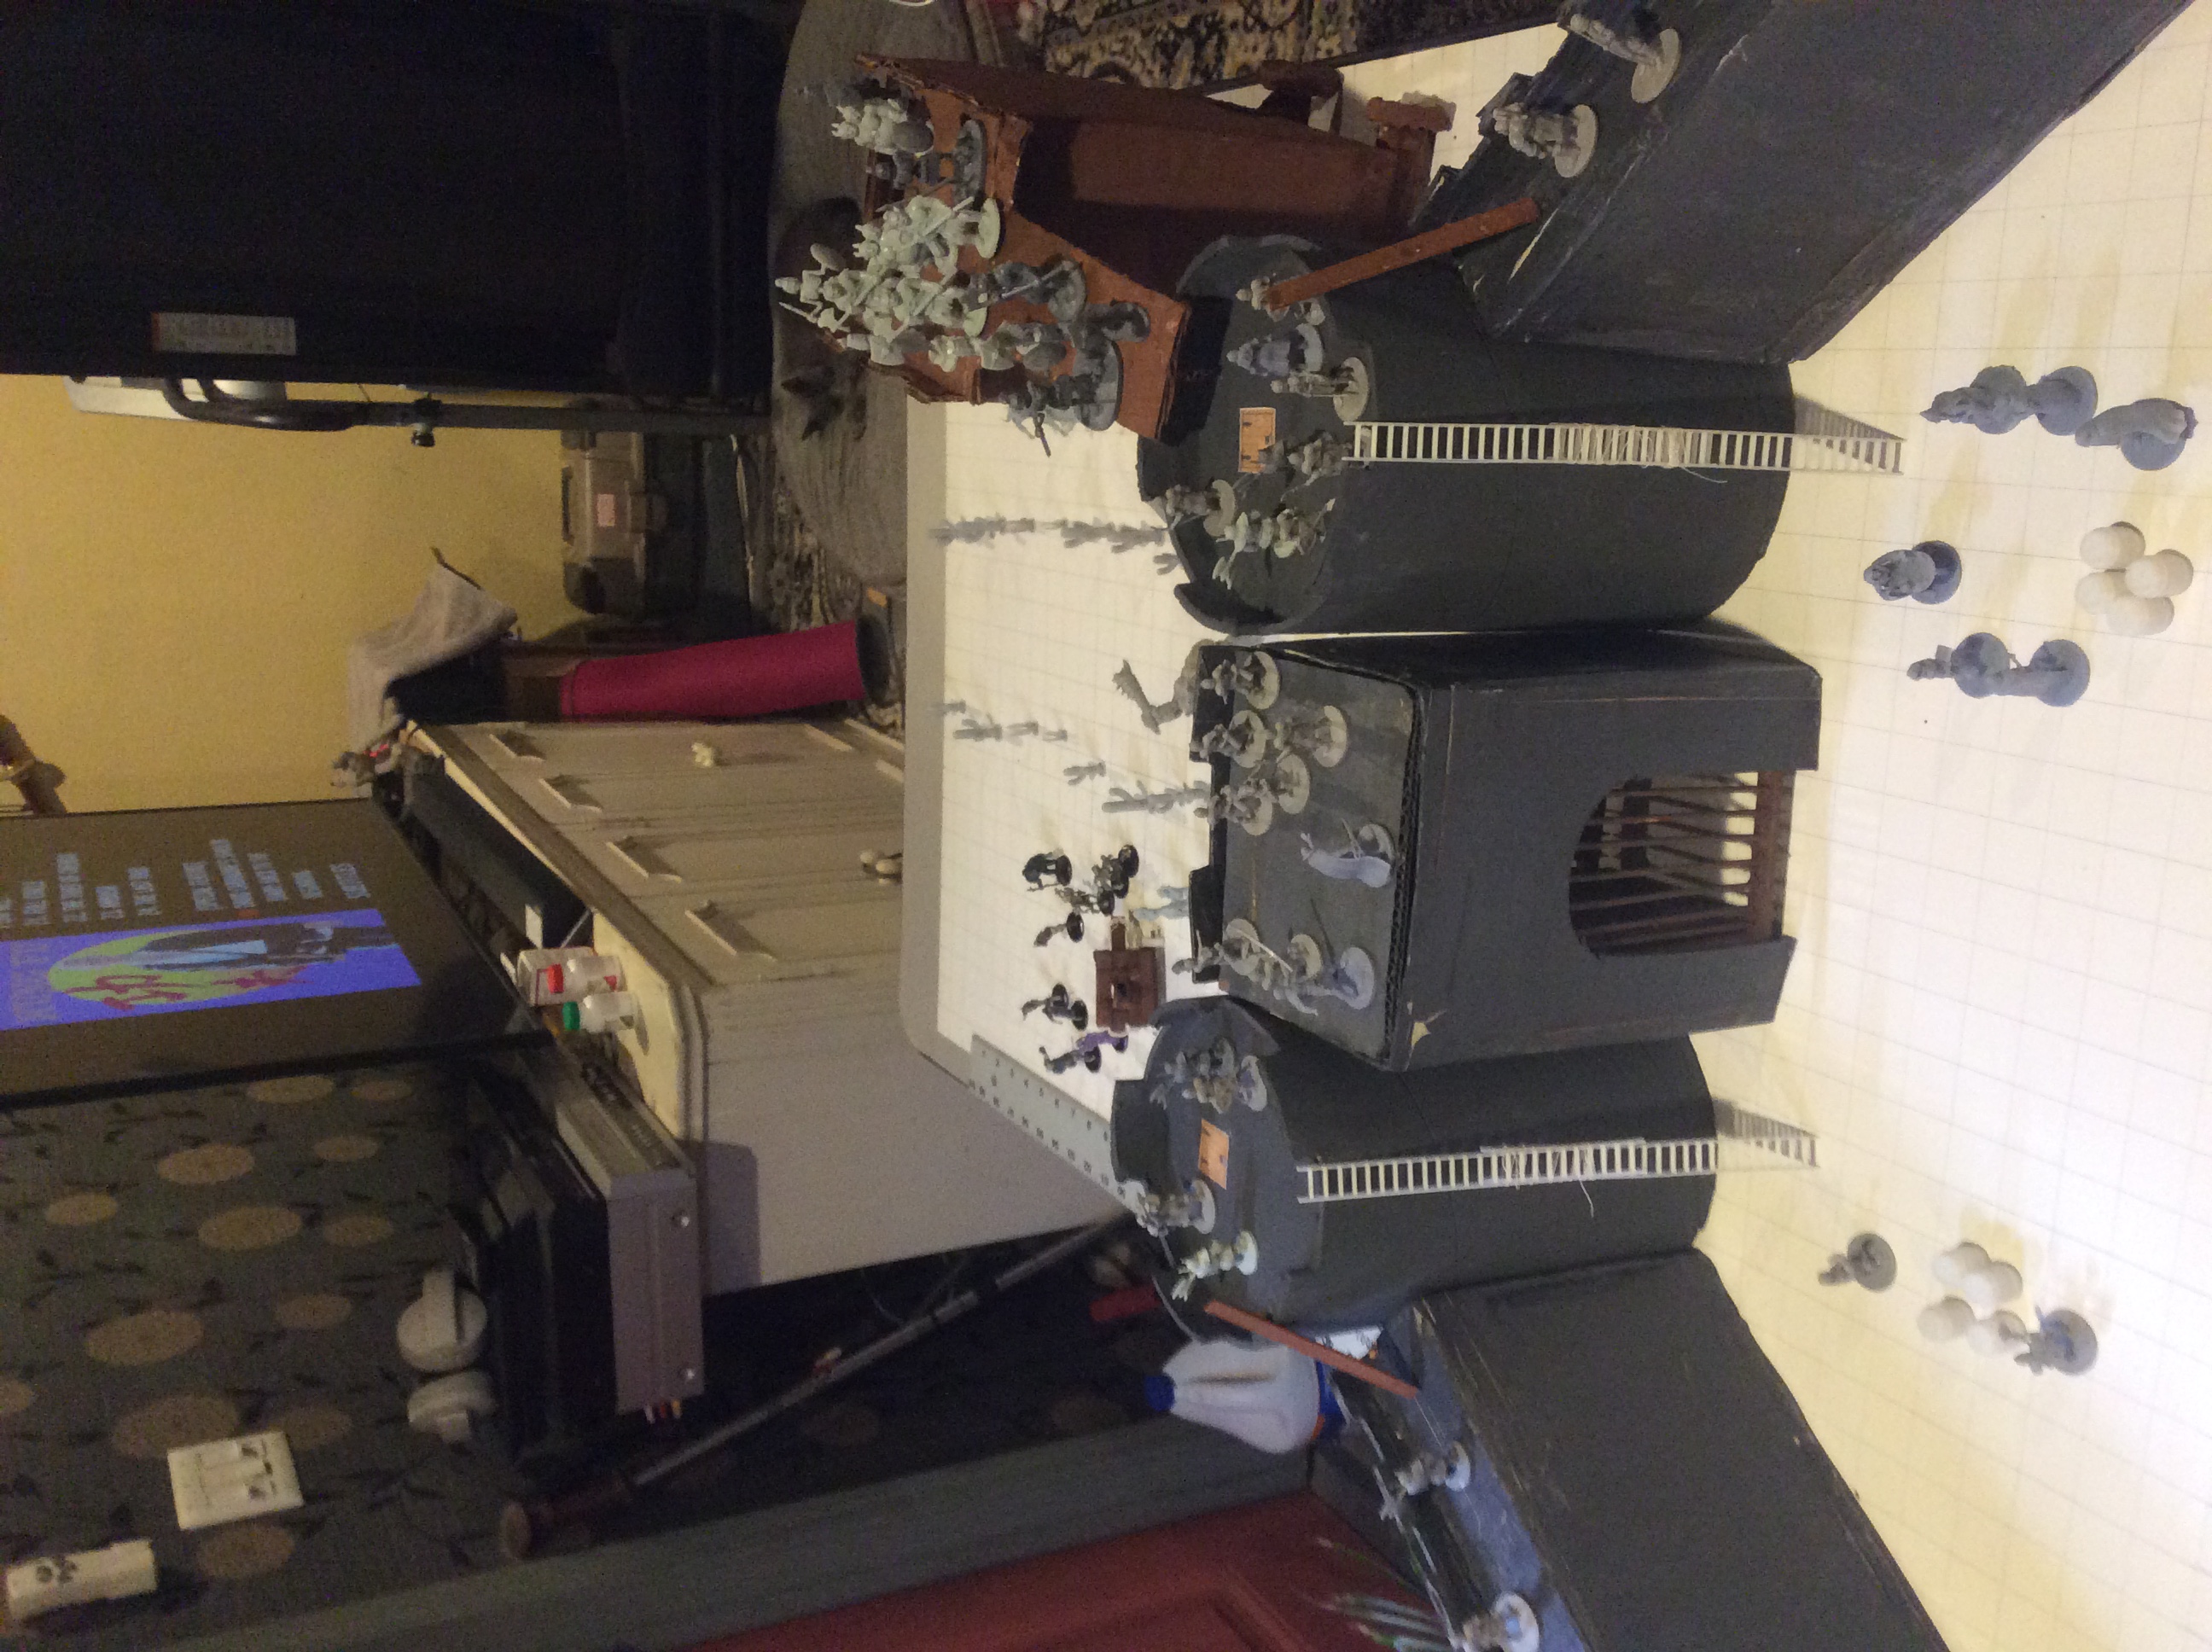
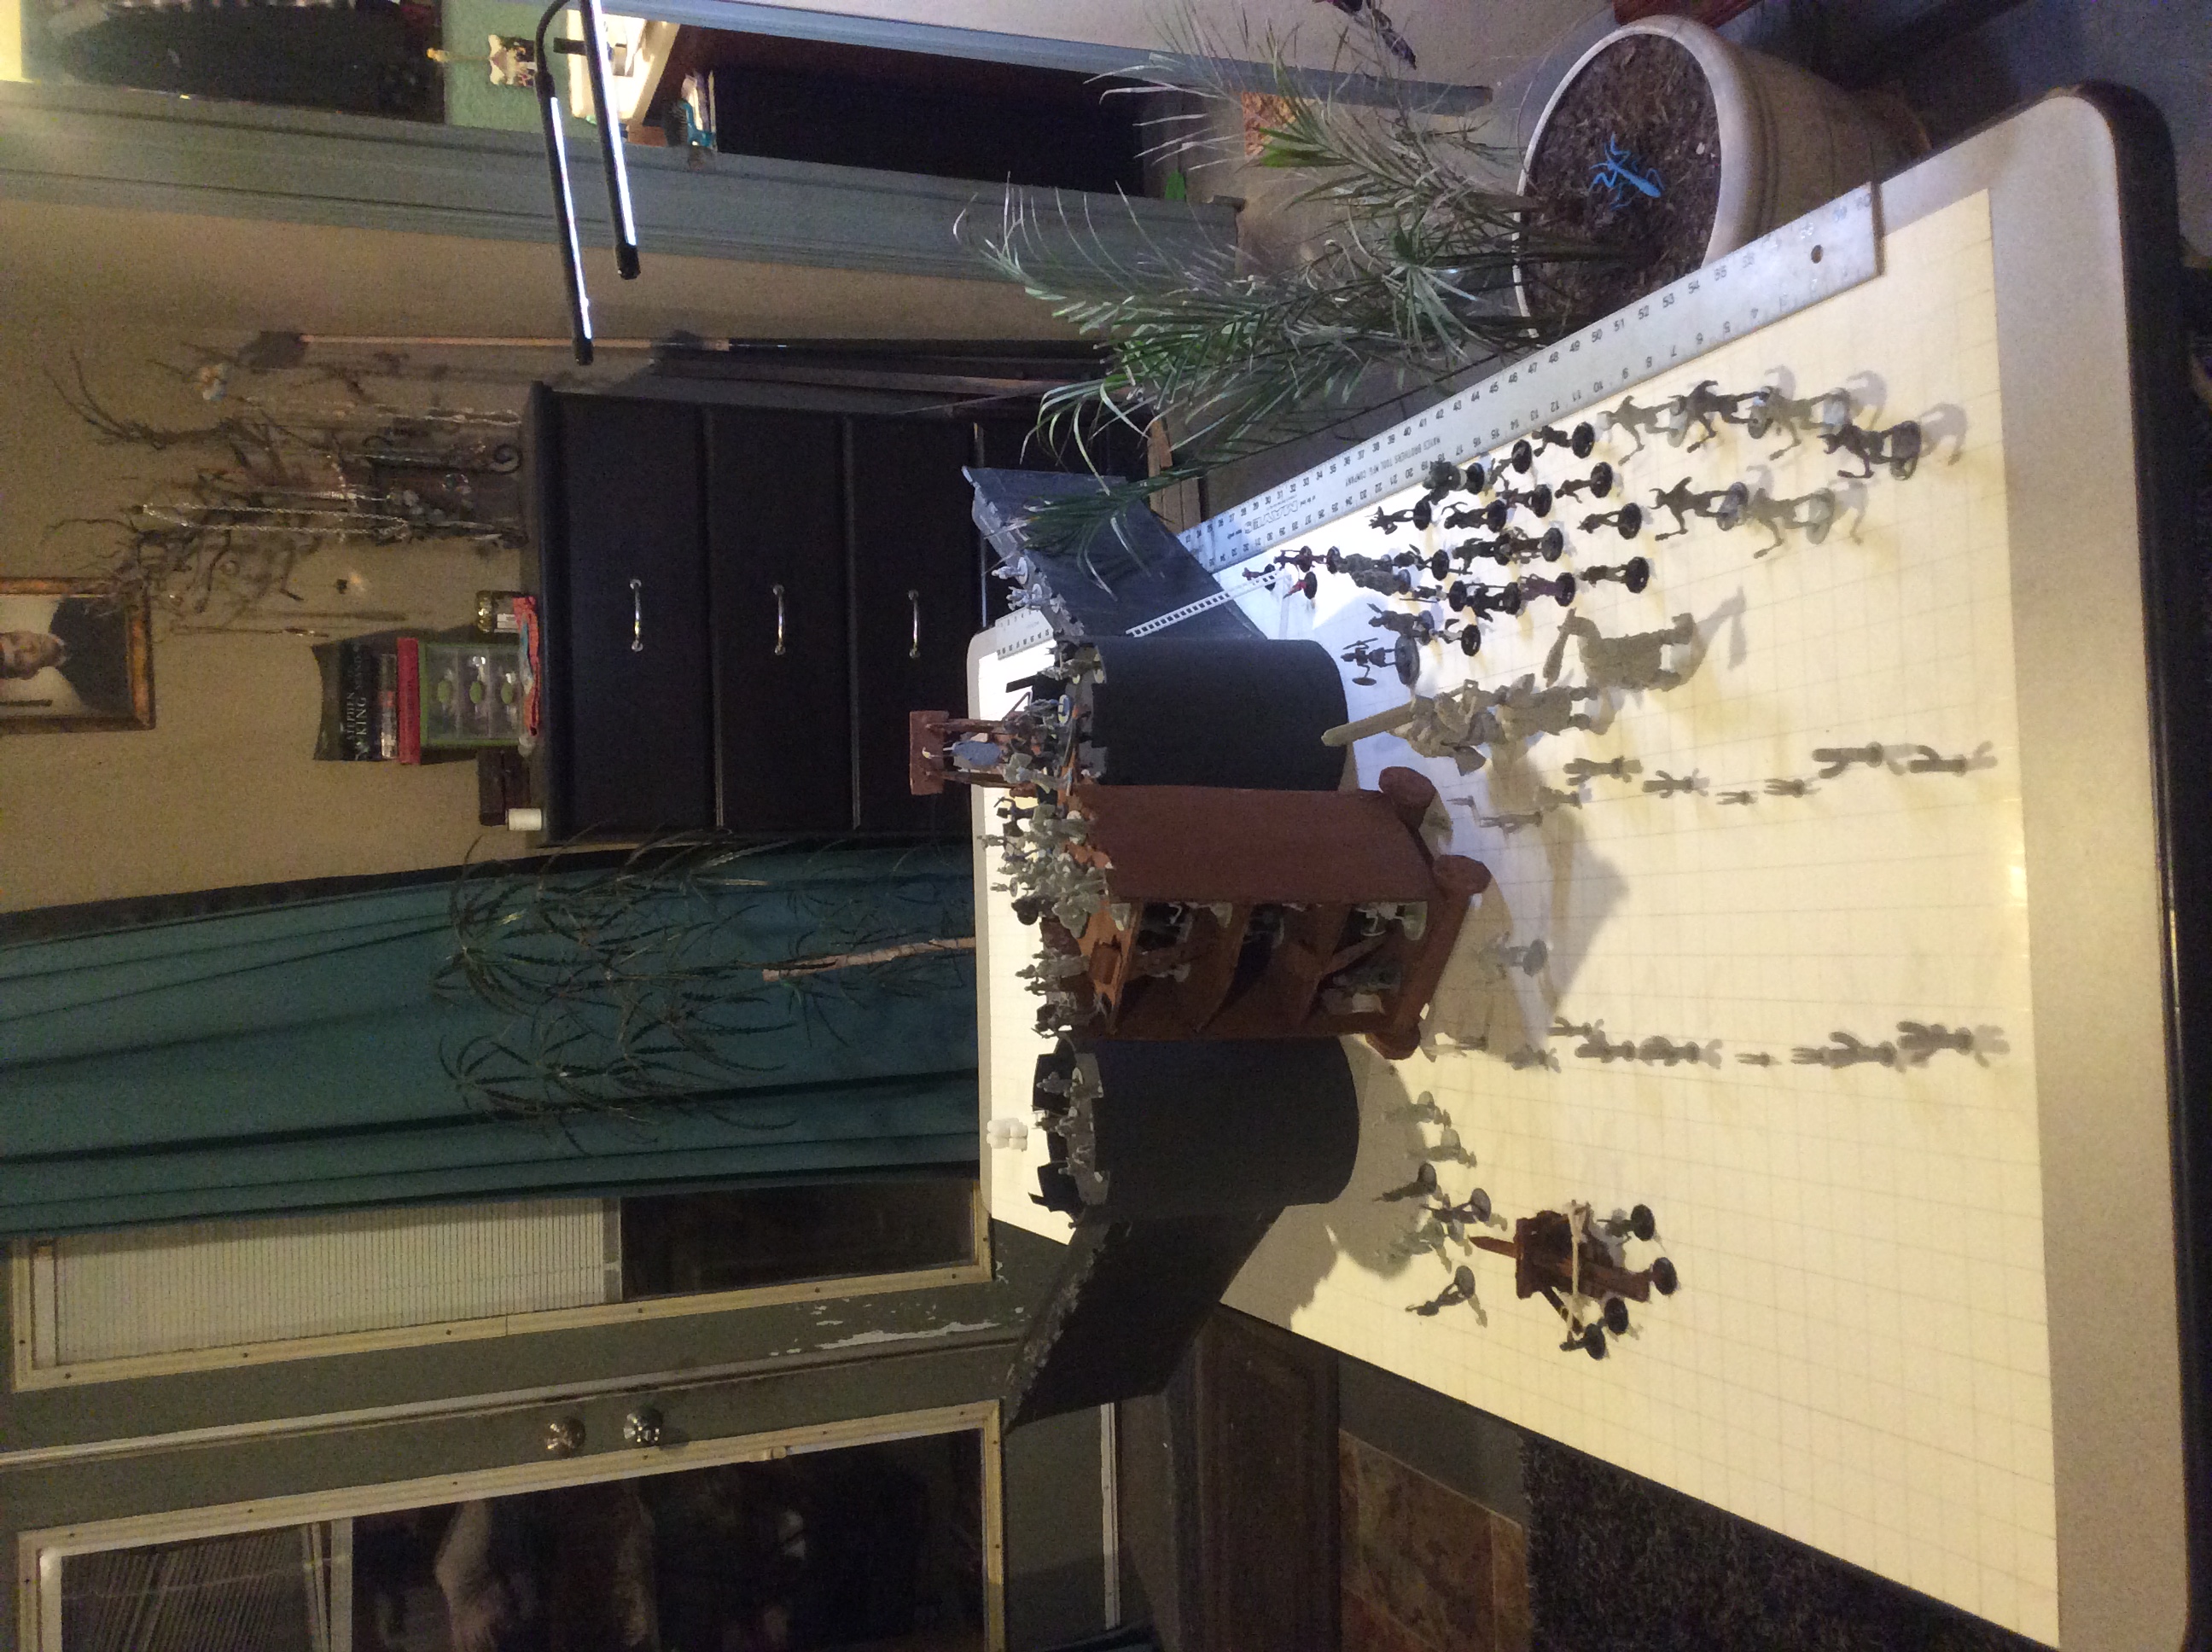
The Fortress Kahar encloses 1200 acres of diverse landscapes.
Lords of War
The fortress of Kahar is ruled by Aperton Adderson, the Marquis of the Kingdom of Goldenshield. He is third in direct line from
father to son and it was his grandfather that built the three desert fortresses, of which Kahar is the centermost fortress,
to resist attacks from the goblinoids. After three generations, the fortress of Kahar is no longer entirely manned by
military personel. Nine hamlets house many families of which only a quarter are active military members. However,
2 weeks ago, all non military personel (grandfathers, grandmothers, mothers and fathers devoted to child care, teens,
children, and babies) were given a choice: volunteer to help the military or be evacuated. Those that did not choose to
help were evacuated to Tisa and Kumi villages, fairly new villages hidden several miles deep in
Bitter Water Canyon. All other personel that stay behind will be expected to work towards the goal of winning the war.
If your party are not soldiers, they will not be expected to follow strict military protocol but they will be required to show a minimum
amount of respect to military authority. Deference to nobility is a requirement punishable by prison or death if not adhered to strictly.
The Lords of Kahar
Well known to everyone in the fortress are the Two Lords of Kahar: the dwarf cleric Lord Fahred Ahmandi and the elf
druid Lady Nalasteron Nazeri, each attended by 24 knights in shining plate armor. The dwarf Lord dwells in a
mansion in Tatu Hamlet nearly as great as the Marquis' Keep, while the Lady enjoys the lush gardens of Mbili Hamlet.
The mansion in Tatu is guarded by Lord Ahmandi's faithful servants and the Gardens of Mbili Hamlet are protected by
powerful magic so that neither place gets violated or destroyed by the enemy. Indeed, PCs will find that by identifying
themselves with their code name and number, for example: "Mjumbe 12", that they will have access to a secure place to take either
a short or a long rest.
a. The Longest Day
This is session Zero. Explain to the PC's:
Kahar is one of three desert fortresses that protects the King's Road in the midst of the Hamakhaave Desert.
Kahar is ruled by the Marquis of the Realm of Goldenshield and Goldenshield is ruled by the Paladin King. The Paladin
King demands diversity and the Marquis of the Realm takes this command quite seriously, so that Kahar (and Kazan and Kabur,
the sister fortresses of Kahar) are bedrocks of inclusitivity. Races of all sorts populate both the desert Fortress
and the surrounding areas.
Some races are more rare than others Inside
the fortress are 9 Hamlets whose populations reflect this diversity and inclusitivity. Even so, racism and bigotry
still exist even inside the fortress, albeit hidden from authority very well, especially when it comes to magic.
Magic fills every corner of the world and takes one of two forms: secular or religious. The religious magic users are
governed by the divine, so that churches, cults, and sects become powerful, and only the magic users loyal to the monarchy
help the rulers stay in power. Secular magic users are, generally speaking, unbound by doctrine or theology, so that
wizards, sorcerers, and necromancers rise to power in the many kingdoms, but a consequence of so many magic users unbound
by law is the birth of the lich and the mummy lords. Magic permeated normal life so much that even non magic users
become preoccupied with the events that arise and evolve as a result of so many magic users. In Kahar, a hierarchy
or magic users is established under the authority of the Marquis and misbehaving magic users are dealt with quickly and
efficeintly.
Kahar has nine towers with a surronding wall enclosing an oasis at the grand size of 18 3/4 square
miles. Corresponding to each Tower are the nine hamlets. Each hamlet supplies food, water, supplies, and the
soldiers to their corresponding Tower. On character creation, it is in the hamlets that will be the home
base for the players fighter, paladin, wizard, sorcerer, bard, or cleric. If players want to roll up a ranger, a druid,
a barbarian, or a unique species of a character, then they are best off creating thier character in one of the many available
places designed for such an occasion. There are two villages belonging to Kahar, north of the fortress, hidden in the
desert mountains, deep inside Bitter Water Canyon. These villages are established after the drilling accident produces
the lake and the river, and, after a few generations, they grow fields of wheat, oats, barley, rye, and, deeper
into the desert mountain, rice fields. However, amoung the many farmers, there are, indeed, rangers, barbarians,
and even a few druids known to frequent these areas.
Now is the time for players to roll up characters,
select backgrounds, and be ready to receive equipment, weapons, and supplies. It is at this time that PCs learn
cantrips and level one spells. PCs will have all day to ready themselves, but the enemy is already outside the walls
and no place outside the walls will be safe. Bright Light will illuminate everything, while the day lasts, even most
indoor places. But at 5pm, the desert sun sinks below the western mountains and the enemy breaks camp. As it
continues to get darker, the attack on the Front Gate and the Rear Gate begins.
This guide will create 4 PCs
to use in describing each adventure as examples:
1. Kite, a female tabaxi sorcerer, with the sage background as astronomer who currently works as a cartogropher in Mbili Hamlet
2. Bavel Nargig, a human male assasin, with a criminal background and a current job as an enforcer for a loan shark in Saba Hamlet
3. Vaylen Sherda, a female elf cleric with the acolyte background who lives in Nne and whose current job is as a nurse for Tower 3
and finally
4. Urthon Thribak,a male half orc barbarian, adopted son of the Chief of the Wanderers of Harker's Point, a desert tribe 24 miles
northwest of Kahar
A goal for the DM could be to modify the settings for the PCs. First thing
might be setting items tailored to the specific classes of the PCs. Perhaps the Staff of Healing (DMG 202)
for the cleric, the Ring of Protection (DMG 191) for the Sorcerer, the Cape of the Mountebank (DMG 157) for the assassin, and
Winged Boots (DMG 214) for the Barbarian. Plus, with the diversity of an oasis on a desert setting, it is possible to
conjour up many scenarios that will test the skills of each particular class , letting each DM fashion the campaign to
suit their own specific PCs.
Since none of the backgrounds displayed here are soldiers or military, this guide will proceed on the premise
that these PCs chose to stay in the fortress when the military gave them the choice to volunteer to aid the military or evacuate.
This guide will assume that these PCs agree that the goal of those inside the fortress is to win the war, and, therefore, be
amenable to orders and commands. This guide will not name the PCs but will retain a generic type of mystery instead.
Scenario
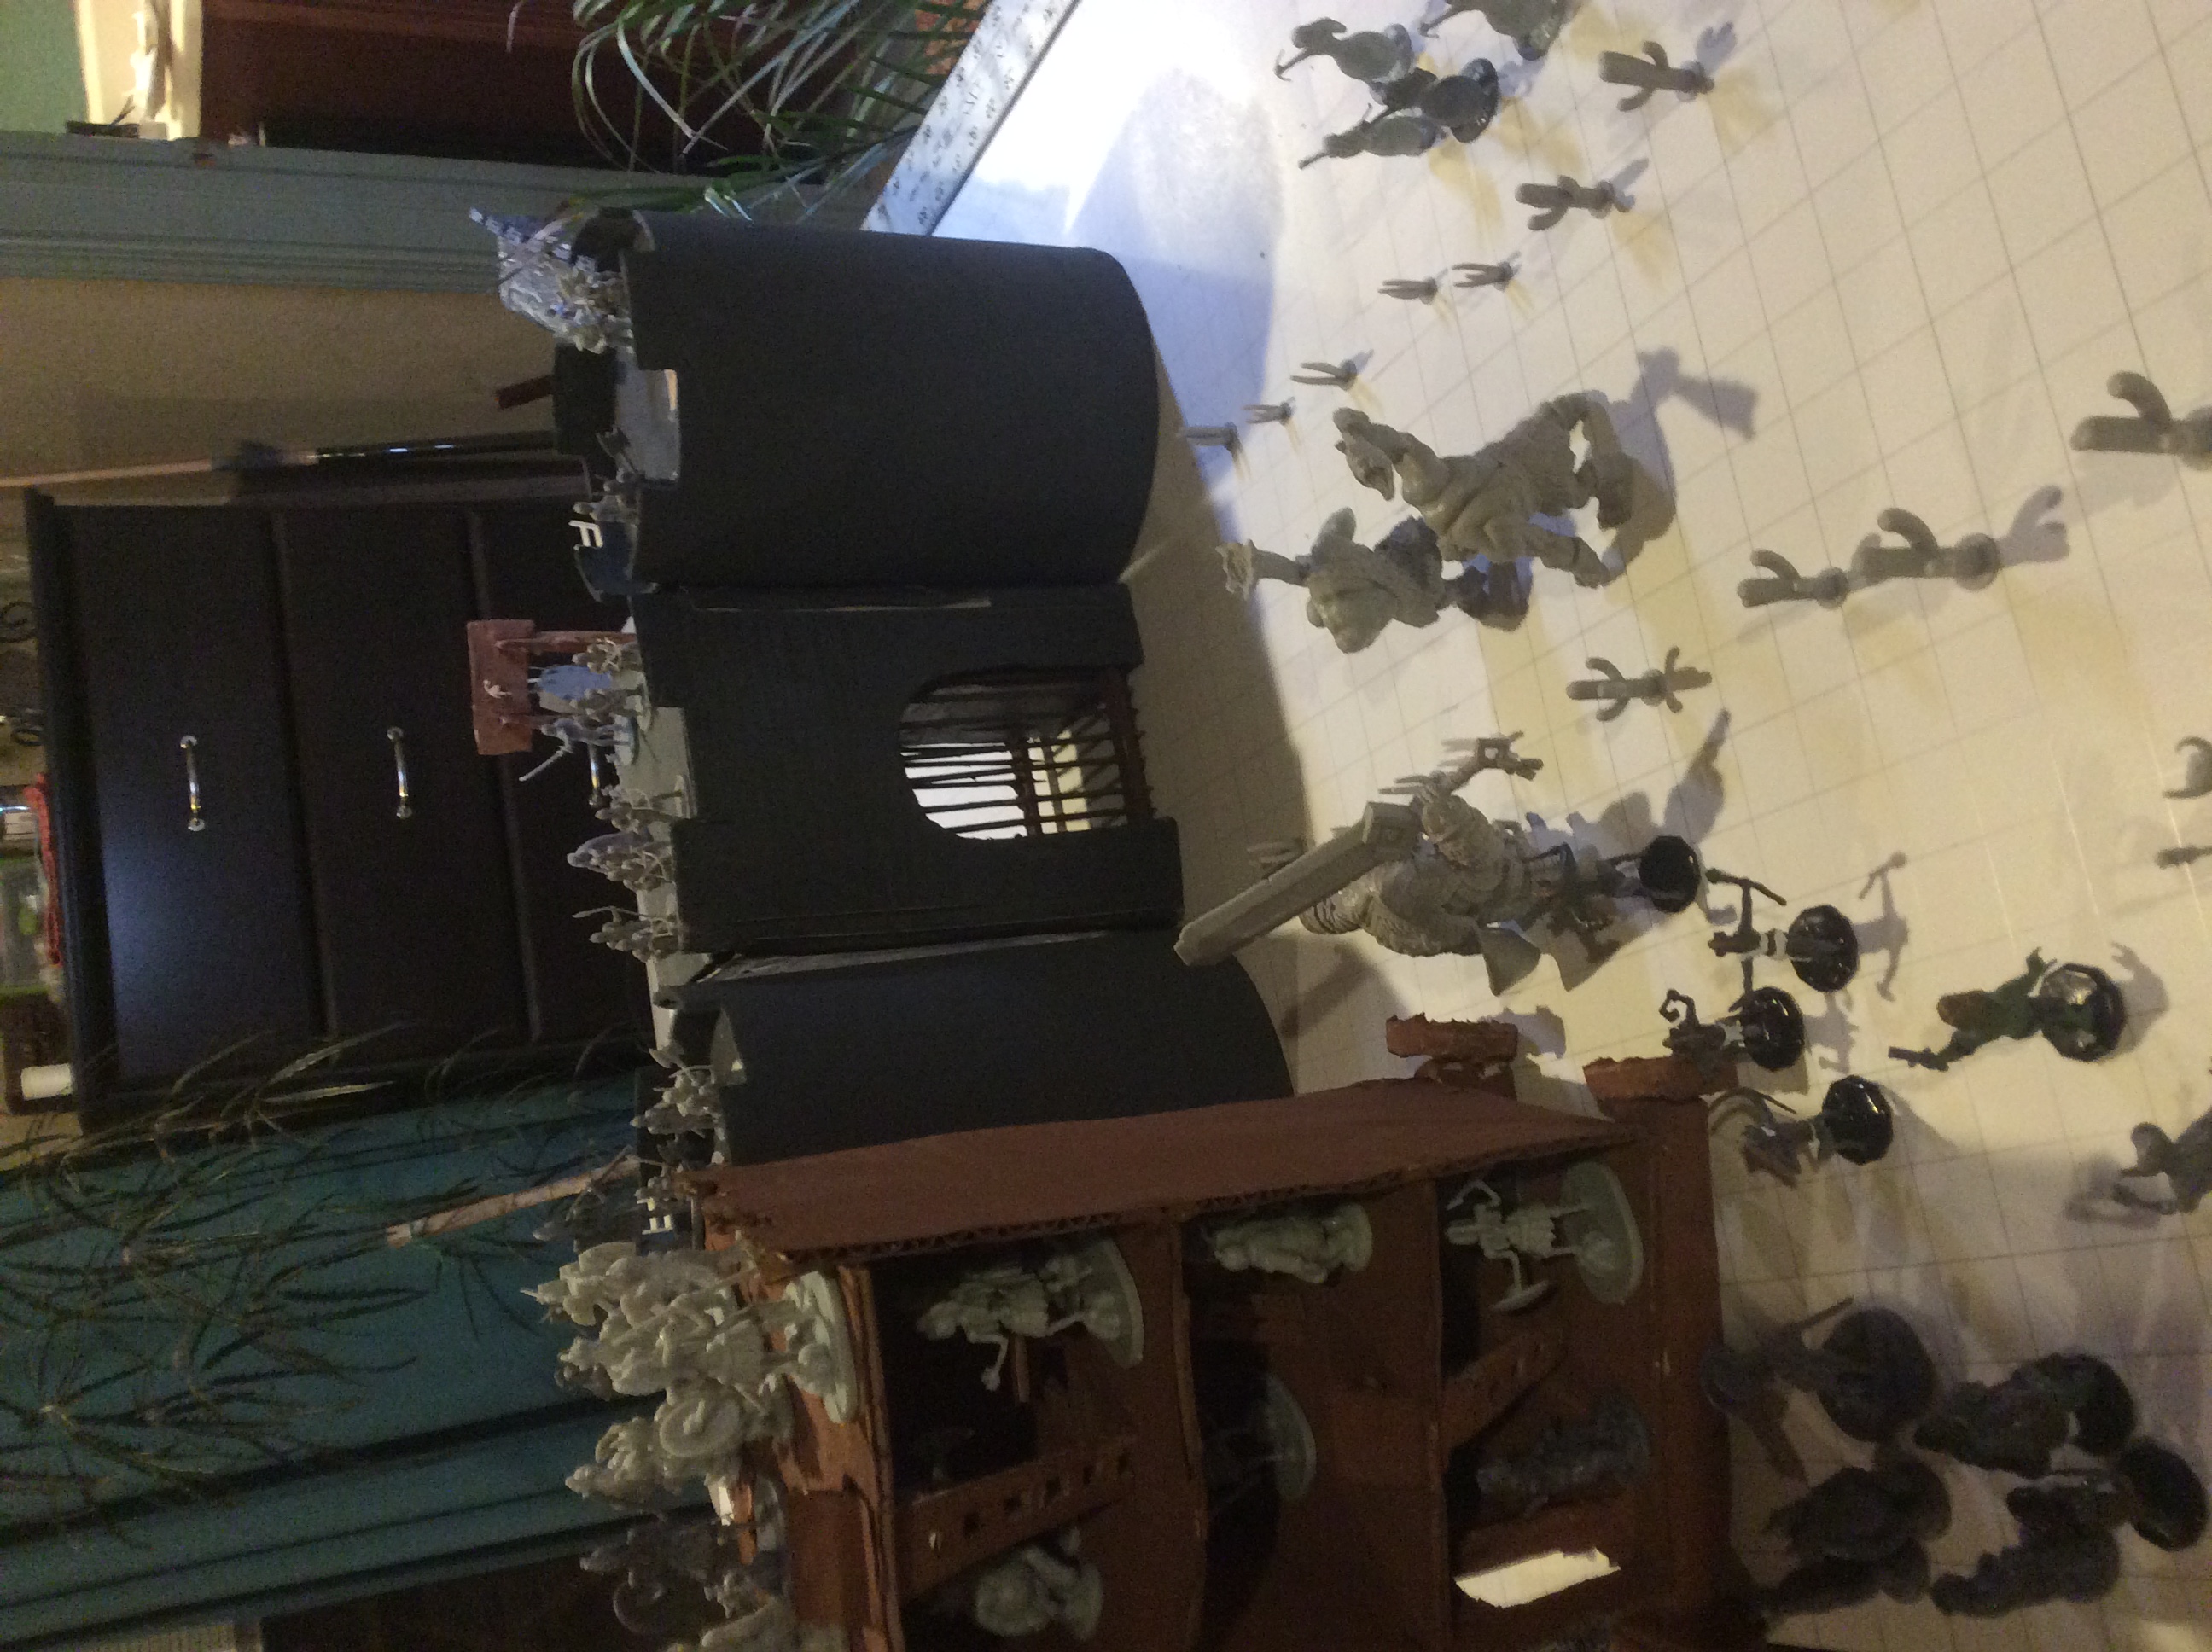
Rhael the Fire Giant has brought his two Hill Giants, Rulos and Eclith,
and a thousand goblinoids (including 100 bugbears that he has ordered to guard the Hill Giants), with many siege towers,
catapults, mangonels, trebuchets, ballistas, and other instruments of war, and many, many, beasts of burden (mostly camels,
but I like to be creative). He has come to destroy the desert fortress Kahar.
Create your characters, choose your race, and pick your class. You will be set inside the desert fortress, Kahar,
where you will witness the coming destruction and be a part of the defense. Learn your cantrips, receive your
proficiencies, pick your equipment and first level spells and be ready for the enemy to enter the walls.
Whether your backgrounds are combined or not, your party is at Braek's Munitions Dump under the authority of
The Priest's Brigade, commanded by
Lord Kyrakis Braek. You are a part of the Messenger Core,
or, better, Mjumbe. You have been commanded to appear at the Keep and you stand in a crowd of over 600 people
and listen to the
Marquis of the Realm as he stands 65' up on top of the Keep Tower. Everyone can hear
him because he has cast Thamauturgy:
"Soldiers of the Kingdom of Goldenshield! I stand before you this day as your Marquis. I plead with you
to remember your oaths! All of them! For this night, the King will have need of you! A fire giant
has brought 2 hill giants and over 1000 gobliniods to destroy this fort! They come every 16 years! Twice I stood
with my Father and turned back the terrible attacks from thier Dark Crusade. This seventh time, my father is no
longer with us, and this time I stand alone. So I turn to you, Soldiers of Goldenshield! Will you stand
with me and turn back this goblinoid gang?"
The PCs will be drowned out by the response of "Yes!" by everybody. Cheers and celebration follow.
Brother
Jaken Voth, an acolyte of Lord Braek, calls each character name,
assigns each person to a team, and announces that he is in charge. You have been hired as messengers in the coming
conflict and will be paid 20 gold pieces a day. Jaken Voth announces he is your superior and you shall call him "Brother
Voth", he is, and will continue to be, a really nice guy who looks out for you. With darkness rapidly approaching, you
are to follow him to Braek's Munitions Dump bringing any and all belongings. He gathers your team and 4
other teams and begins the 20 min walk north. You notice you are in a caravan of many other messenger teams, all
heading north to Braek's Munitions Dump. Once across Armory bridge, he assigns you and the other teams a
cart and horses. Jaken Voth hurriedly gives your party and the other 4 parties a tour of the Munitions Dump,
the warehouses, the sleeping quarters, the factory, and the Mansion. The only places you are not shown are the upper
levels of Braek's Mansion. Under the authority of Jaken Voth, your party is given access to arms, shields, bows and
arrows, crossbows and bolts, and other munitions. The warehouses are also filled with rations, beer, healing kits,
and fire suppresion equipment. Every house and every warehouse is equipped defensively so that they can be
locked up tight with barred and sealed windows, flat roofs with crenellated edges make them easily defendable, and
adobe brick construction makes them relatively fire proof. Braek's Munition's Dump is a good place to hole up.
Identifying Allies
Askari and Mjumbe
Most important among Jaken Voth's instructions is that he gives each team an identification medalion, the team name
"Mjumbe" and a team number. The medalion he gives your party is 3" in diameter and hangs on a steel chain necklace.
On it is stamped the name Mjumbi and a number from 10 to 15. This identifies you and your party as assigned
the team name and number to the medalion in your party's possesion, for example, if the medalion in your party's possesion is
"Mjumbe 12" then that is your parties identification. Your DM will select which number your party is assigned, or
pick it randomly.
Two names you and your party will hear out in the battlefield: Mjumbe, which is
messenger, and Askari, which is soldier. These simple words are key to identifying your party to Goldenshield soldiers
and to other messenger parties. If you hear or see any contacts while in the field you must shout out "Mjumbe" (which
goblinoids cannot pronounce easily), and the proper response will be "Mjumbe" or "Askari" followed by the number assigned to
the team. Conversely, if your party hears "Mjumbe" or "Askari" shouted out in the darkness, then you or another party
member must yell out your identification, for example: "Mjumbe 12", or risk coming under attack by friendly fire. If any
character that is part of your party yells out "Mjumbe" and the proper response is not given, the contact will be considered
hostile.
The Adventure Begins
The party is given their first order from Jaken Voth: load one barrel of rations,
one barrel of beer, 2 barrels of arrows, 5 crossbows, 5 swords, and 5 shields; take the load to the front gate and
report to
Corporal Weaver from Tower 9 who will direct you where to unload. Finally, hurry back
to the Munitions Dump to reload for the next delivery.
It is up to the PCs if they take their wagon off the
road or stay on the roads, but whichever they choose, on the way they will roll once on the encounter table where they
are warned that the enemy is flinging some wierd type of debris into the fortress. The very next thing that happens
is that bodies coming flying out of the air and land near the PCs. There are (party size - 1) goblin zombies and 3
crawling hands.
If PC's are not level one, this is a good time to secretly send them over the wall to assasinate as many hobgoblin
commanders as possible.
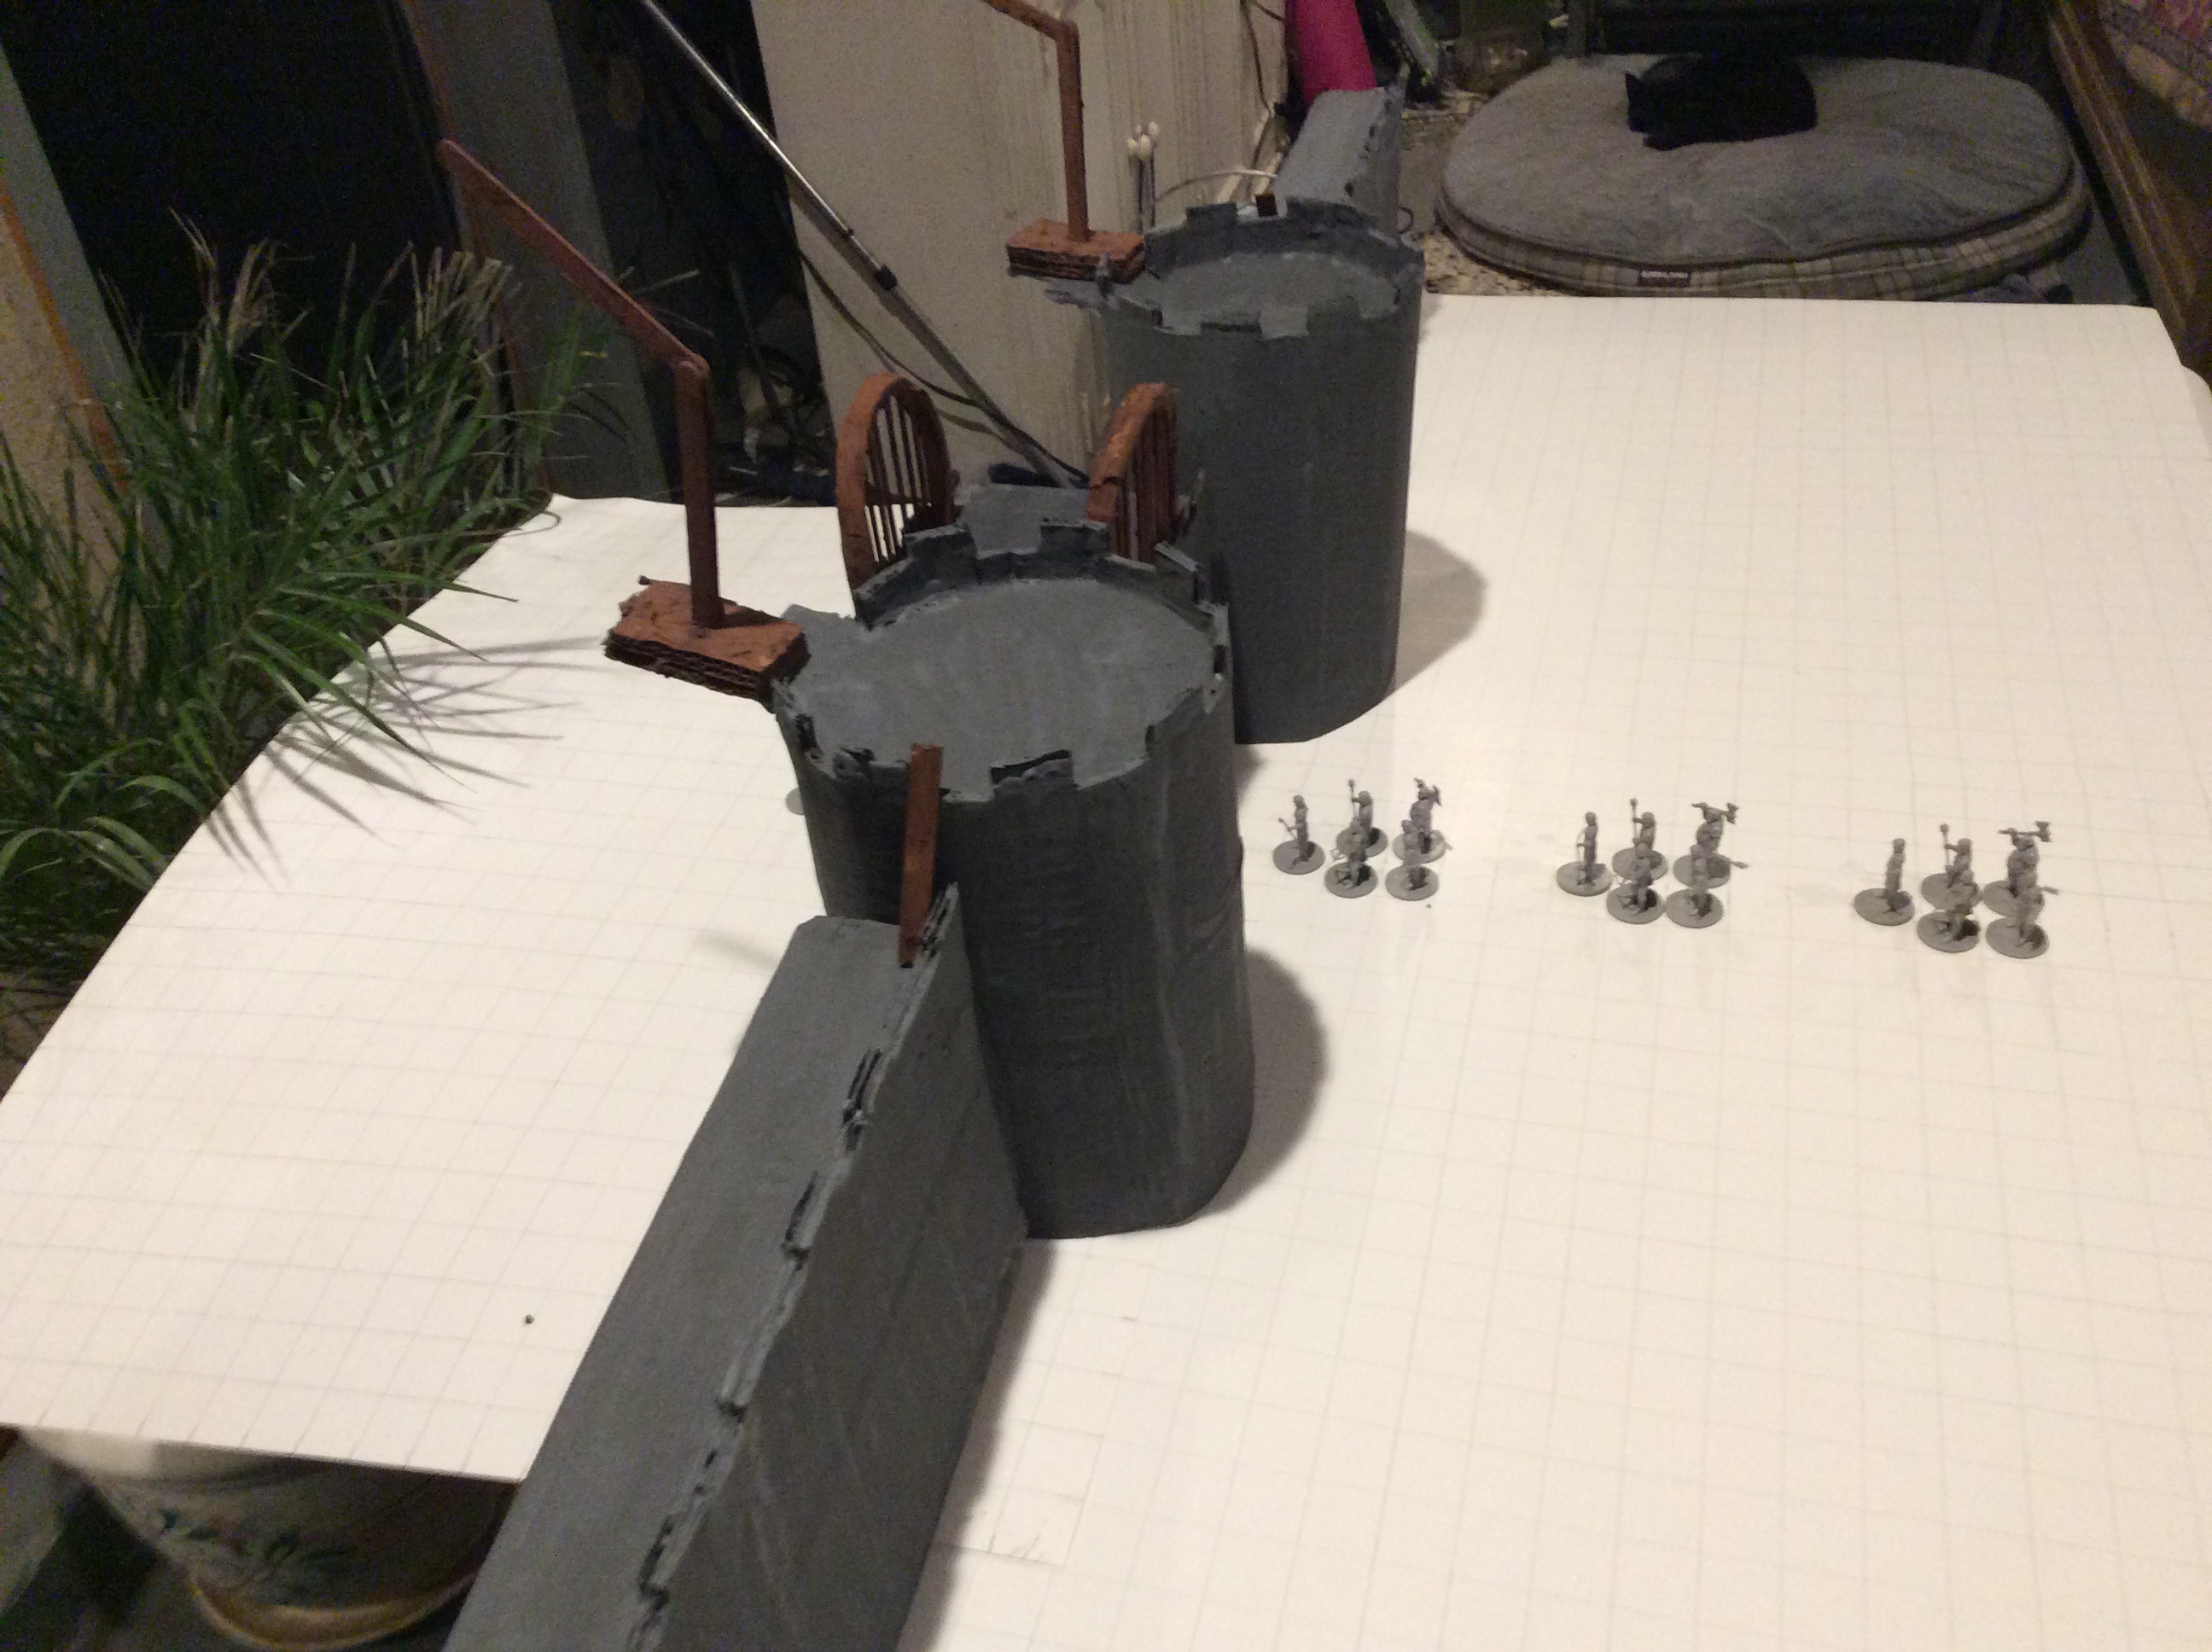
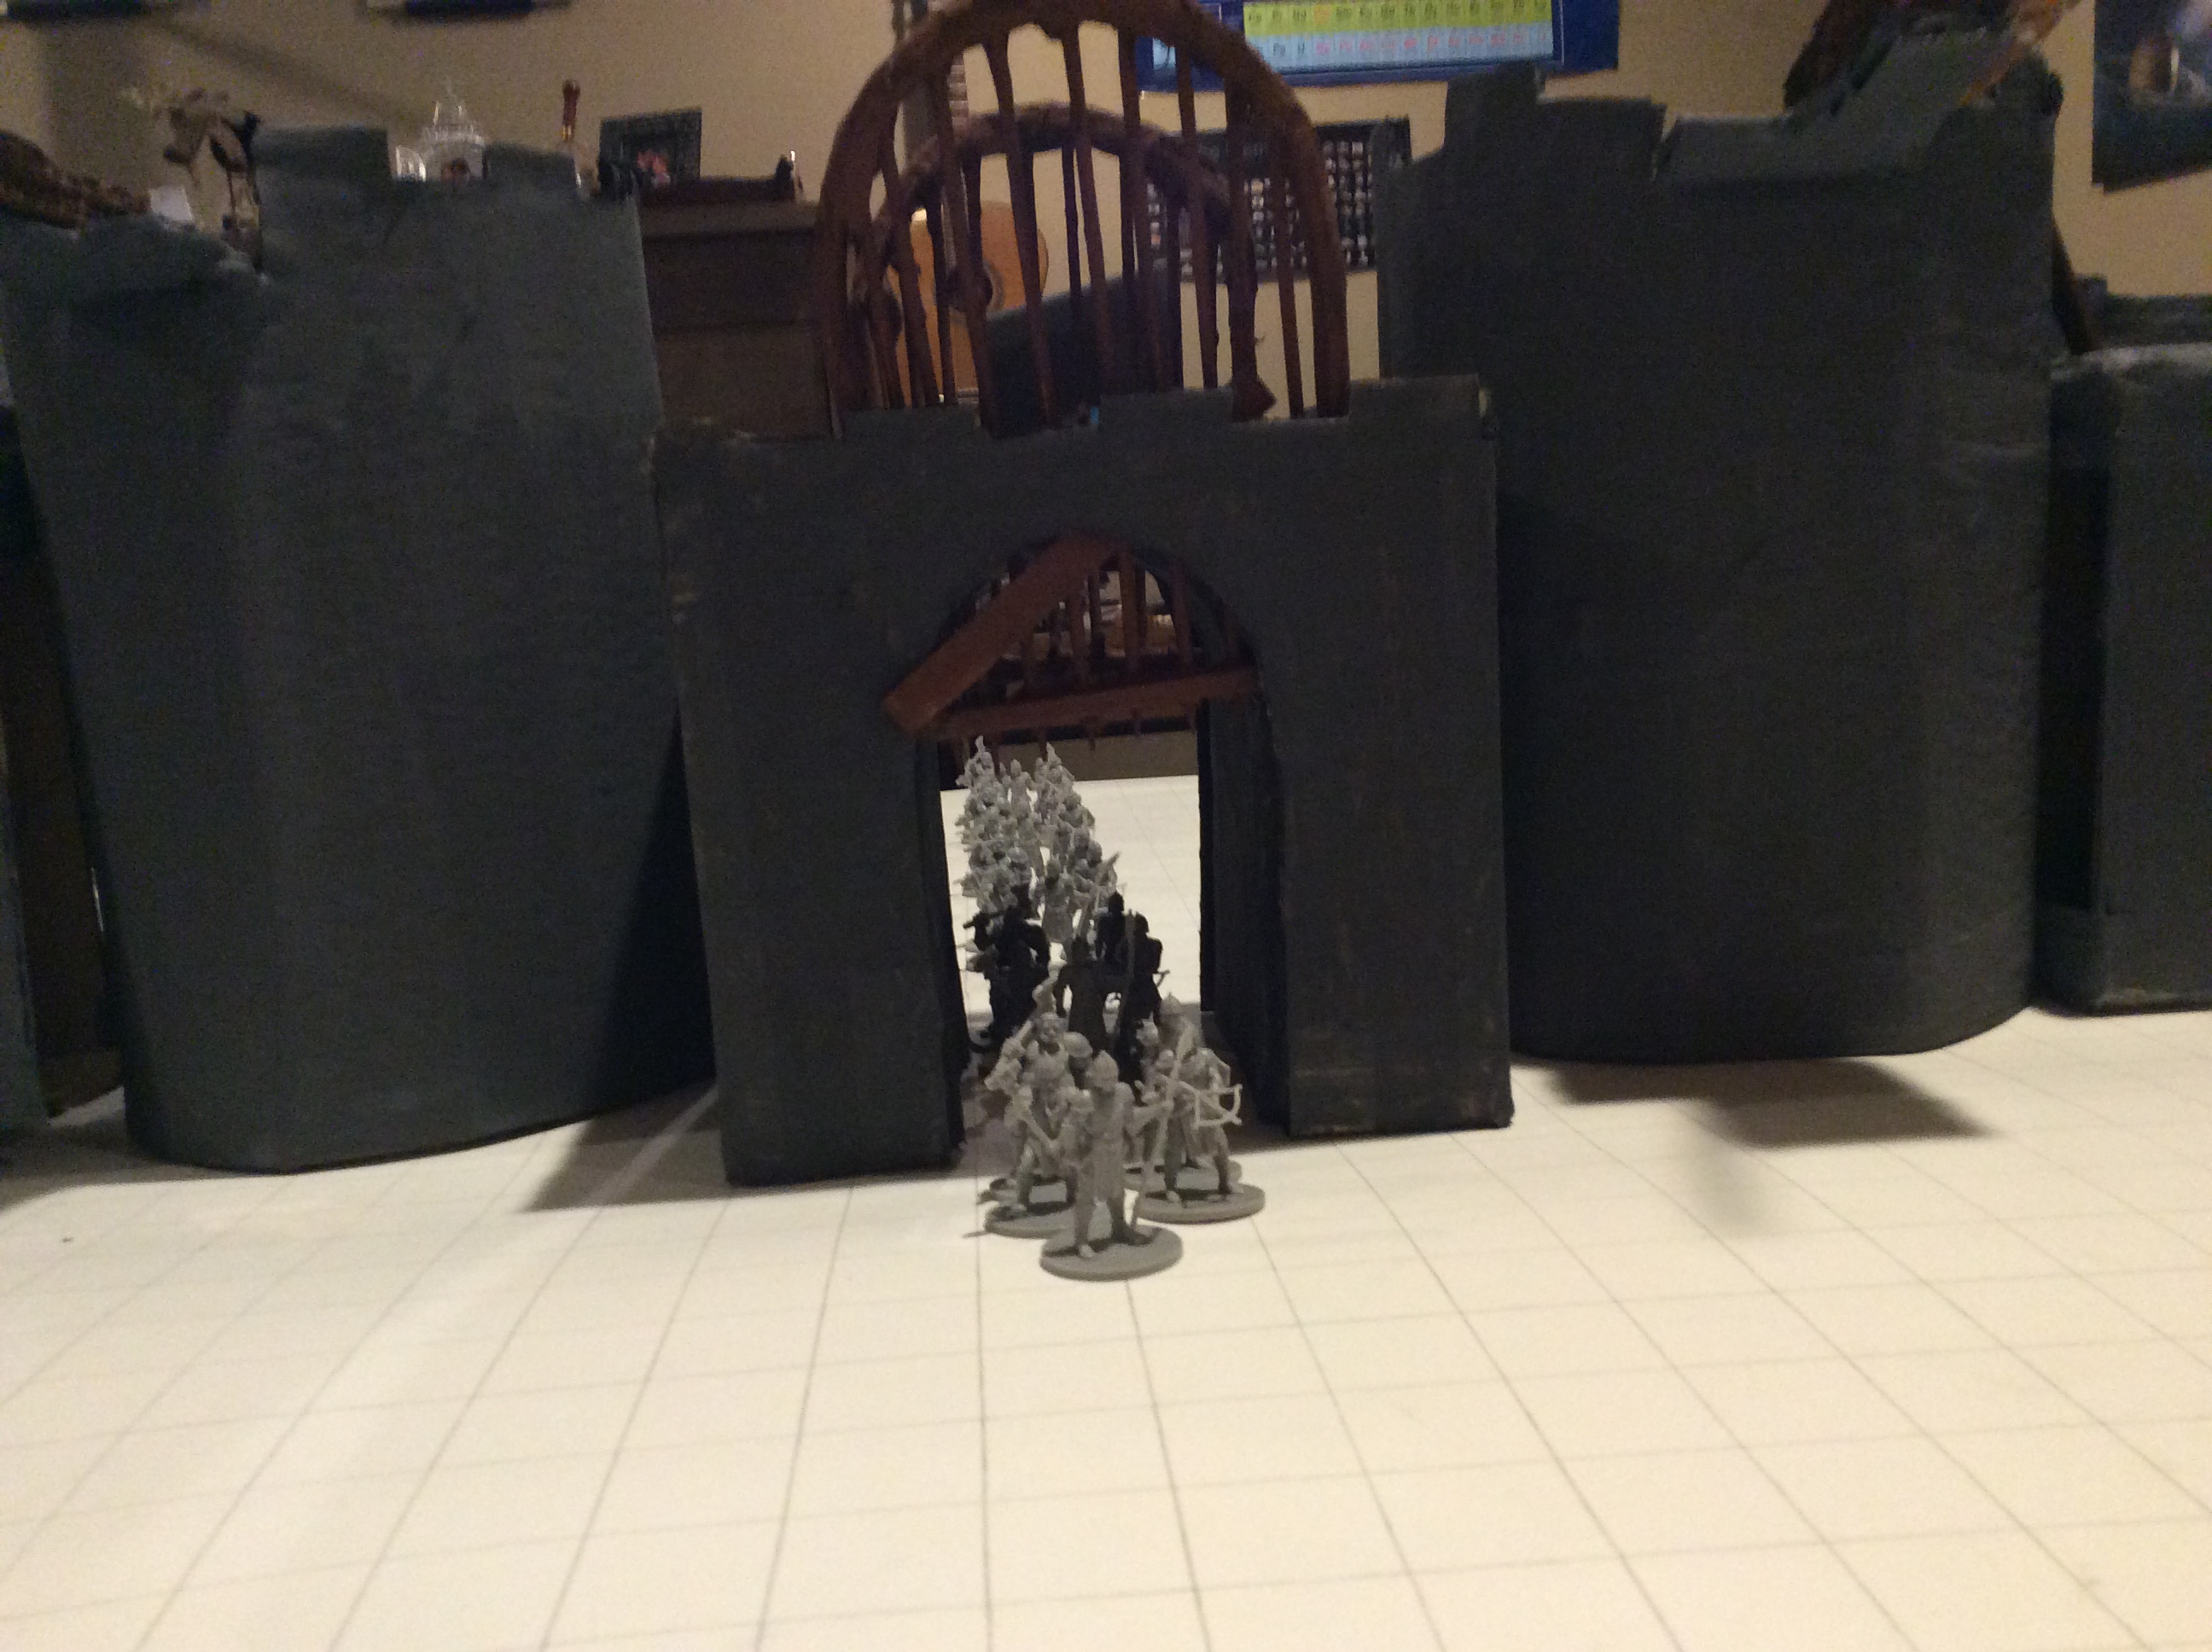
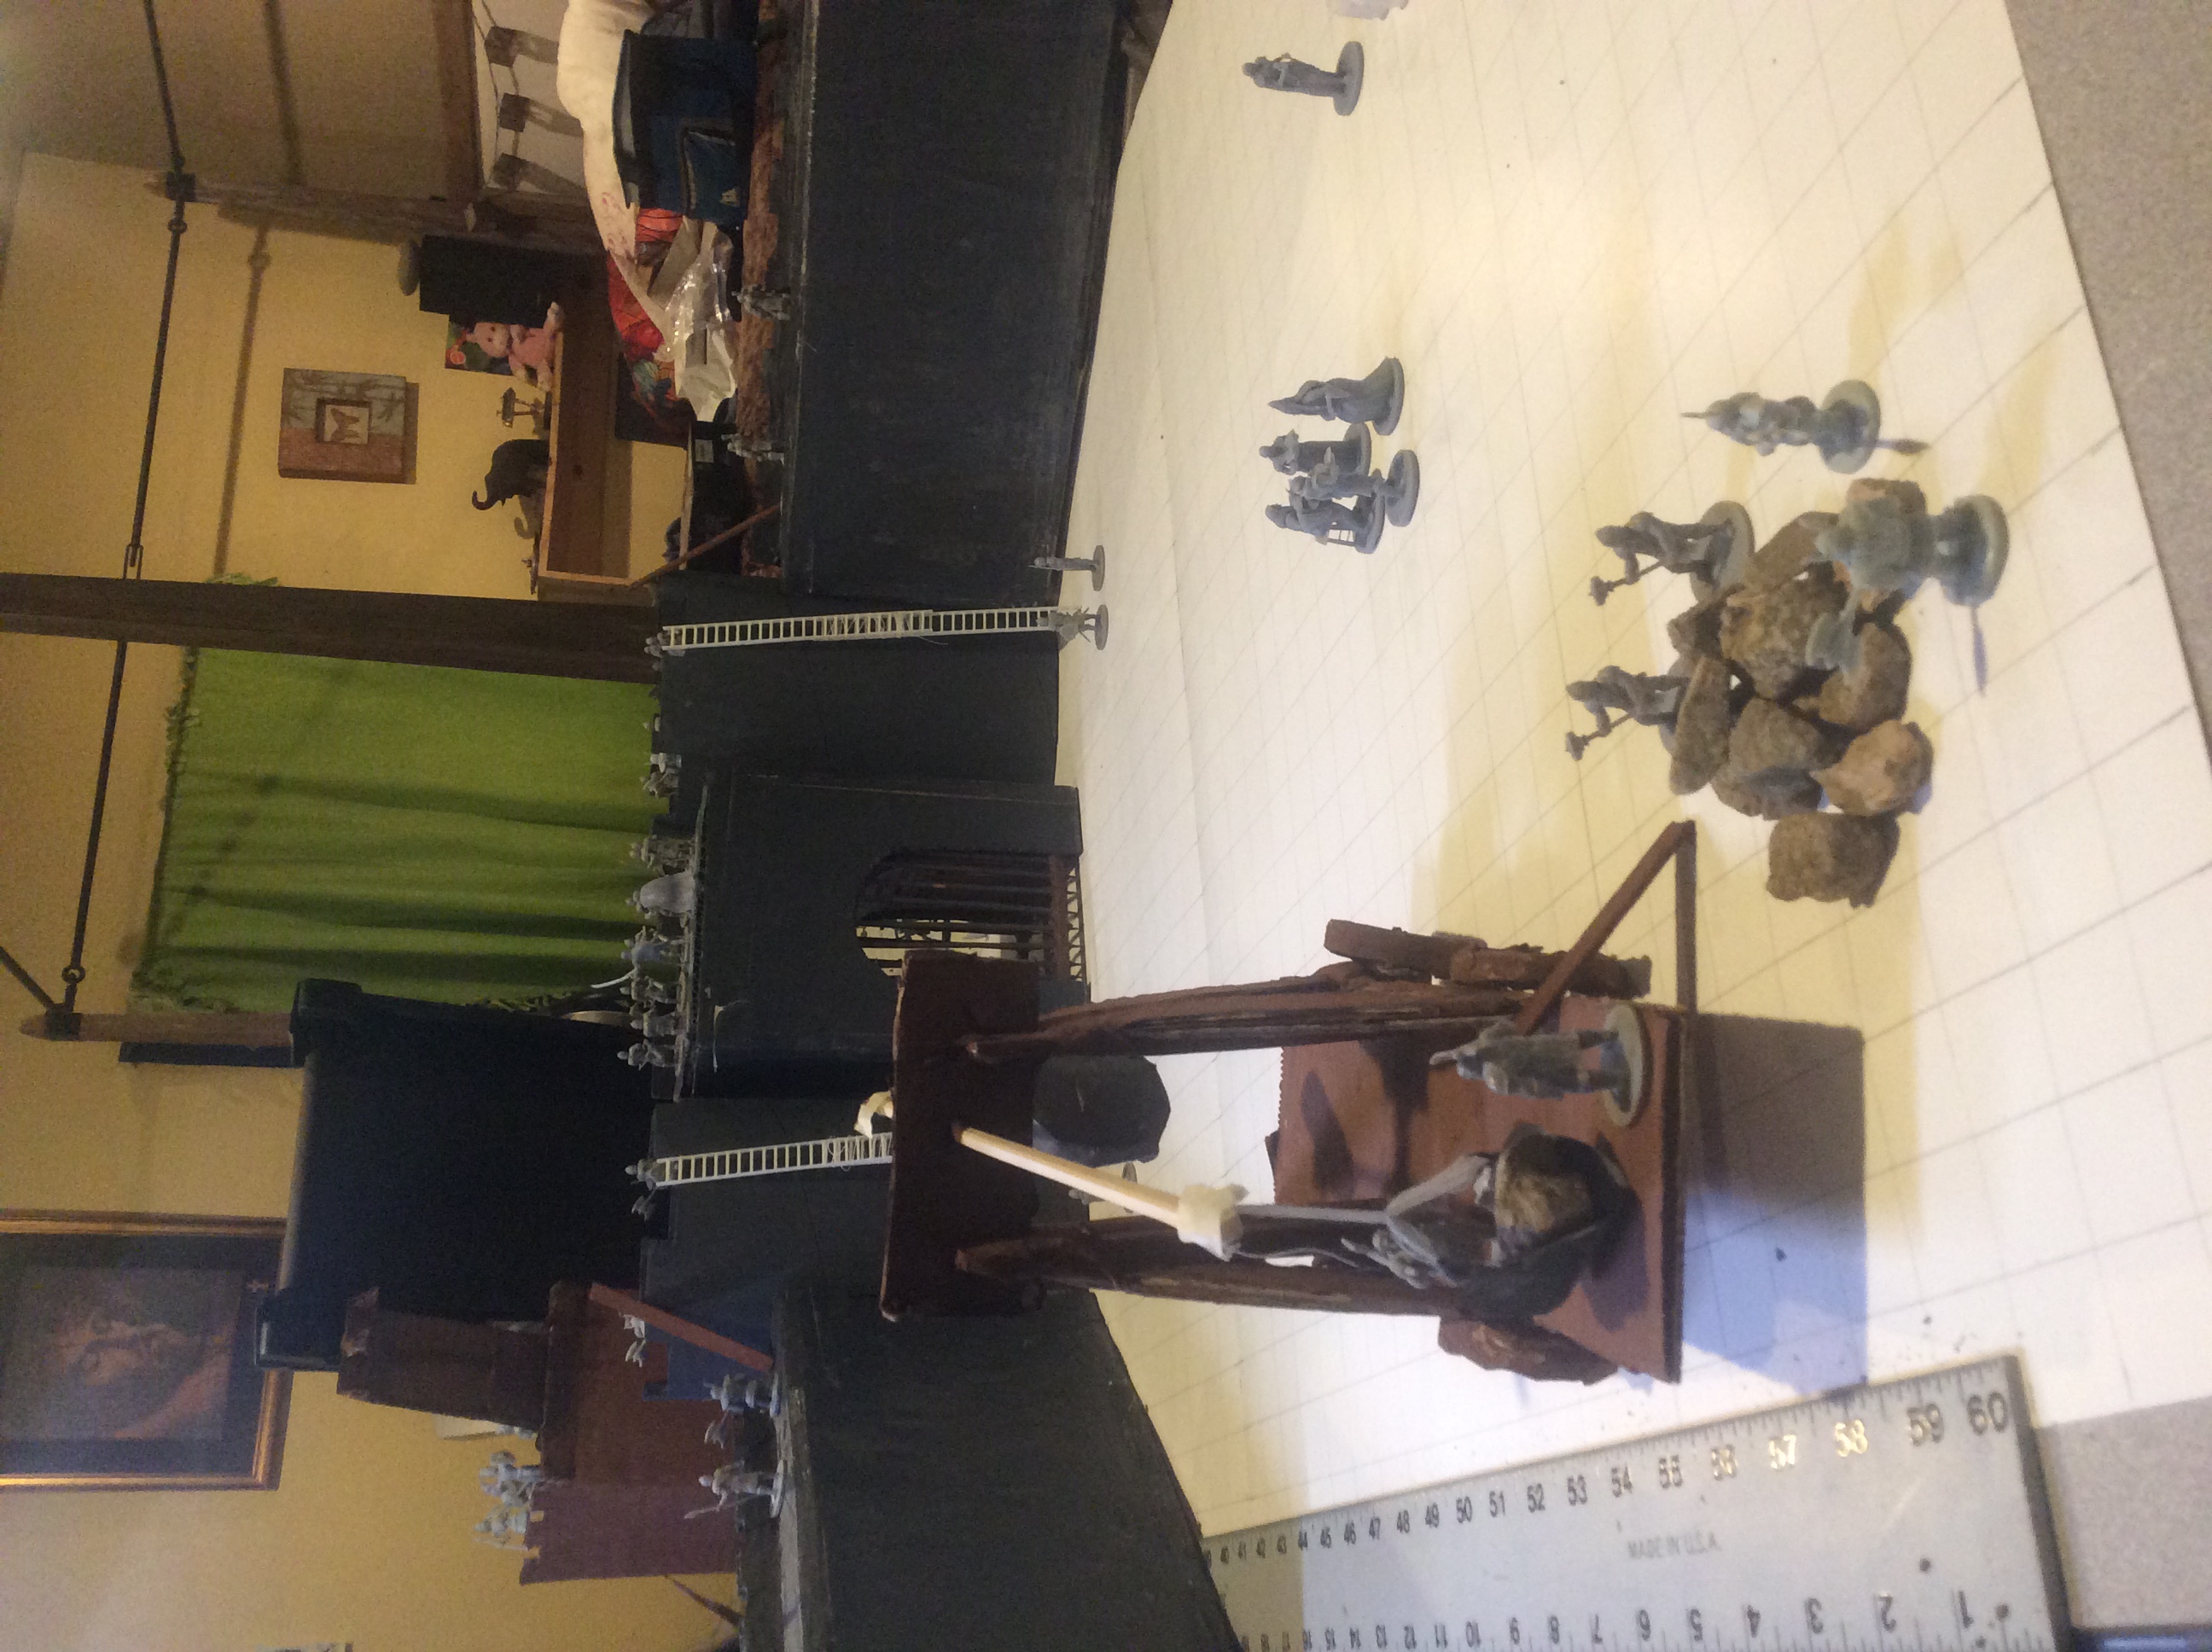
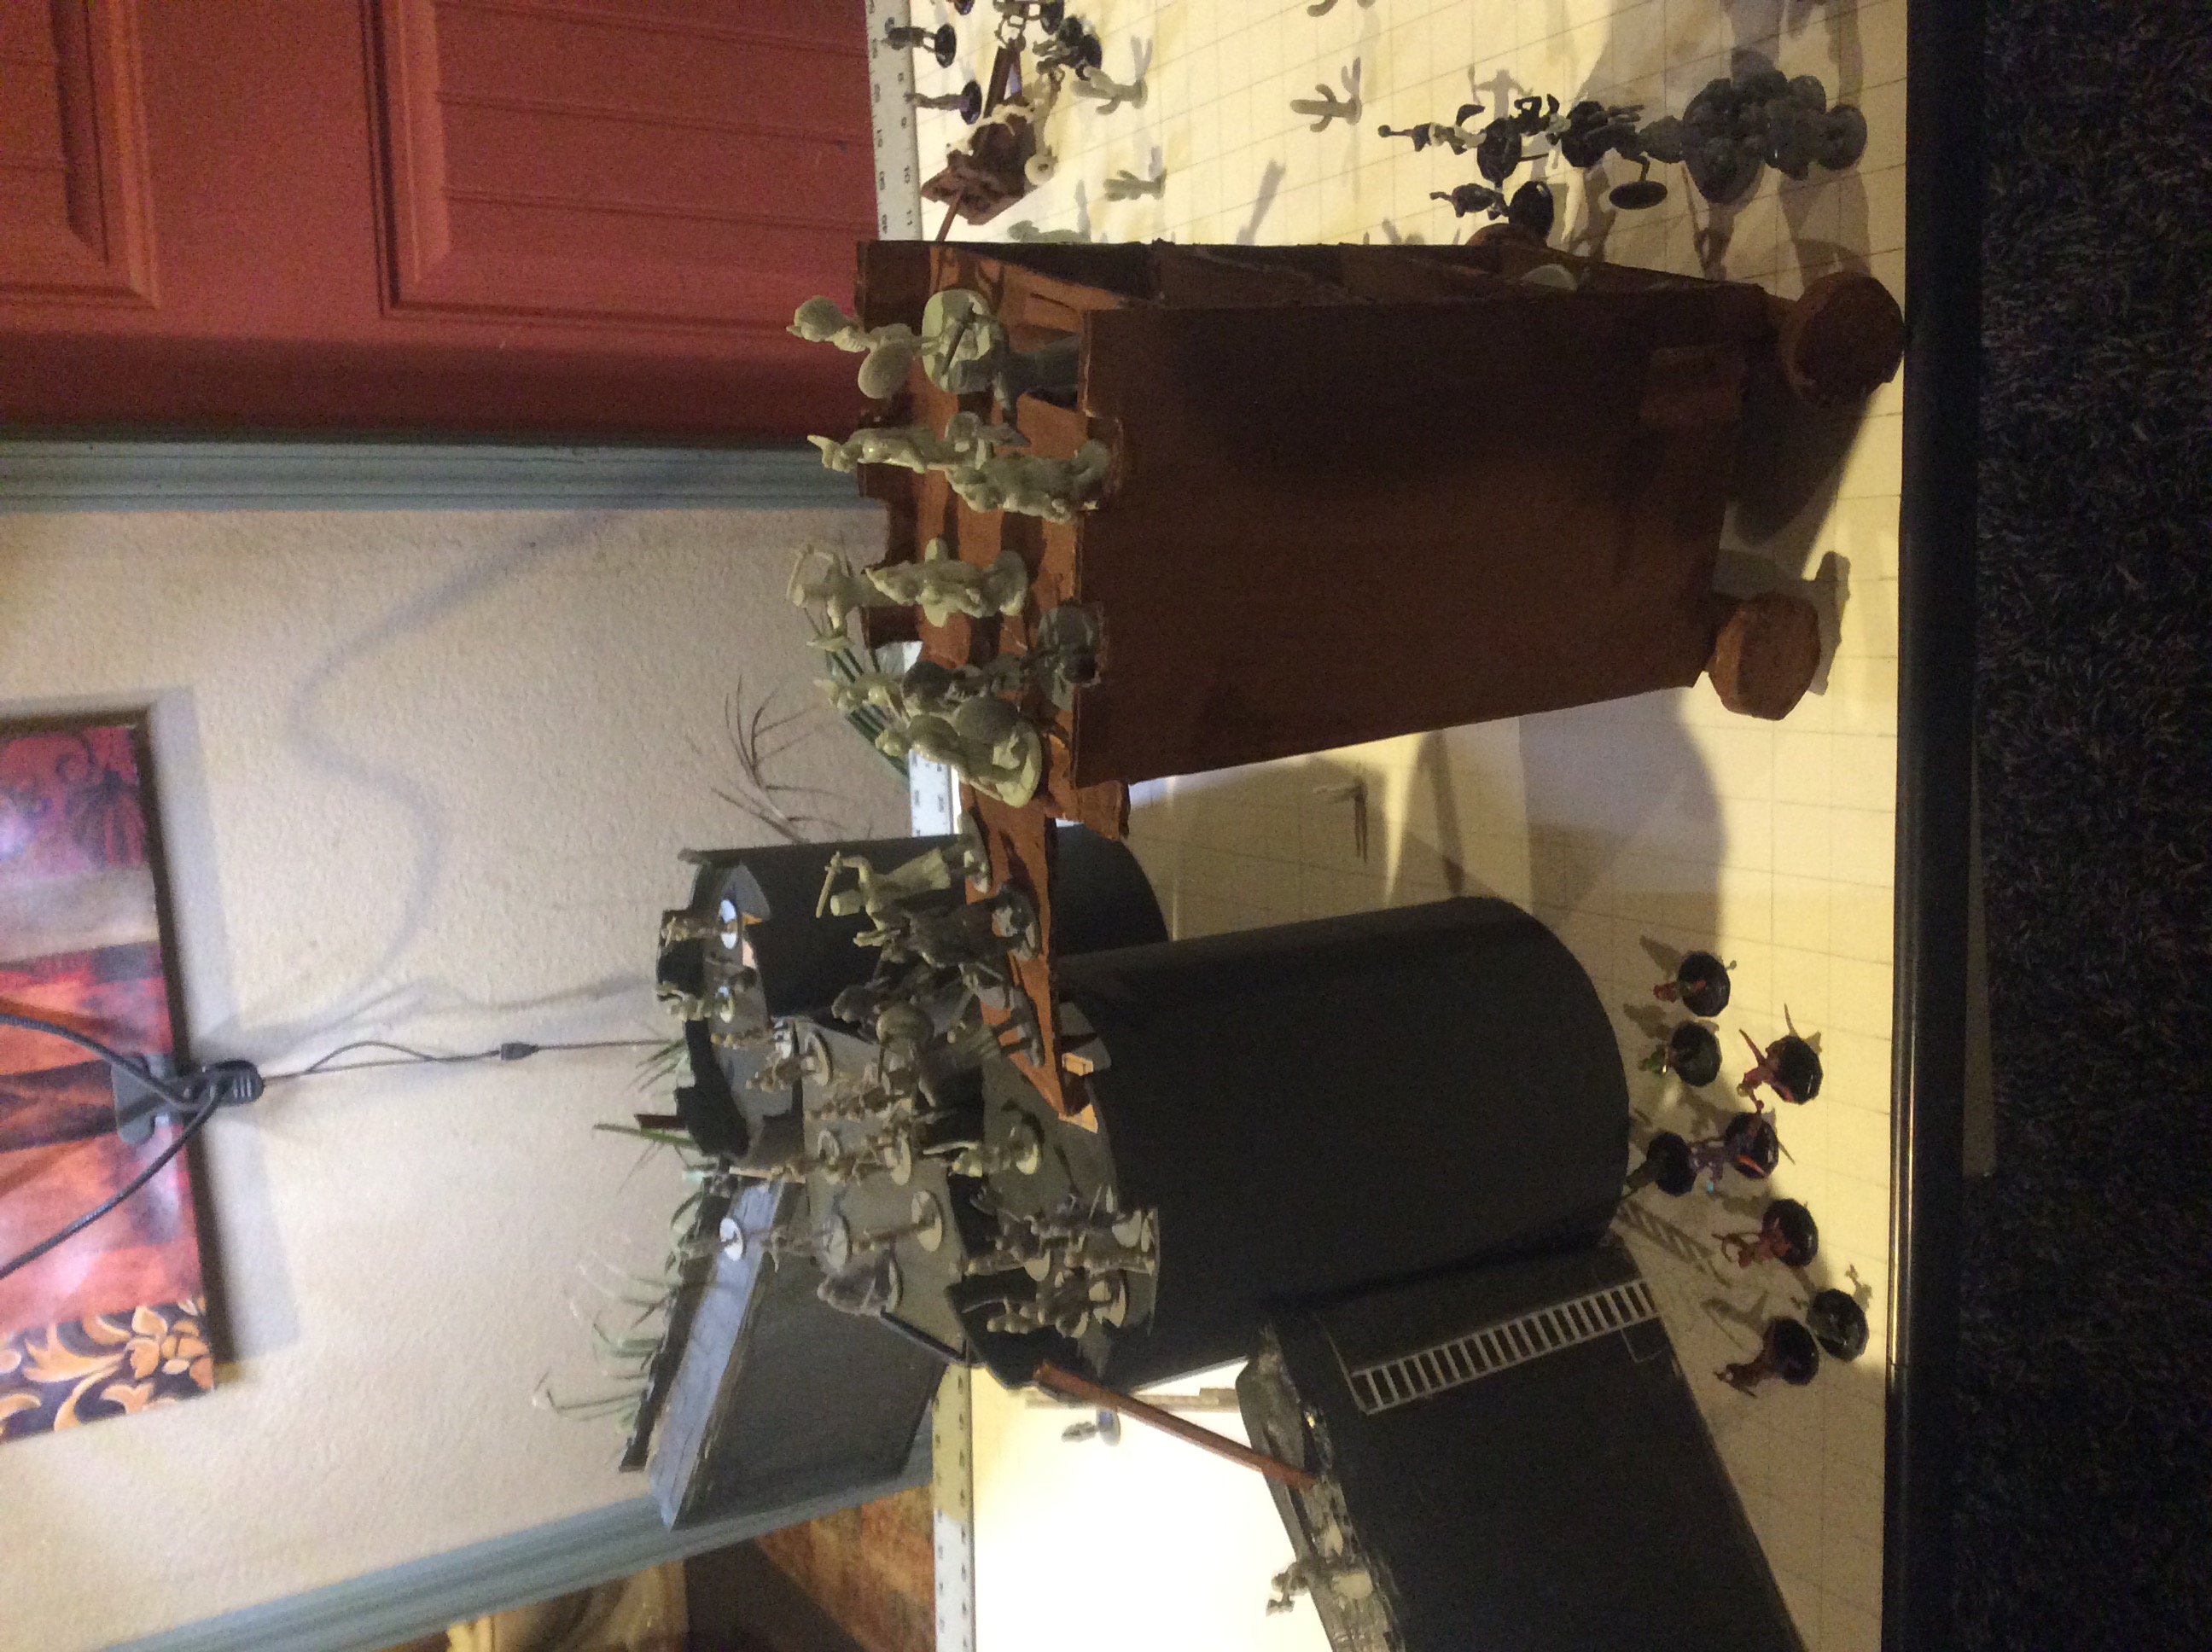
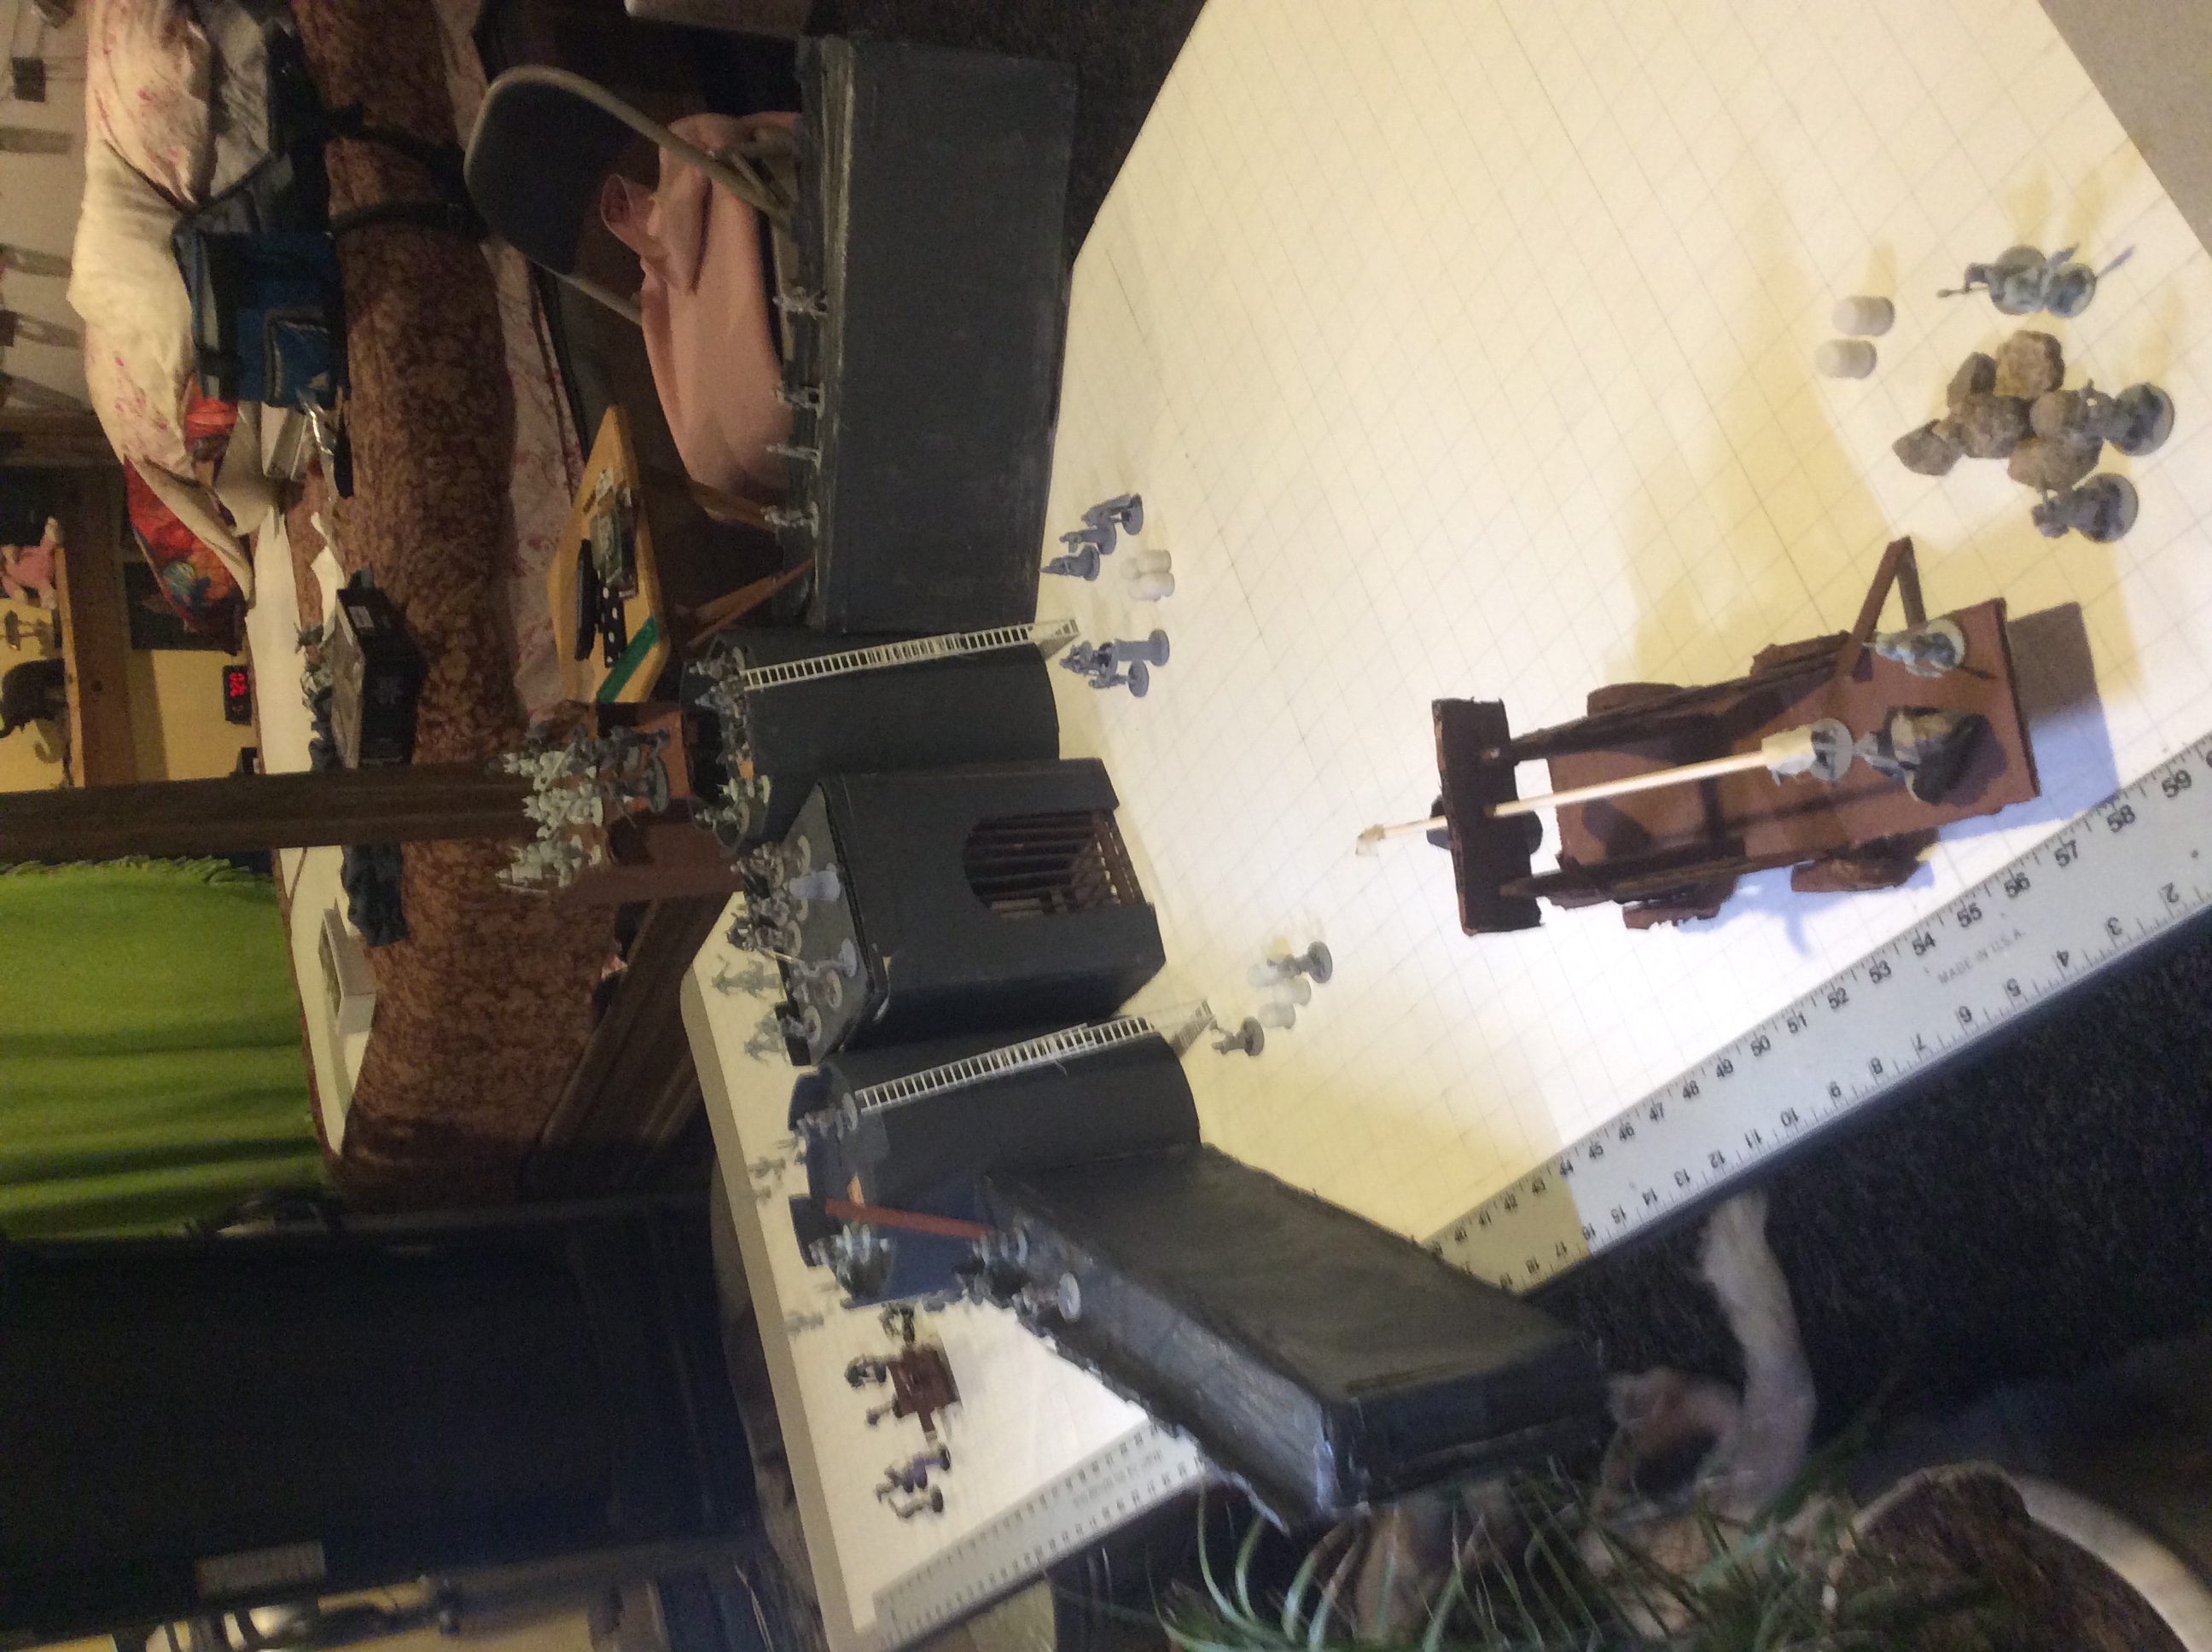
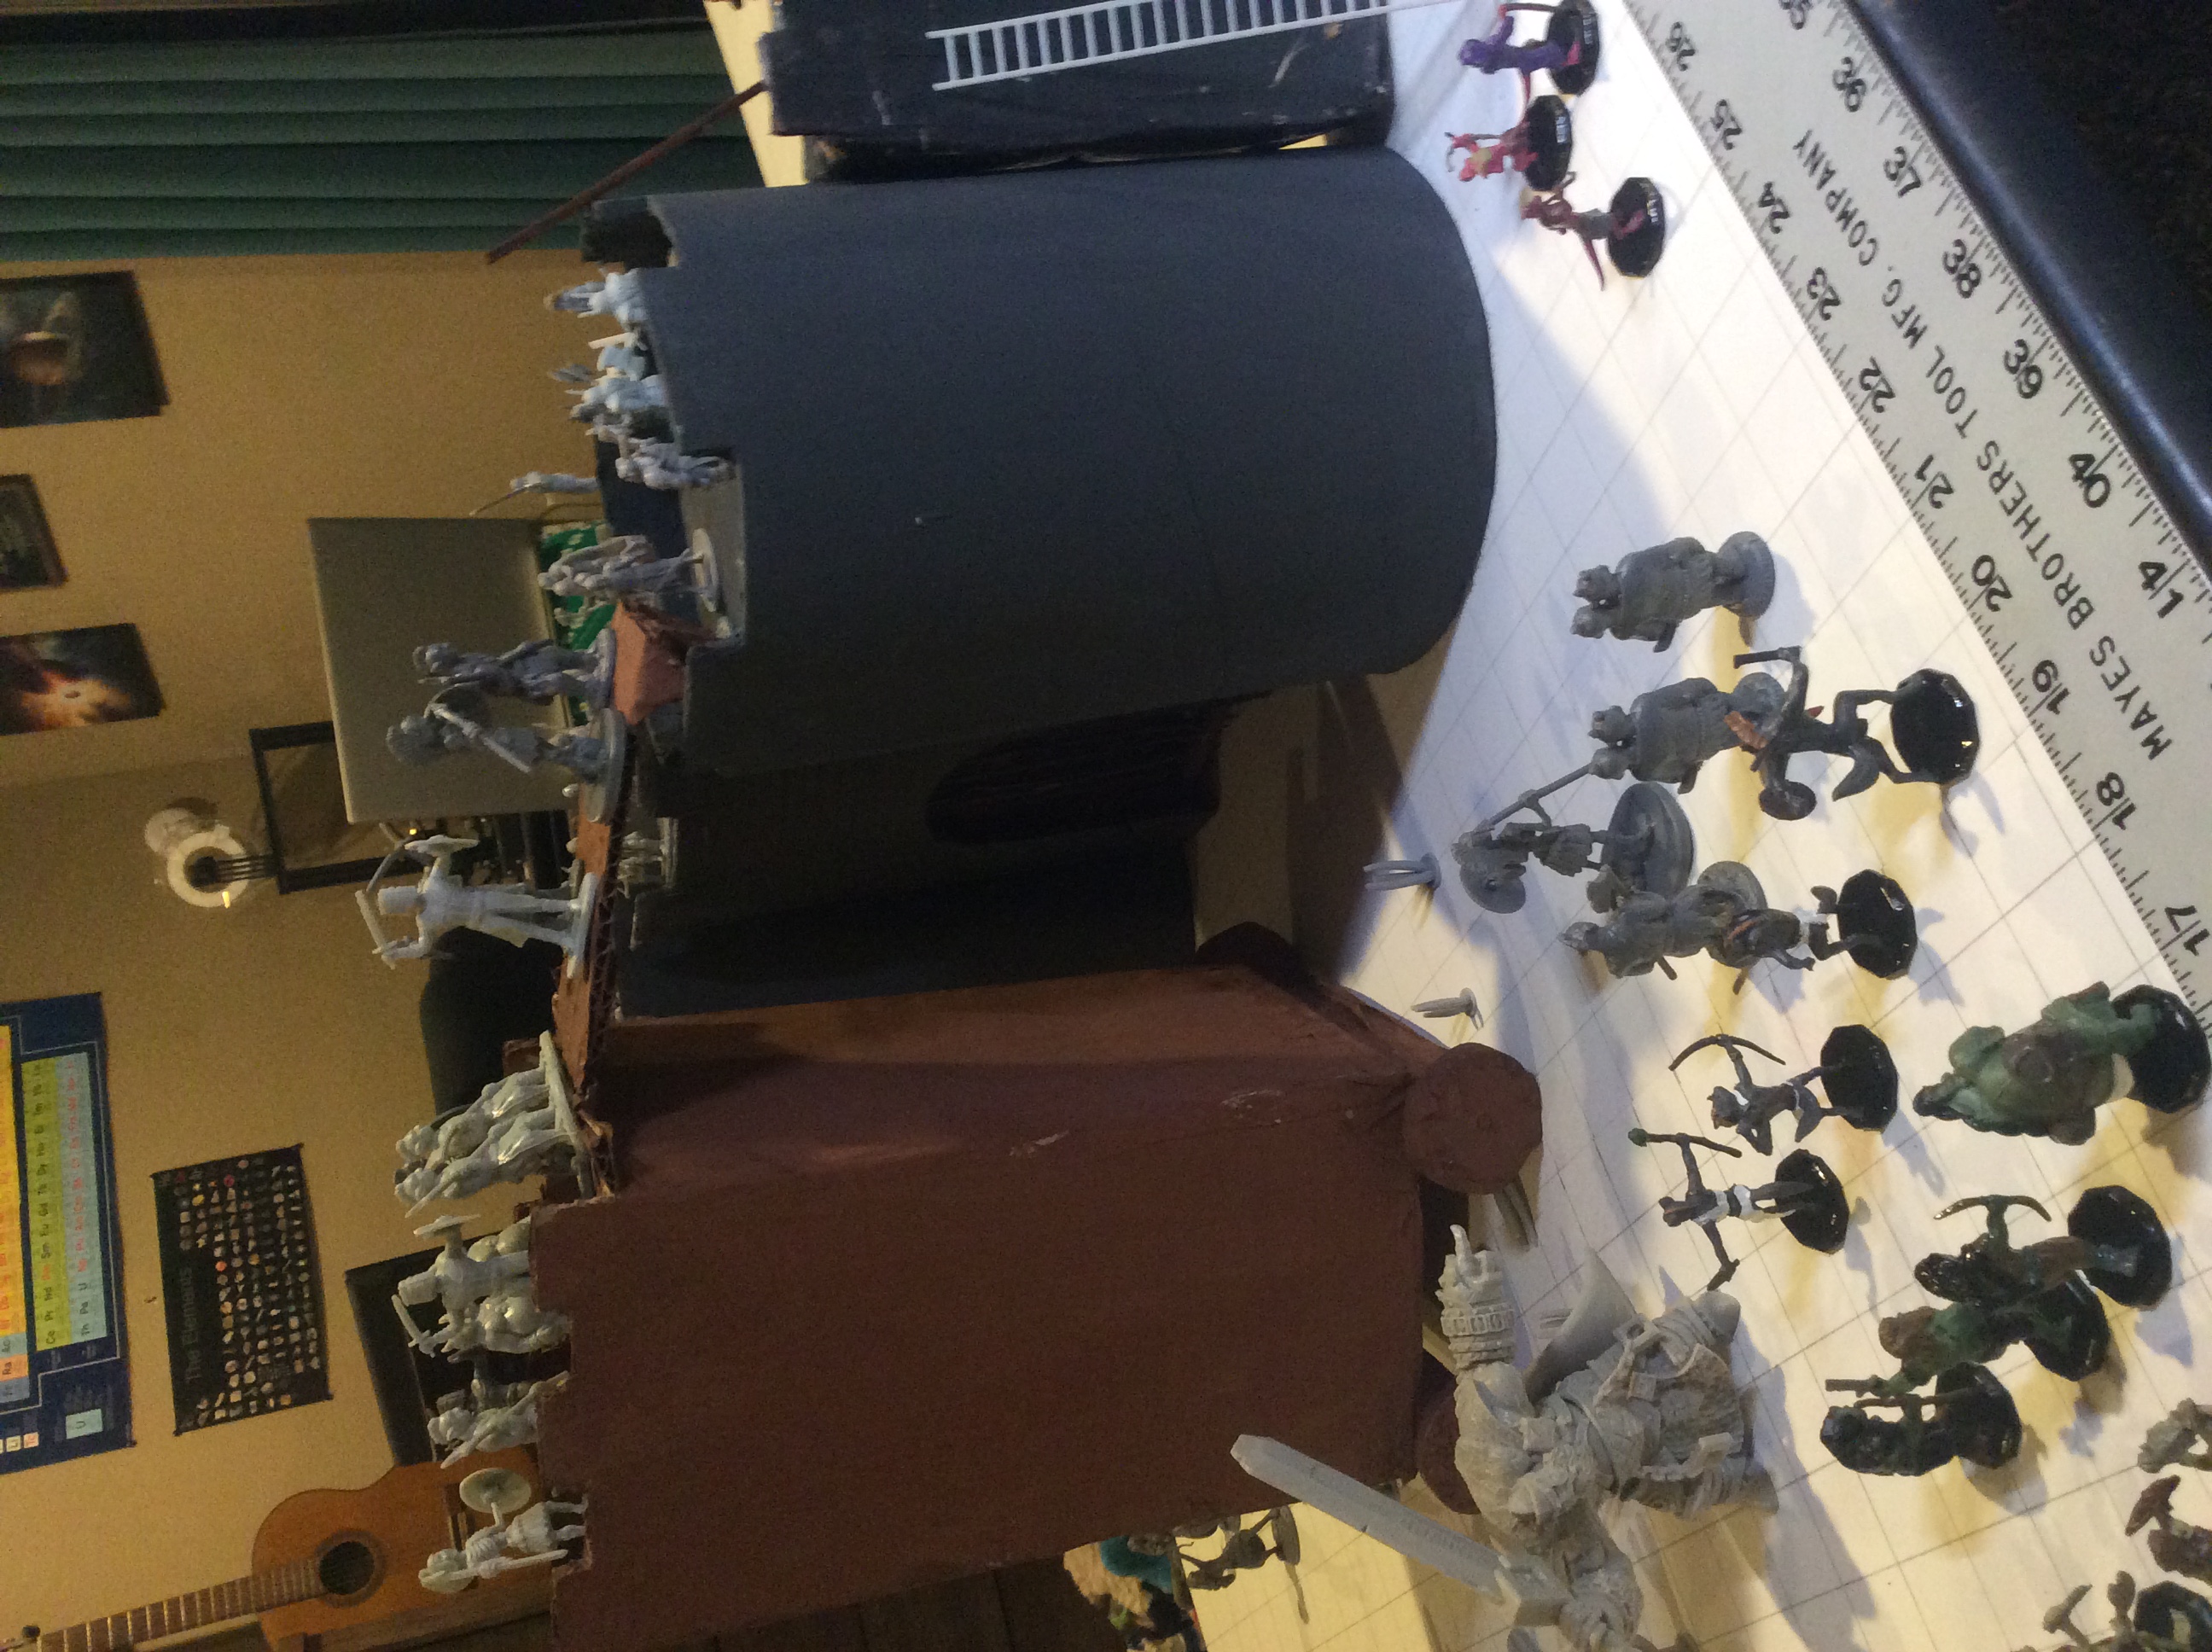
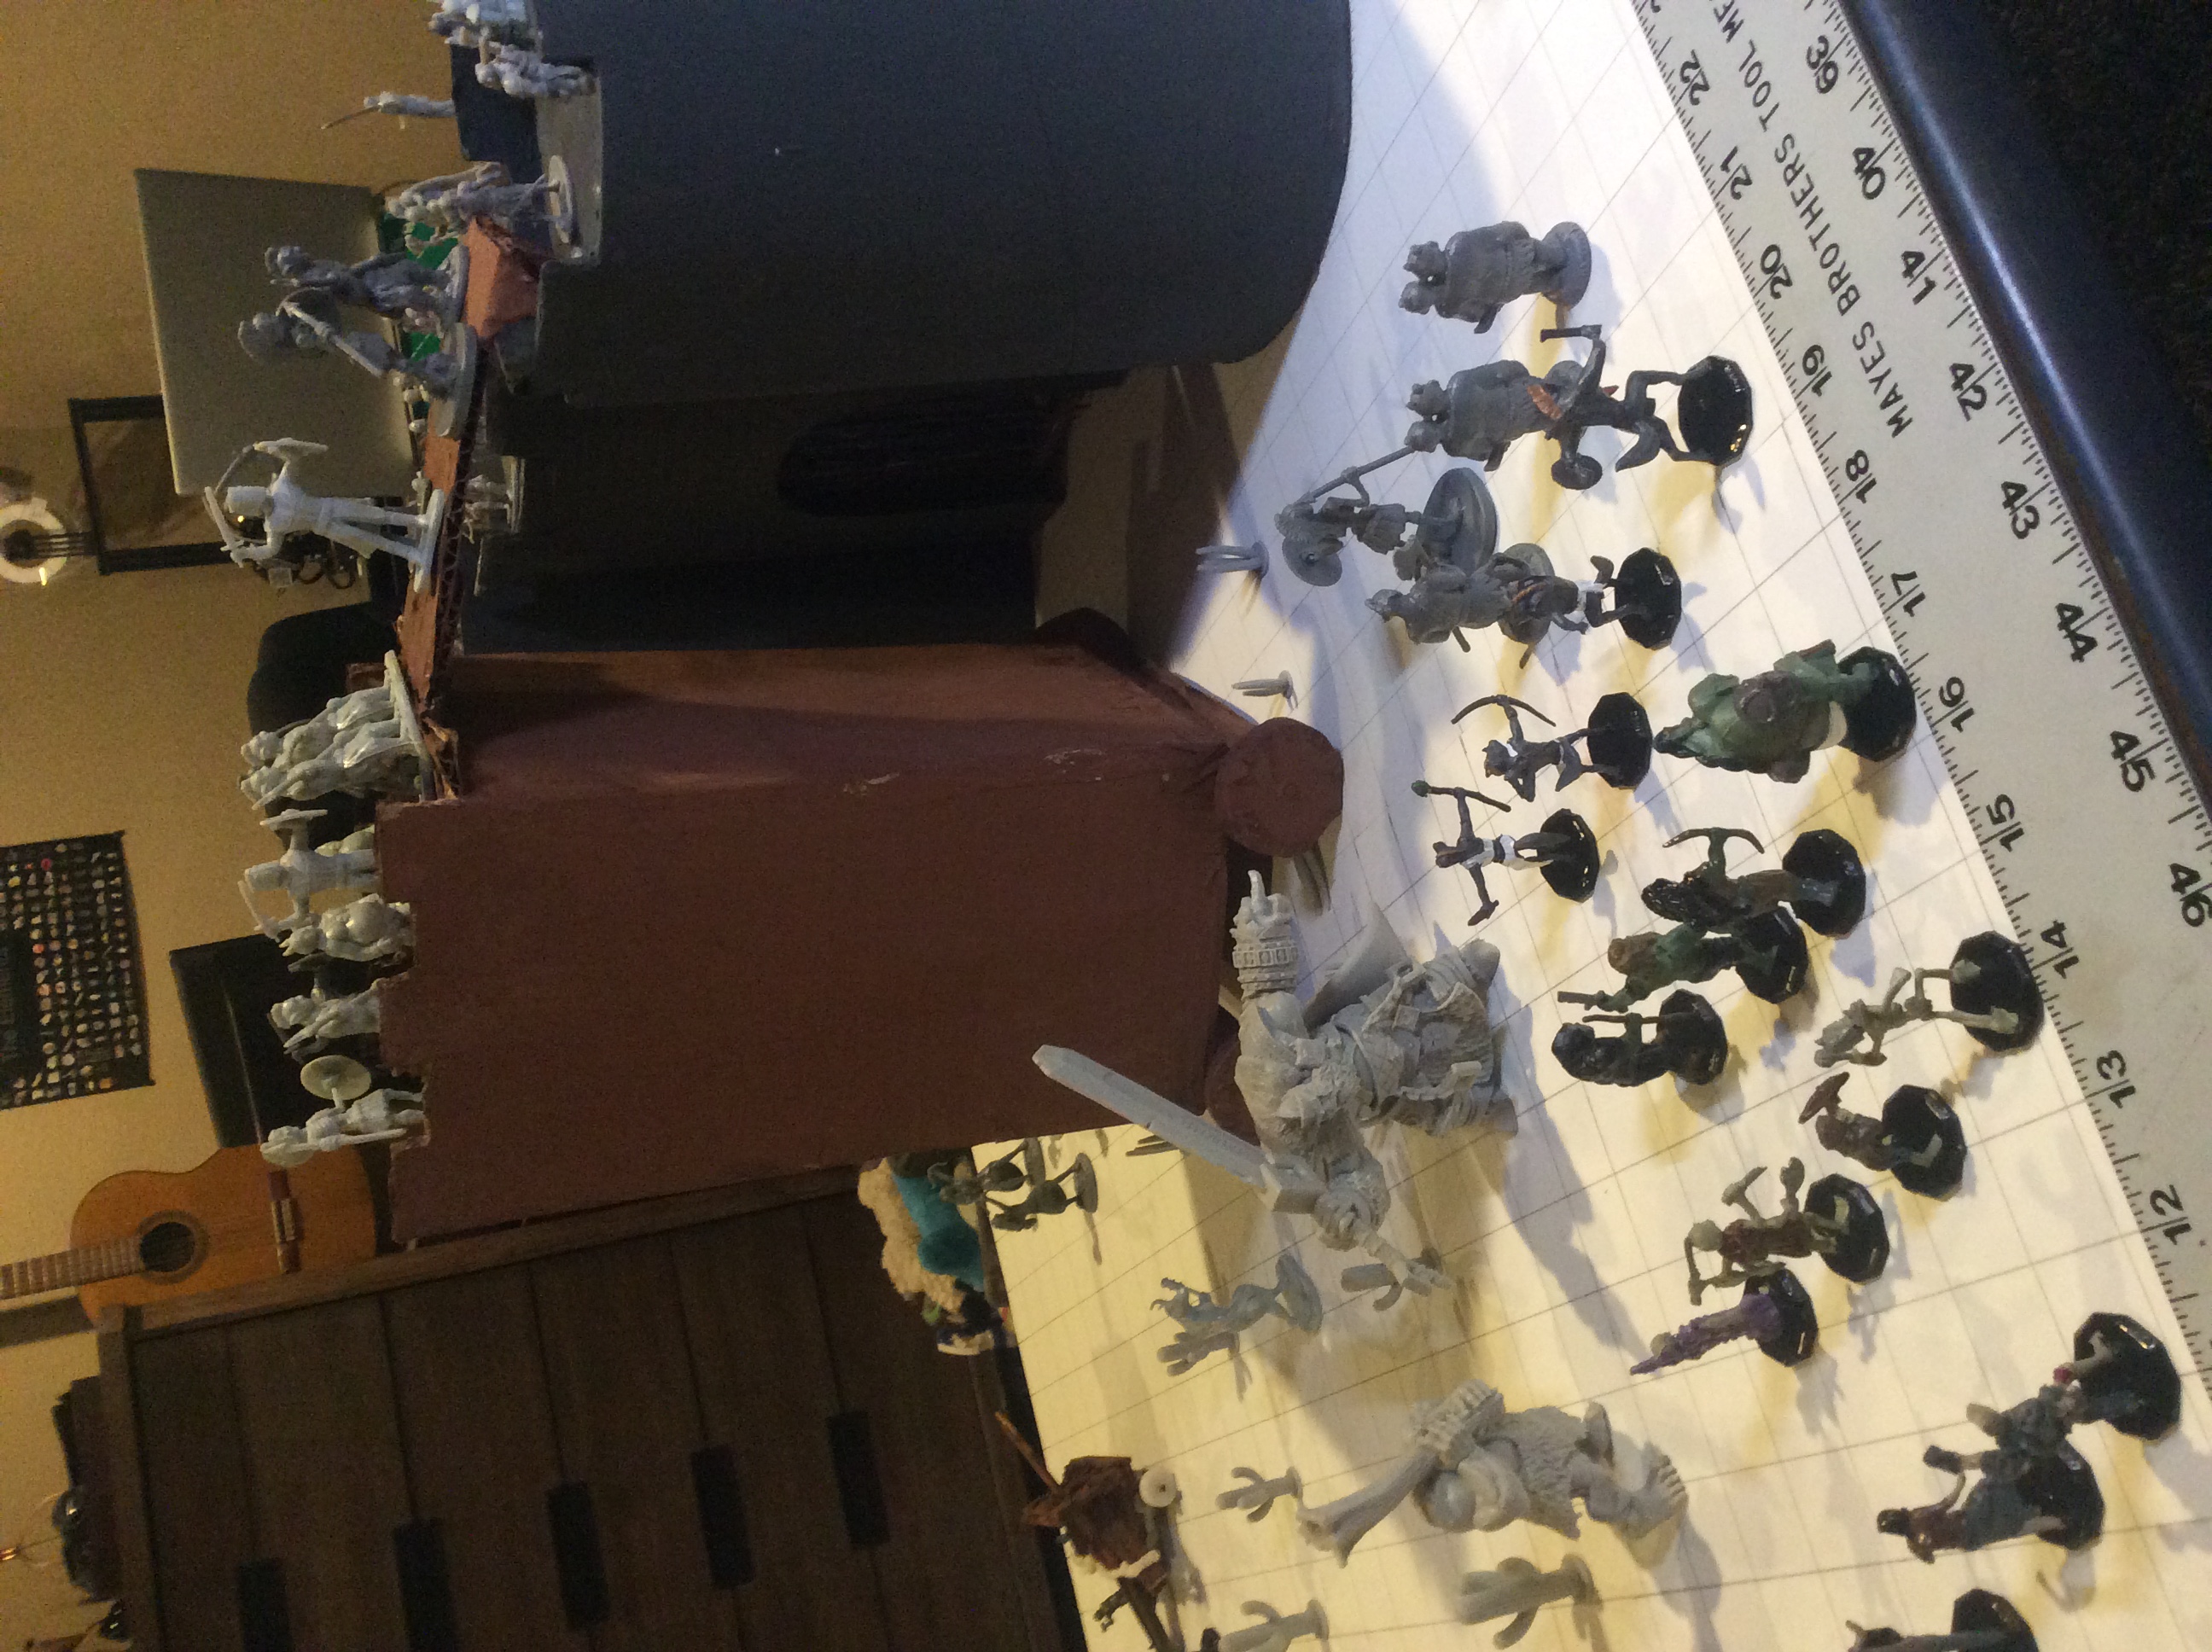
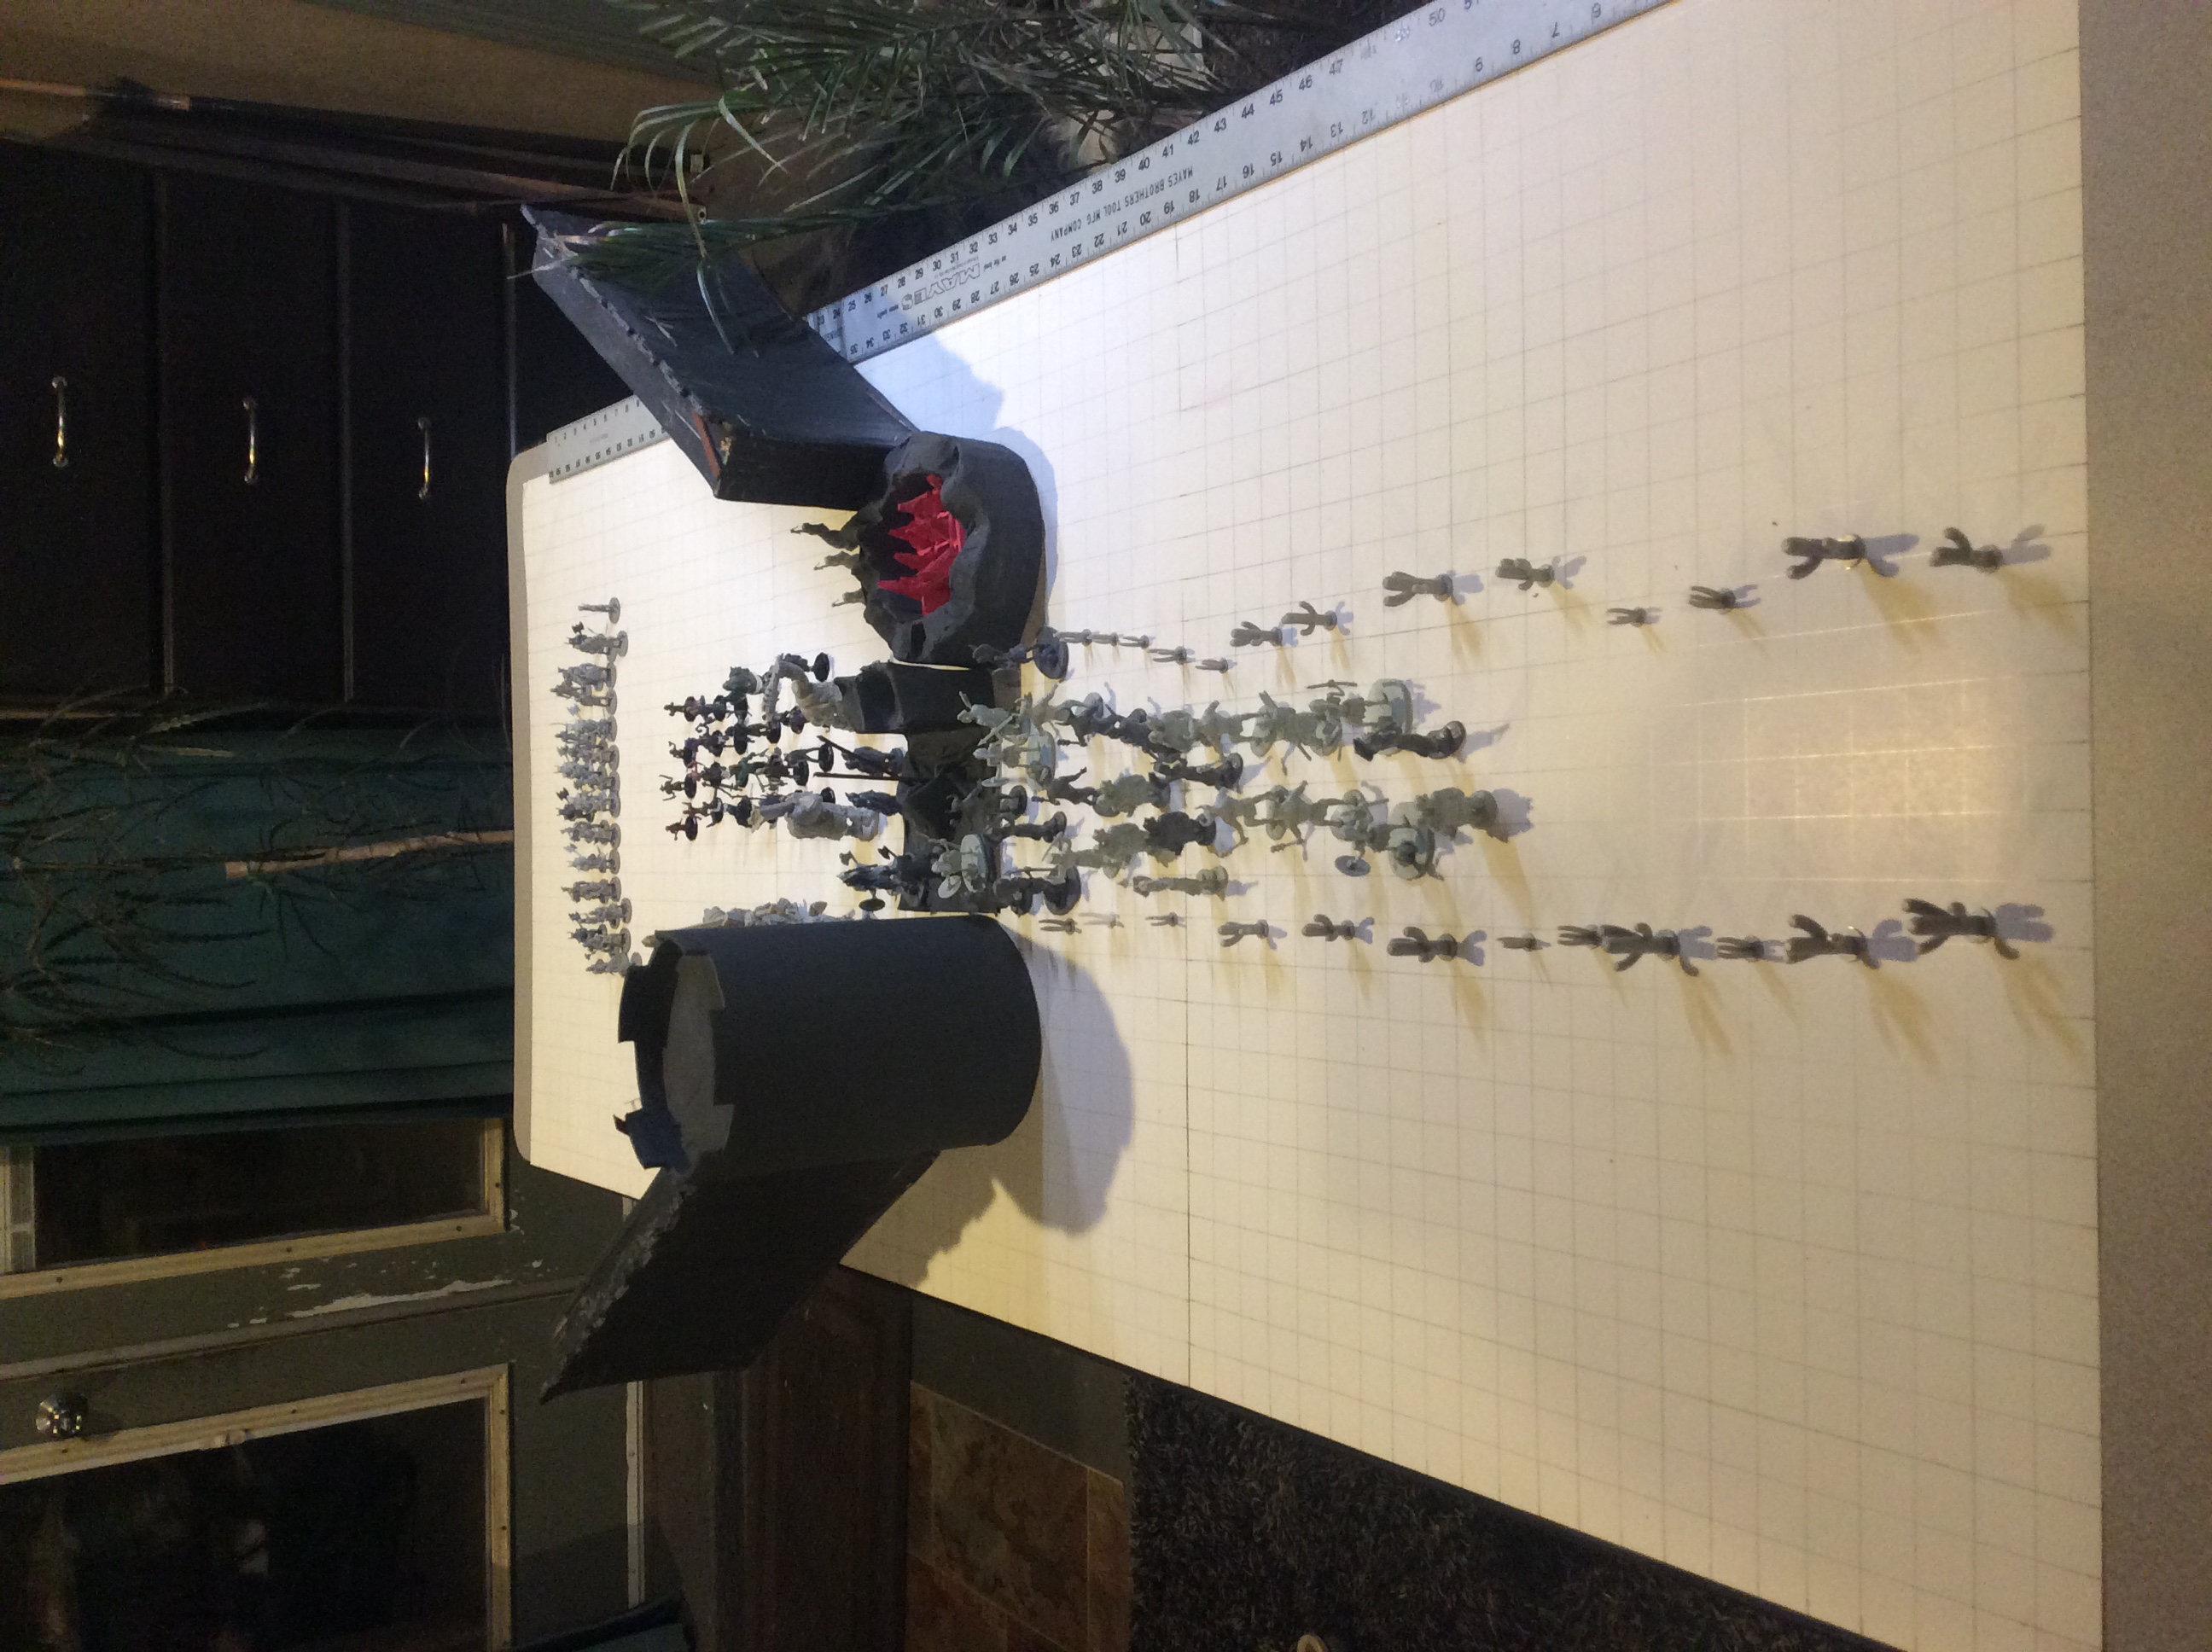
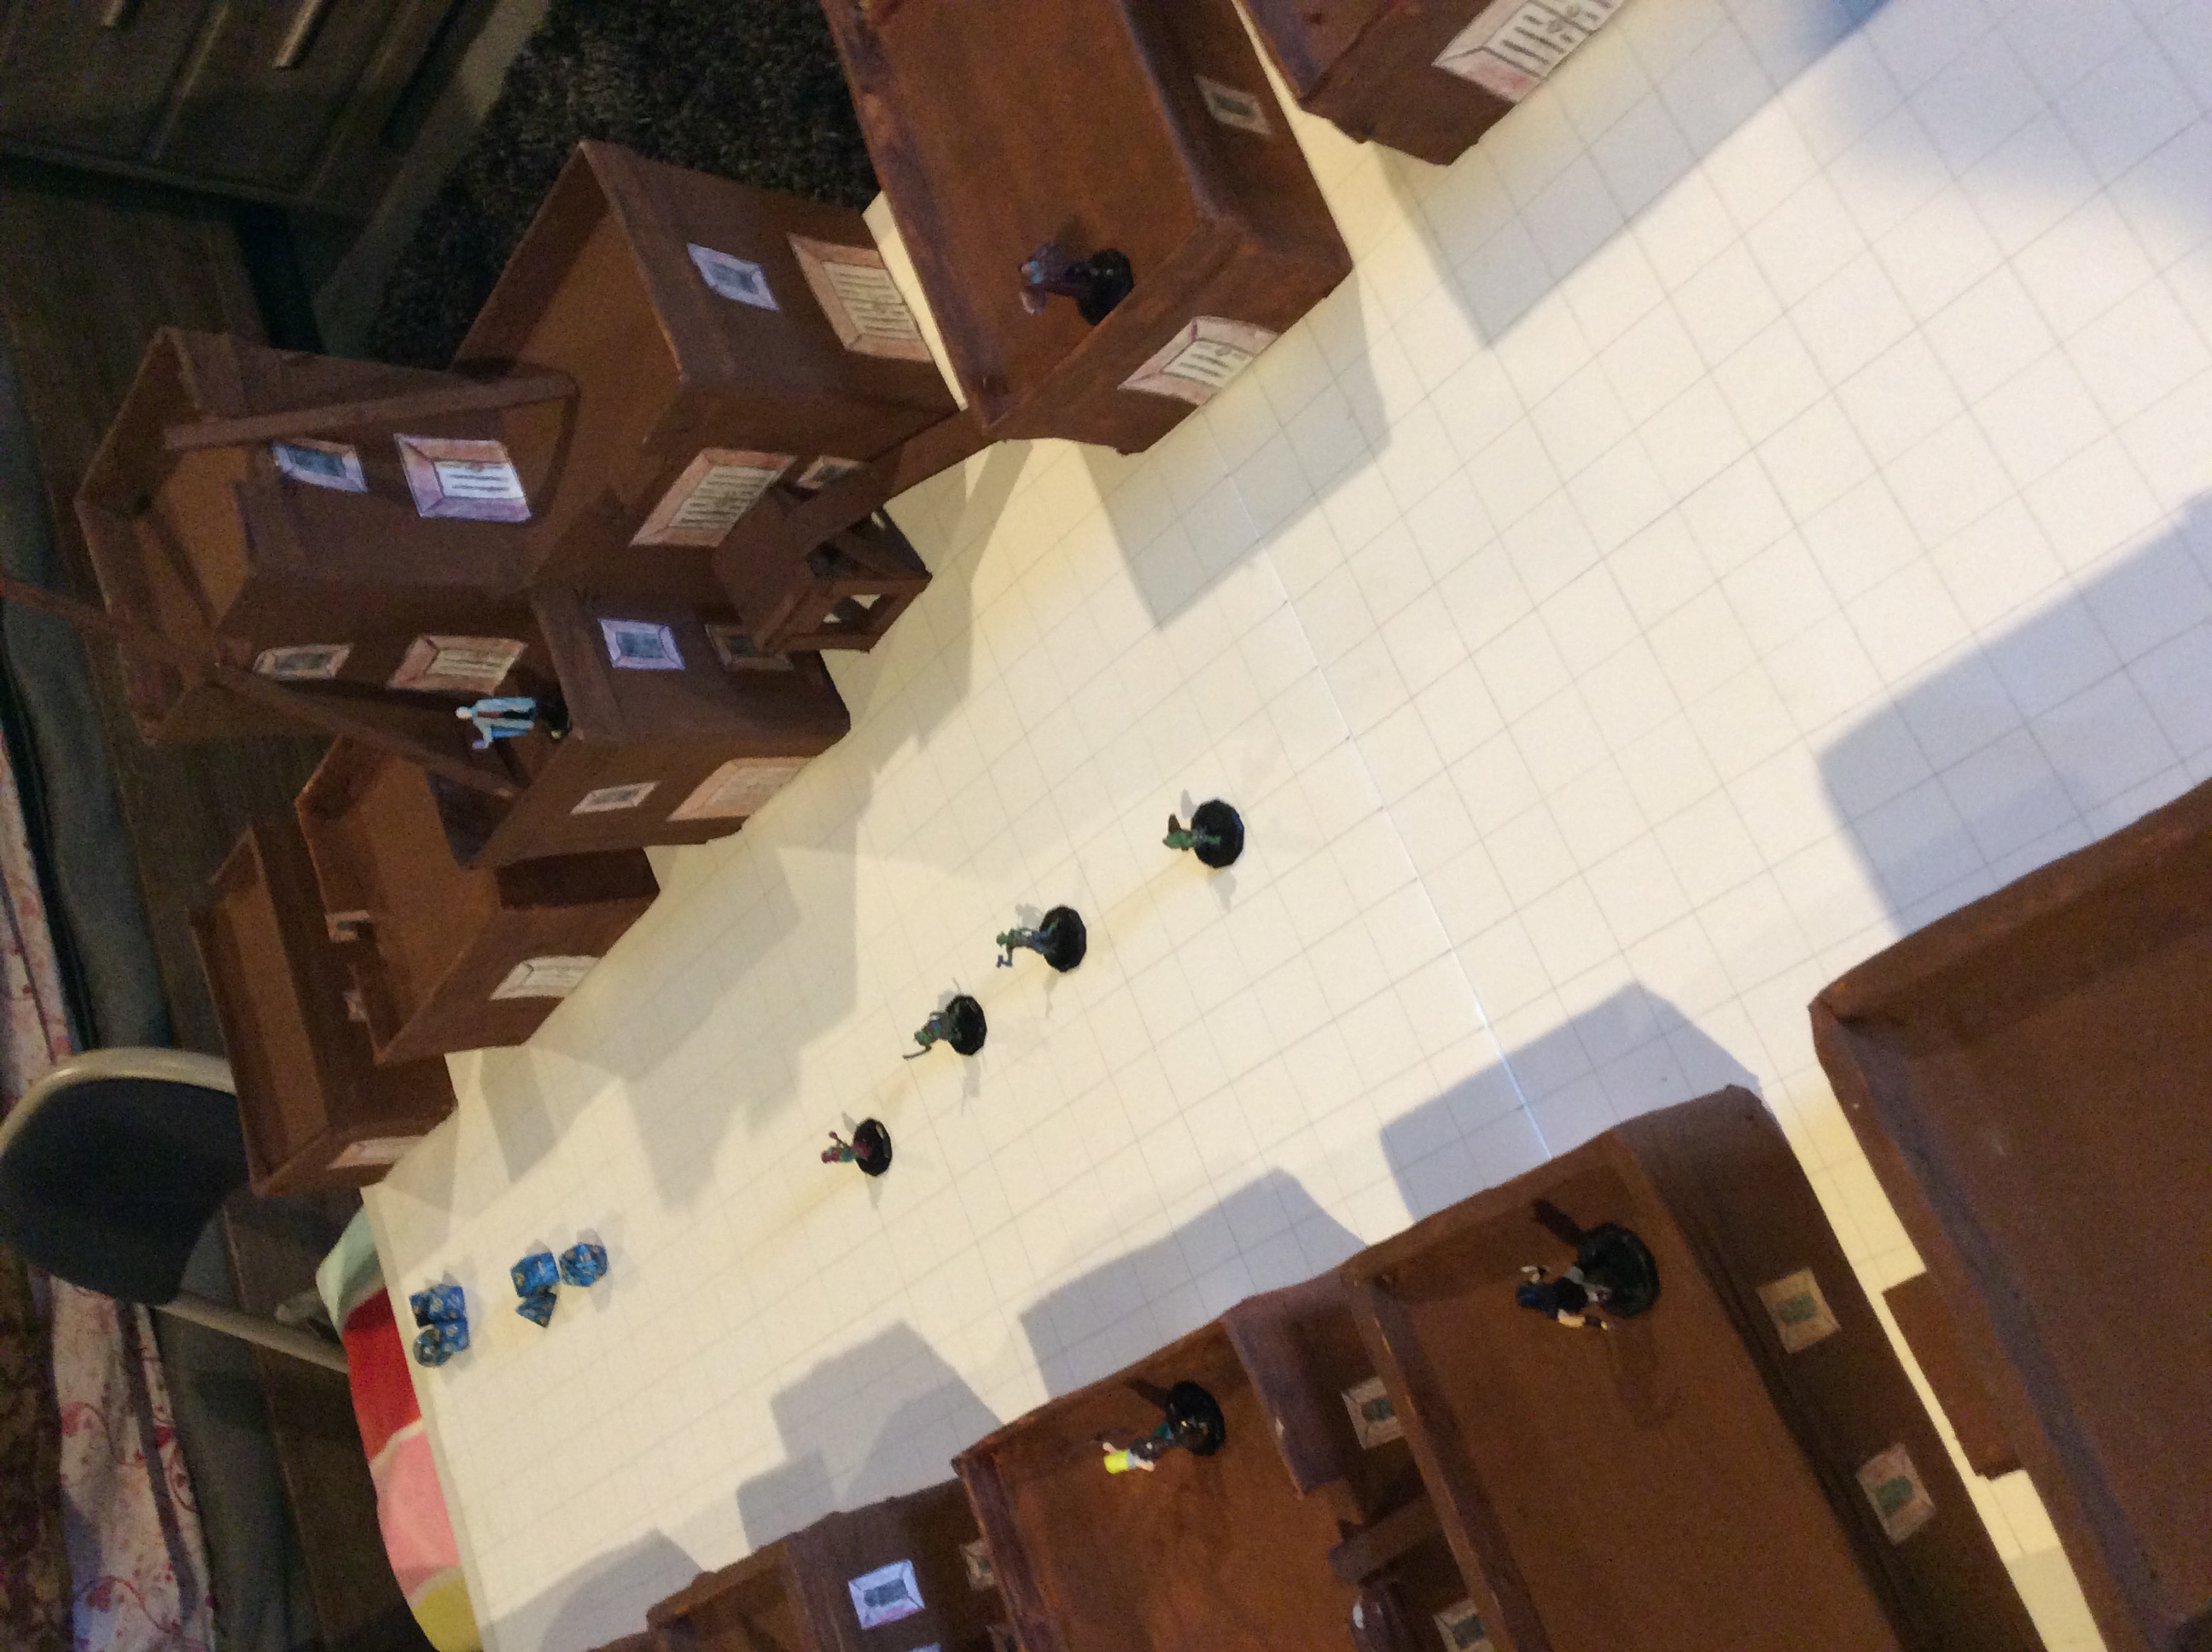
Here are soldiers marching through the Front Gate to fortify the main entrance. This didn't happen
at the battle at Kahar, but it was fun to set up and photograph. :)
Longest Day Encounters
The enemy is still trapped outside the gates but if the PCs are running around inside the fortress or even performing their
assigned duties they are likely to encounter others wandering inside the fortress. For every half hour the PCs travel, use
the following table to see who the PCs meet:
The latest news they will tell is that the enemy is flinging debris into the fortress and that everyone
should be careful.
b. The Fall of the Front Gate
Rhael the fire giant splits his gang in two. To assault the front gate, he keeps 3/5 of the goblinoid
forces and he sends the other 2/5 to assault the Rear Gate. Out of ten siege towers, only 8 are able to attack,
4 go to the front gate and the other 4 go to the attack the rear gate.
In the span of forty minutes, Rhael the fire Giant has his forces attack Tower 1, Tower 9, and the Front Gate.
Rhael's goblinoid forces will lose three siege towers and over 30 goblinoid soldiers will be killed or wounded,
but his sappers are able to tunnel under Tower 9. And then the
Second Treachery occurs:
The Lieutenant of Tower 9 signals for help to stop the sappers, and help comes. Lord Kyrakis Braek and the
Ecclesiastic Brigade 36 soldiers strong, many wielding divine powers and religious spells, are dispatched over the walls
to stop the sappers and end the threat to Tower 9. What few know is that Lord Braek is one of four noble commanders
that is under Khalista's spell. Having been caught in deceitful webs of opportunity and overcome with avarice, these
nobles have been cast under a powerful charm that makes them servants to Khalista. She orders them
to betray the Kingdom of Goldenshield. In this case, Lord Braek does nothing, which allows Rhael to command
his three magmin to start a blazing fire Furthermore, Khalista uses her magic to fuel the fire
until it blazes so hot that it causes a breach to the Elemental Plane of Fire. The fire consumes Tower 9 and
it collapses in on itself and a river of lava runs north to the lake. Rhael the Fire Giant climbs on top of the Front Gate House, and pulls
apart the burning pieces and feeds them to the fire in the stones of Tower 9.
It is another 20 min
before the goblins can get through the fire at the Gate House, at least, enough to clear the wreackage and open a path.
Along with the fact that the ruins of Tower 9 are, from here on out, in a continual fiery blaze and leaking lava continuously,
the Front Gate House is gone with only a few steel beams and an a small pile of rubble to show where it might have stood.
The Fire Giant and the Hill Giants jump over the wreckage and scatter the defense and the goblinoids are able to force an opening
and get through the ruins of the Gate House. From here on out, anyone in any of the hamlets or inside the fortress, can
be under attack by goblins, hobgoblins, or worse.
Of course, not including the hobgoblin commanders, bugbear hill
giant bodyguards, and countless goblins, and only counting the Fire Giant and his two Hill Giants, this place is a deadly encounter
to any lower level PCs, even for a level 9 party of 4 this is still a deadly encounter, so the DM should lead any PCs that happen
to be hanging around the Front Gate away from this area by having NPCs in command direct them.
The Sun is down
so bright light gives way to dim light in the course of forty minutes, dim light will linger another forty minutes
getting darker and darker until nightfall is complete and darkness covers everything.
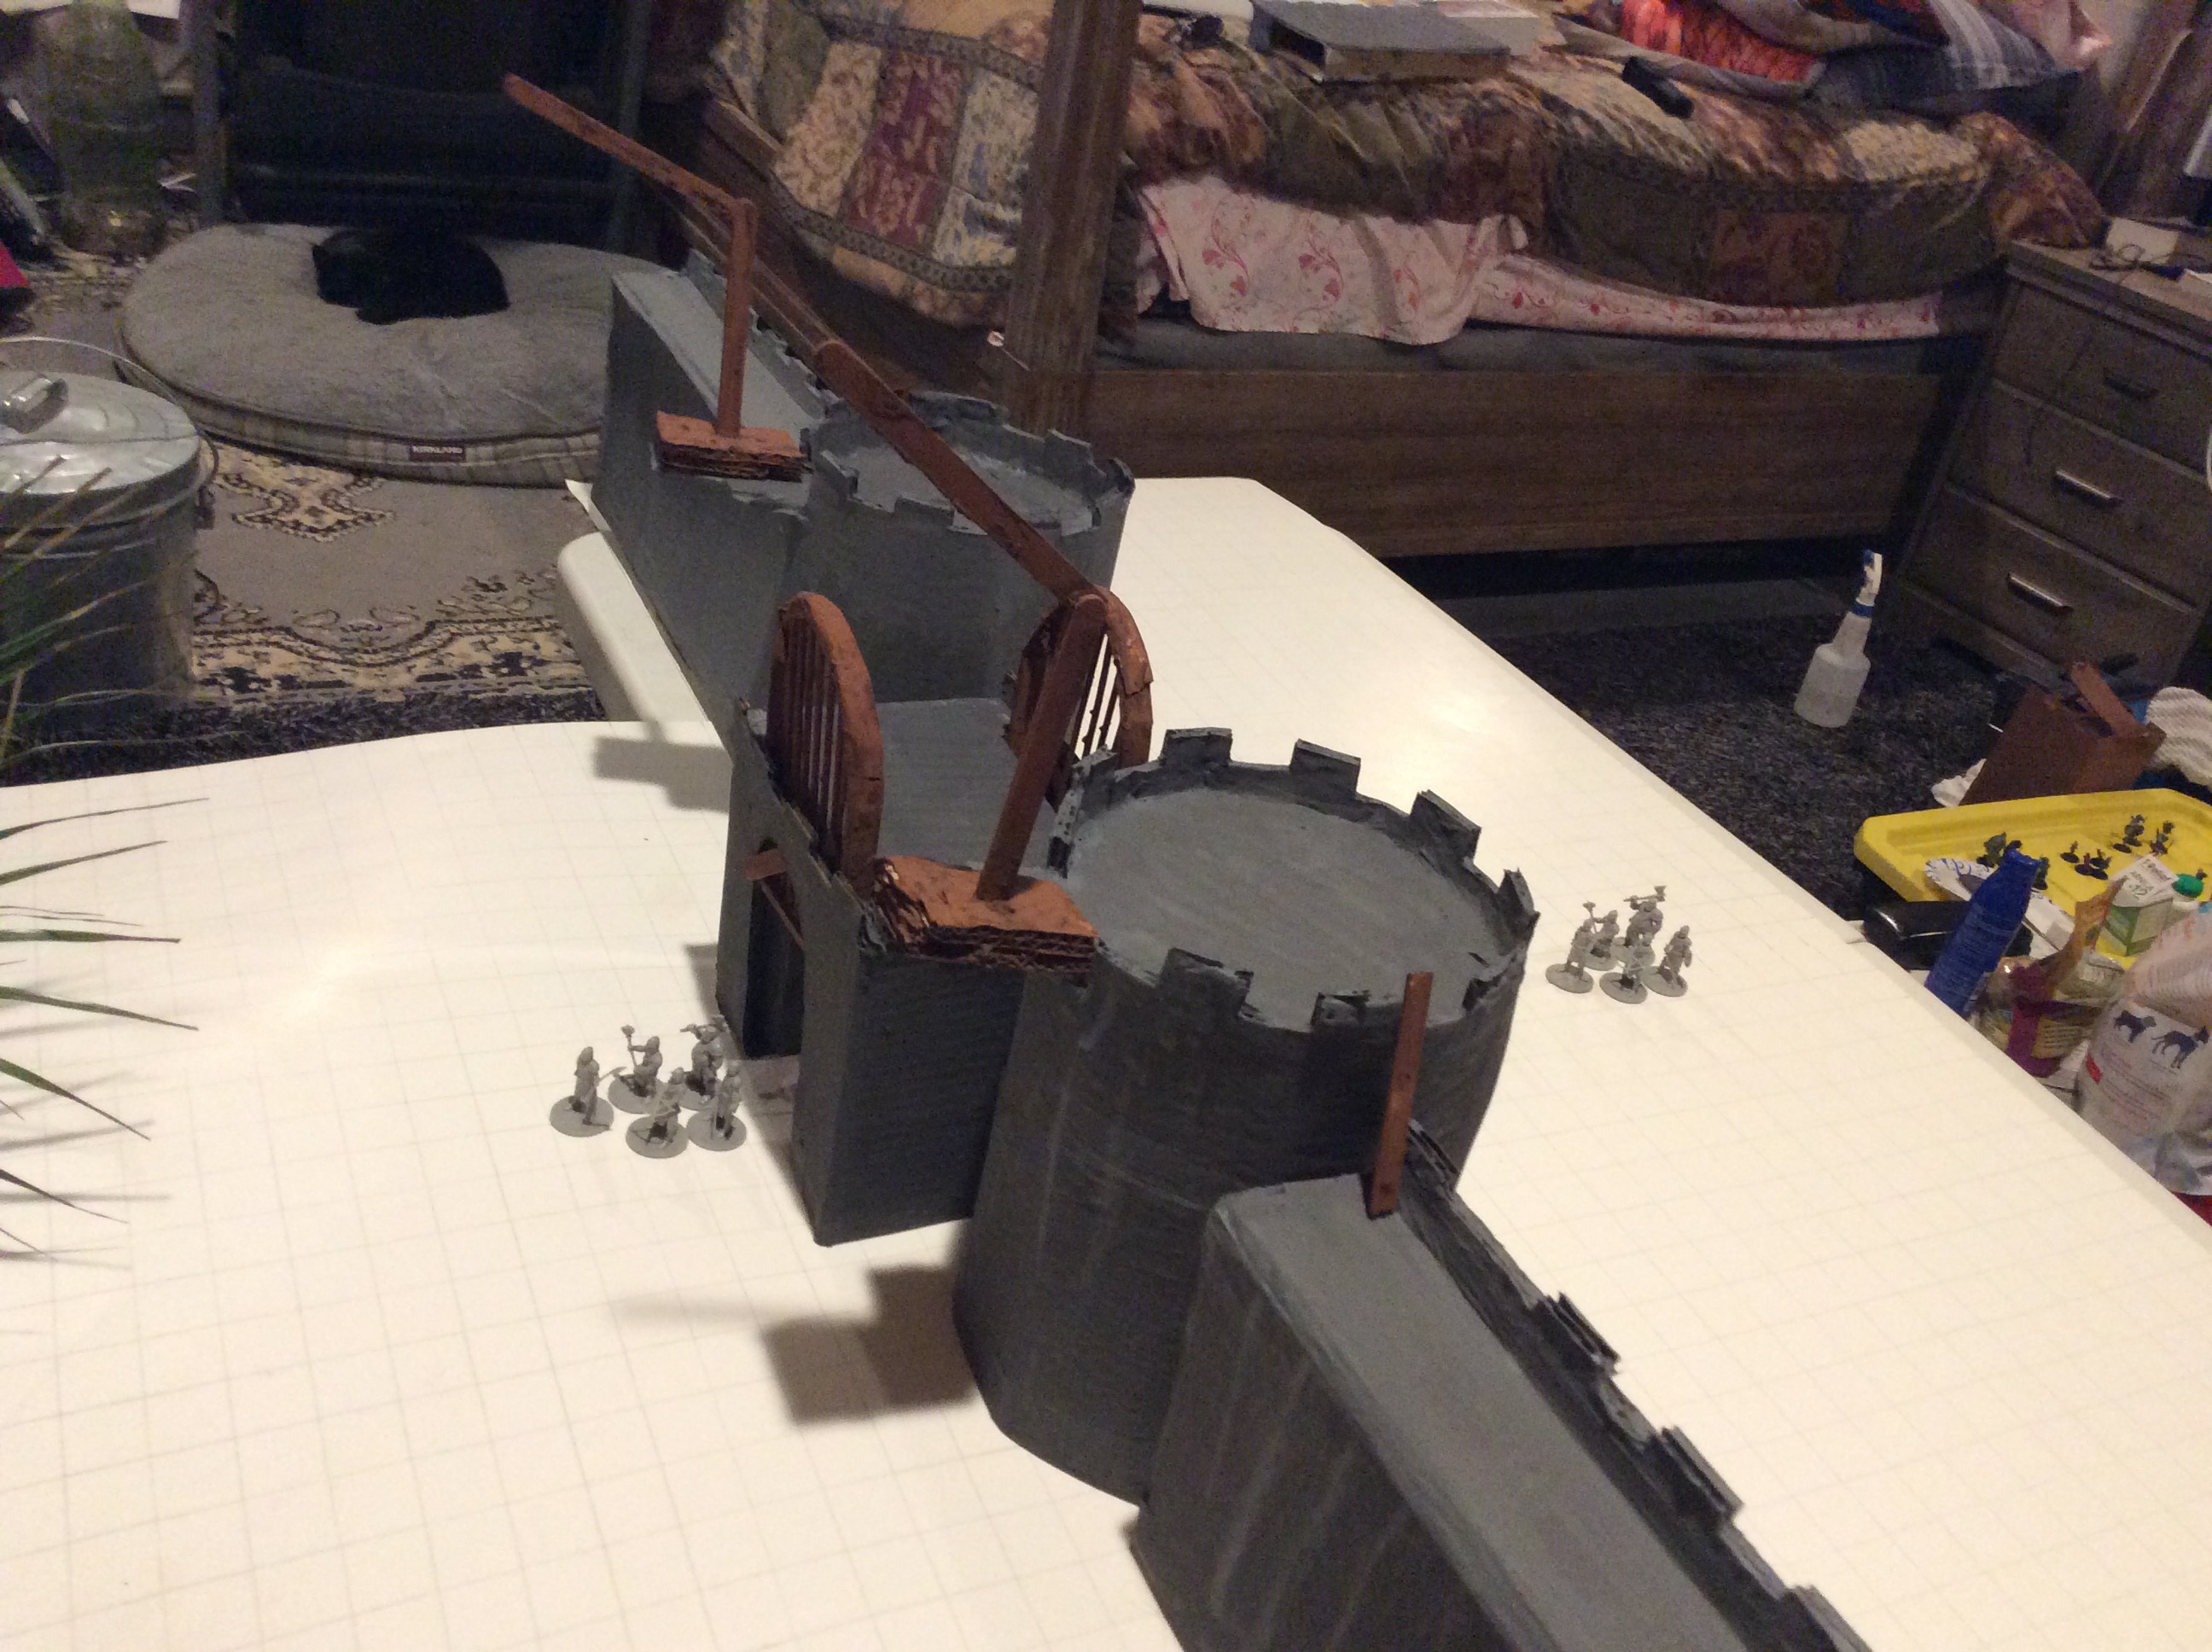
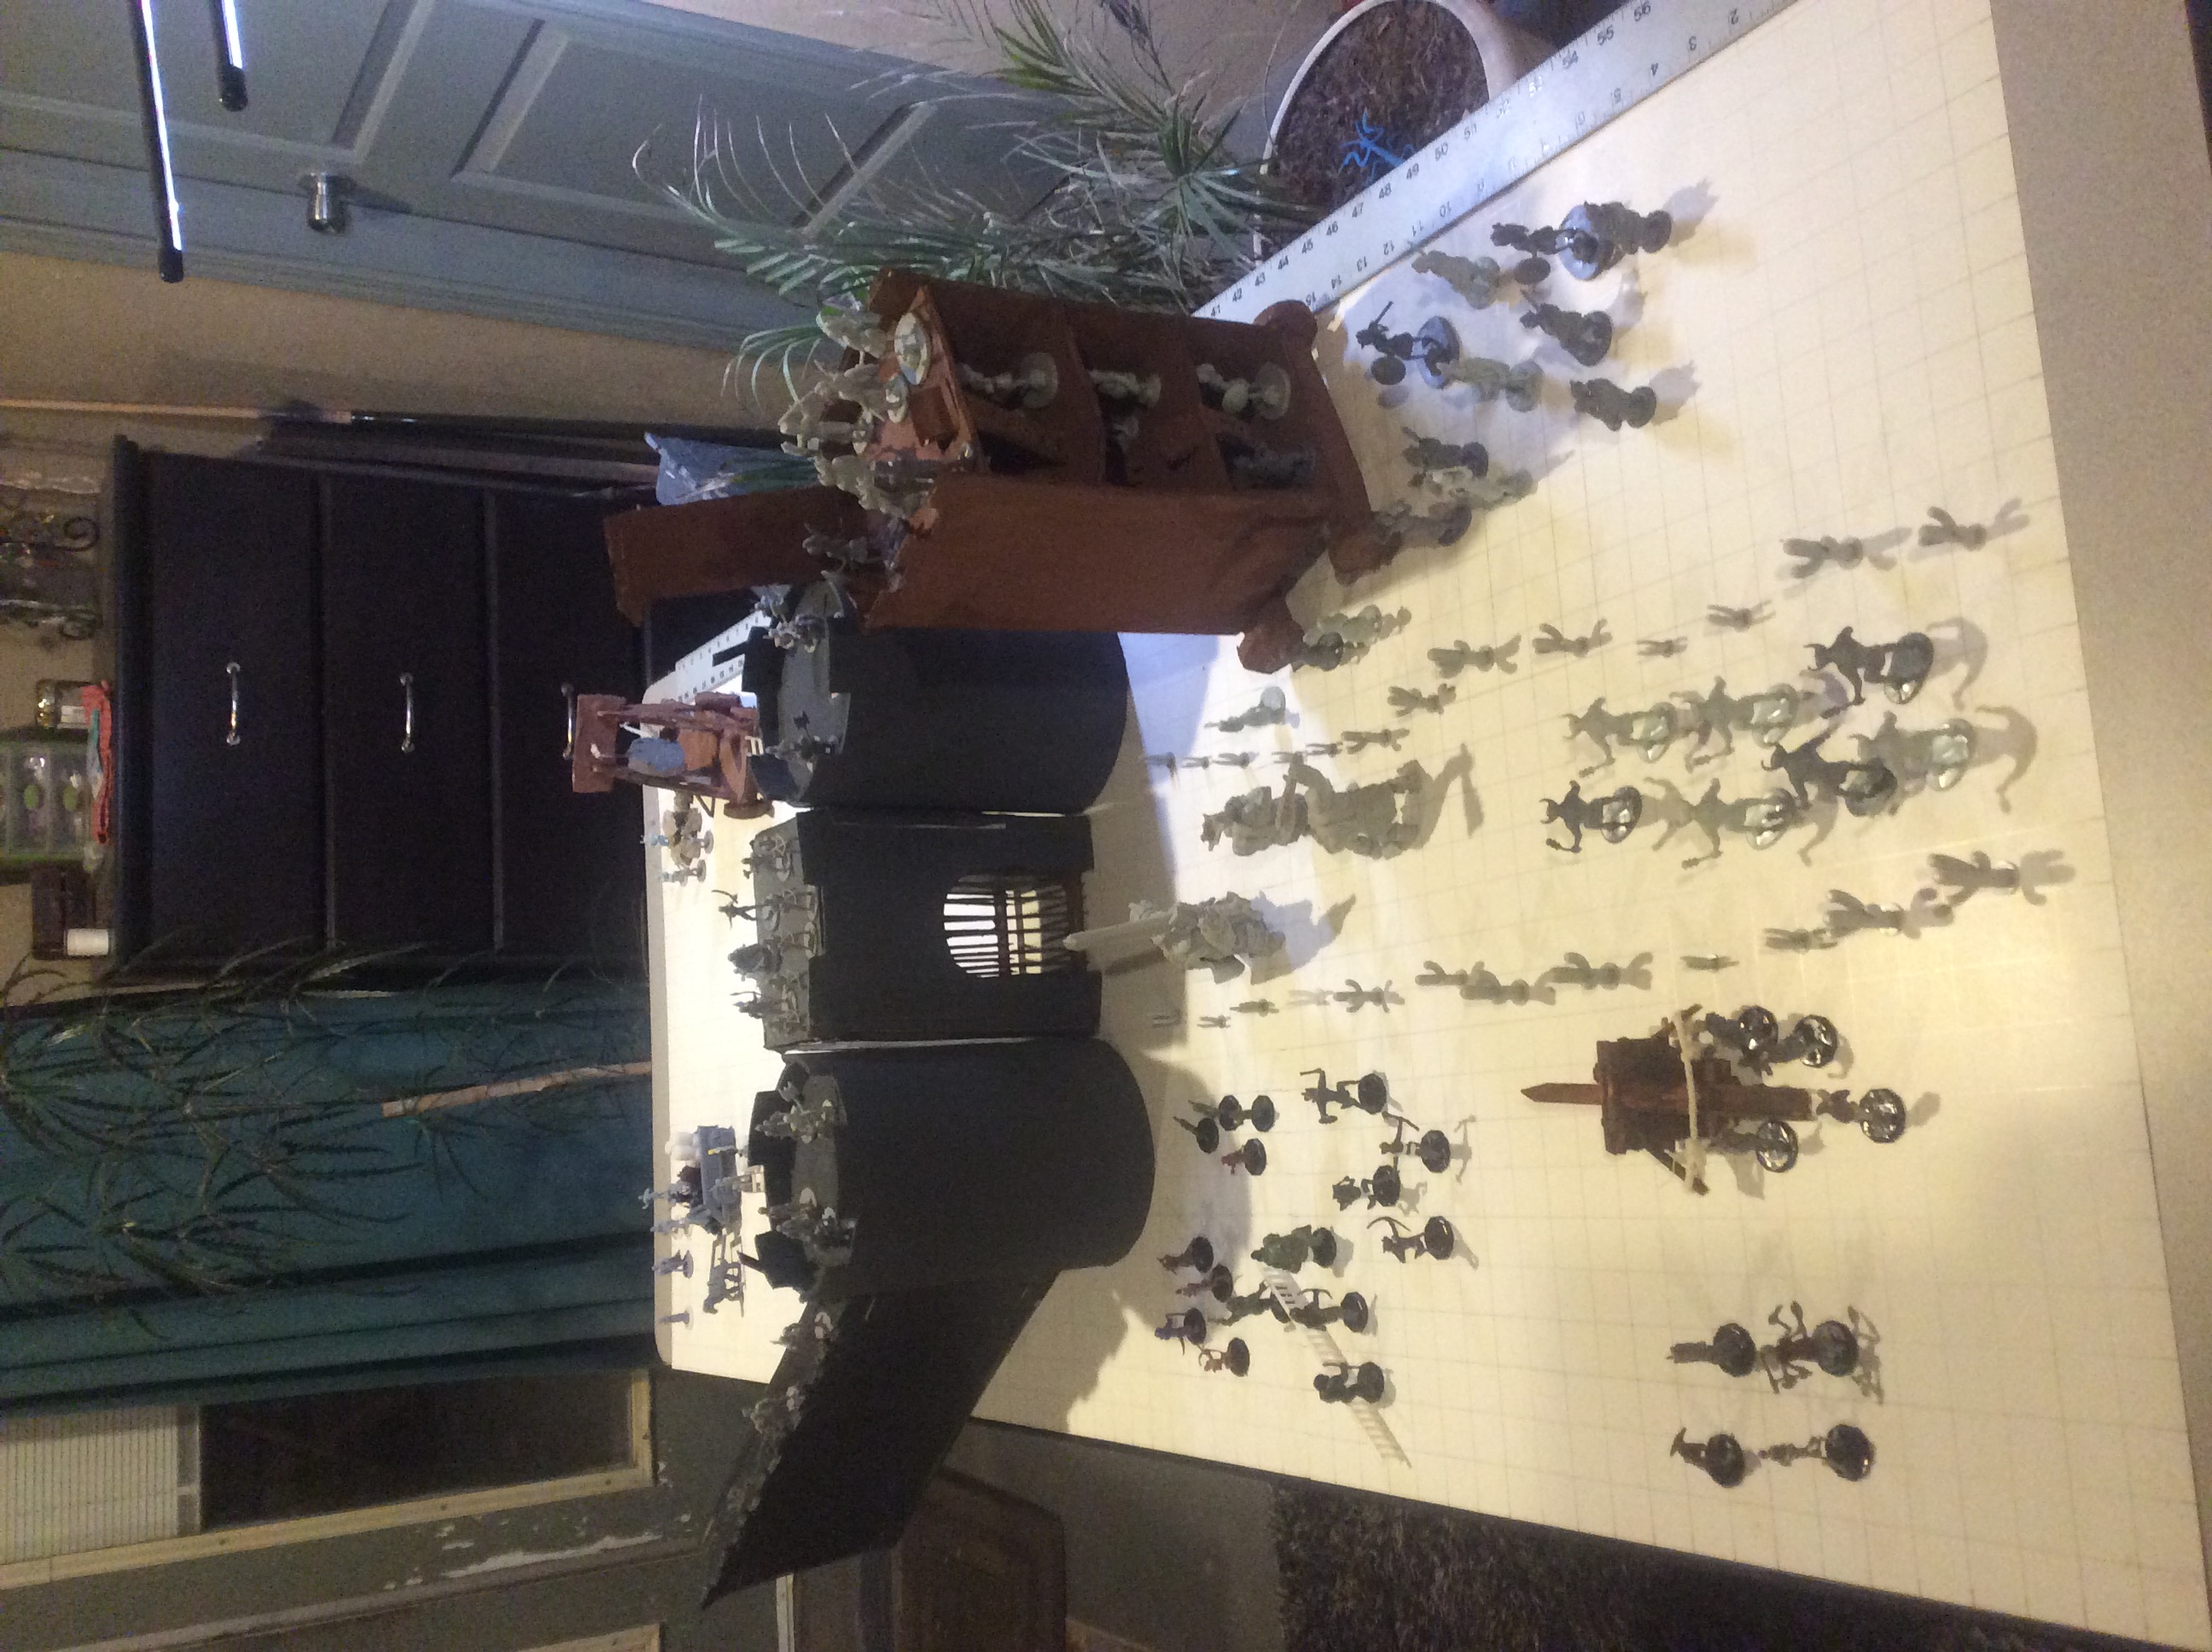
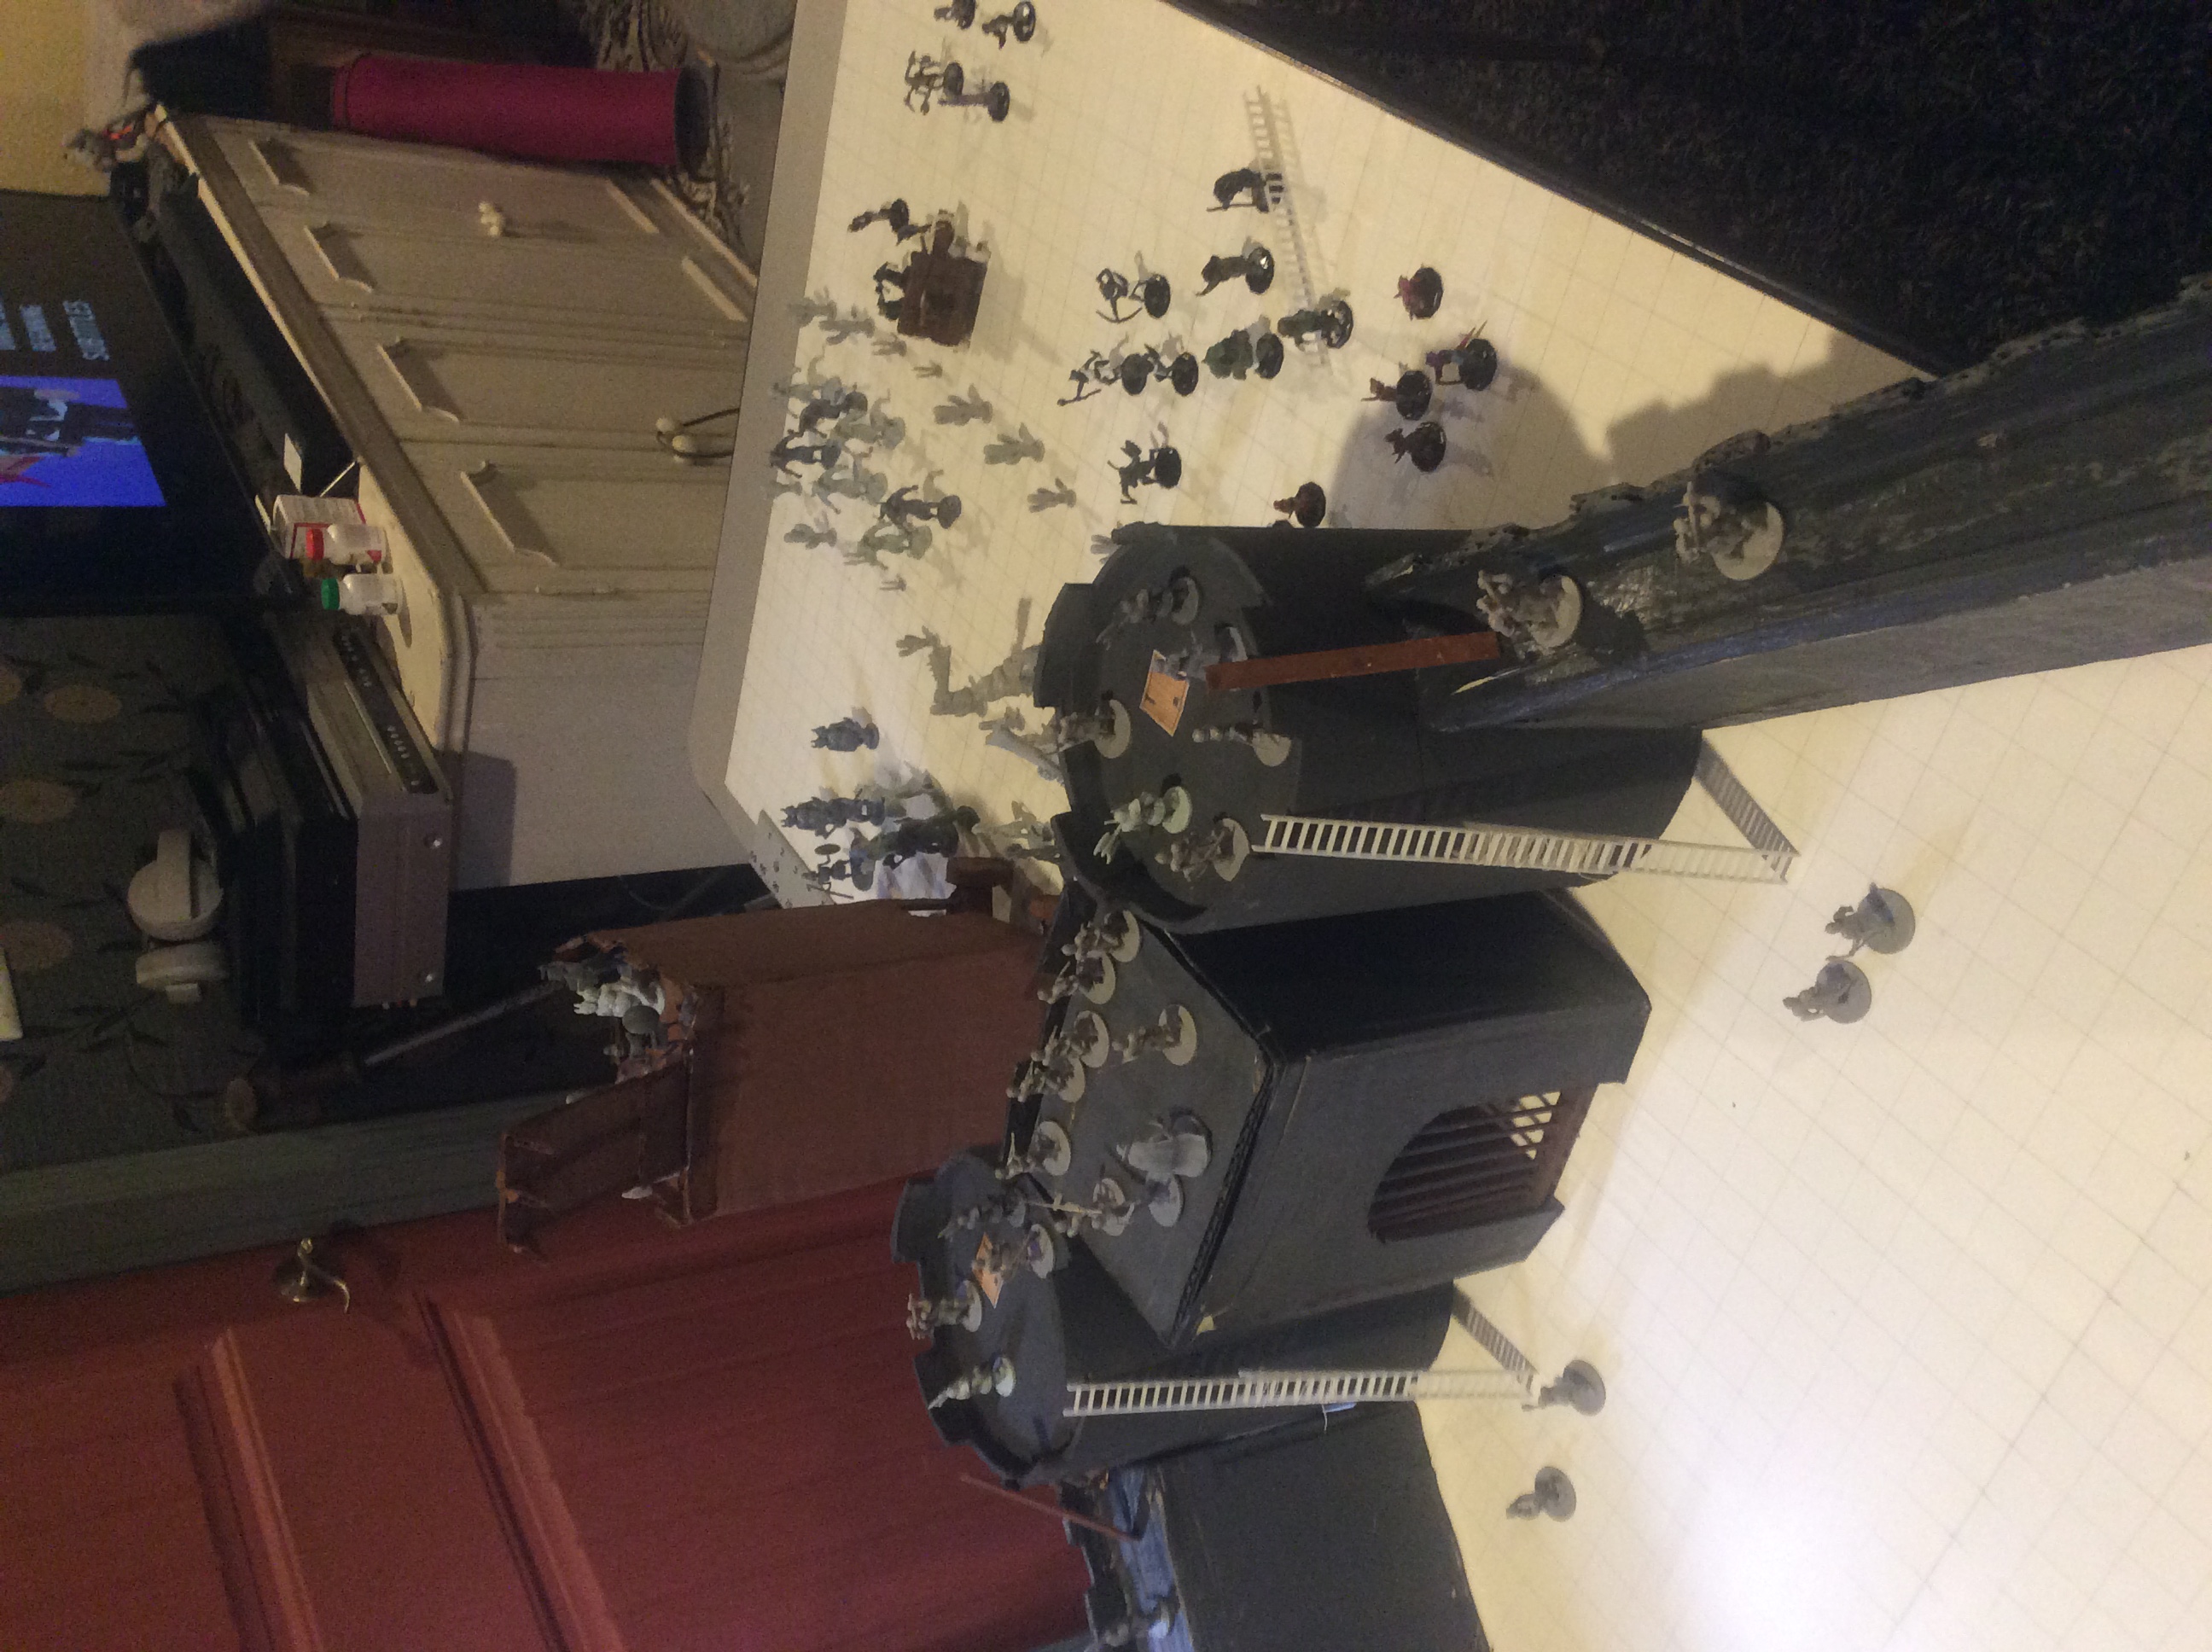
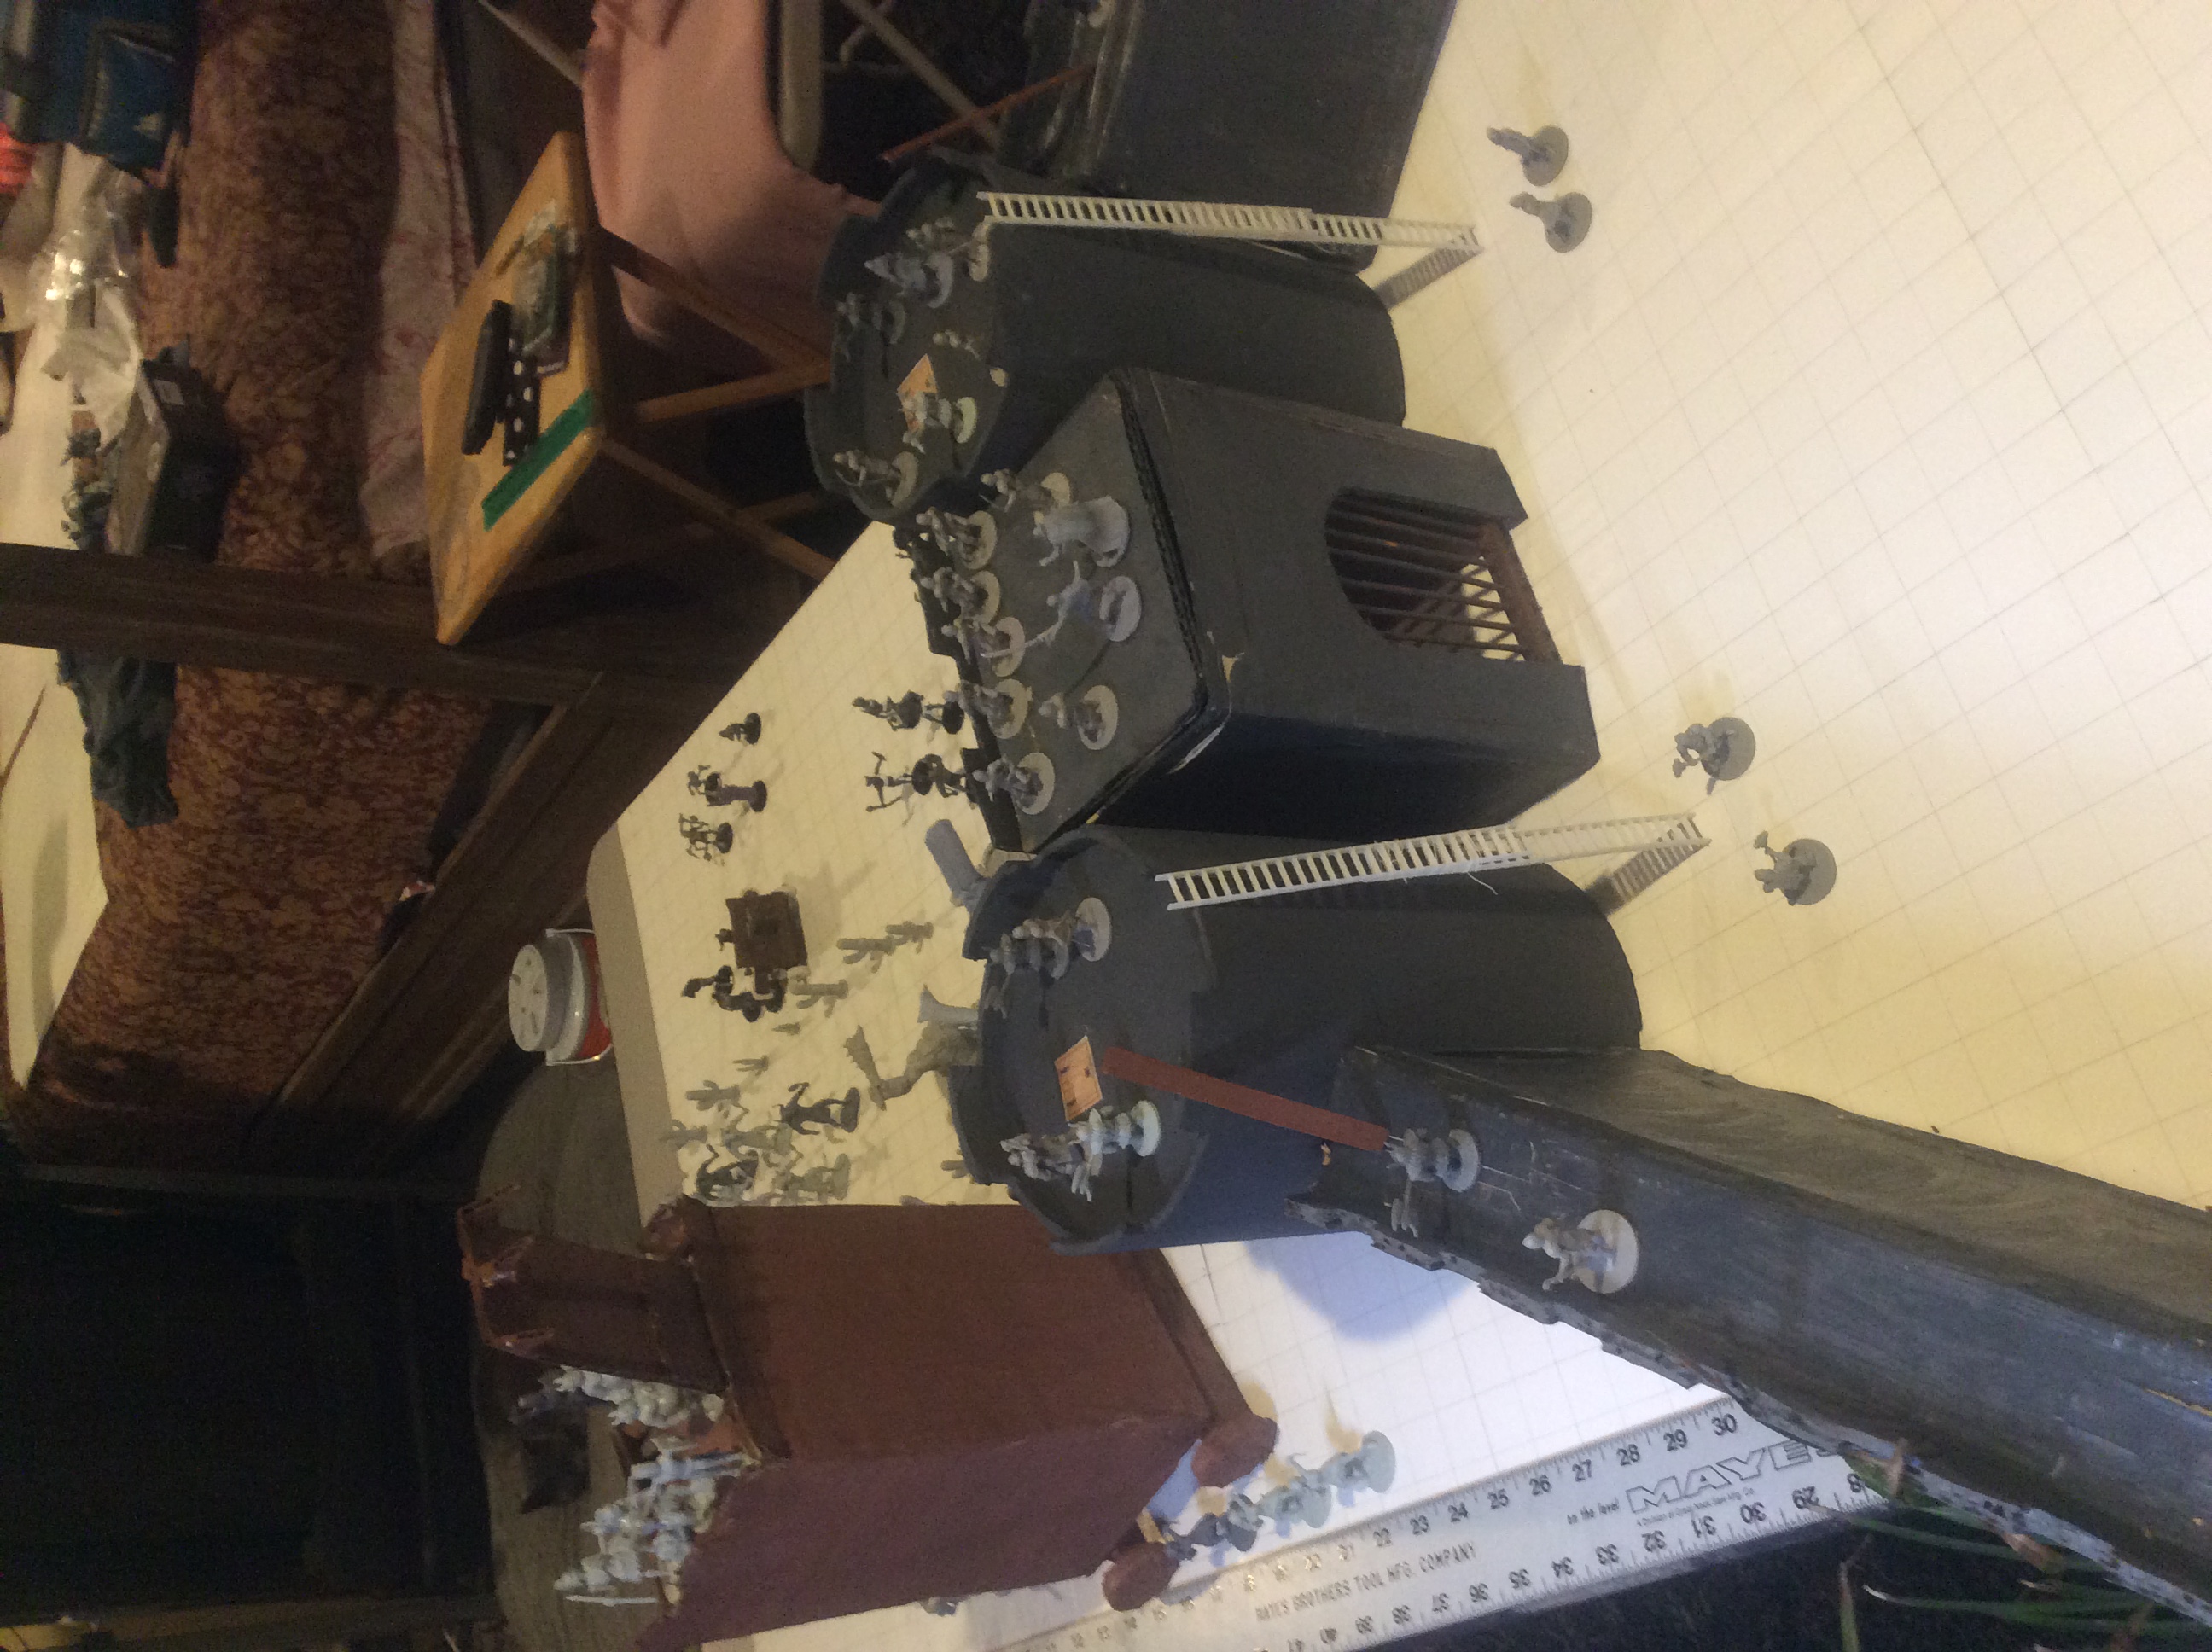
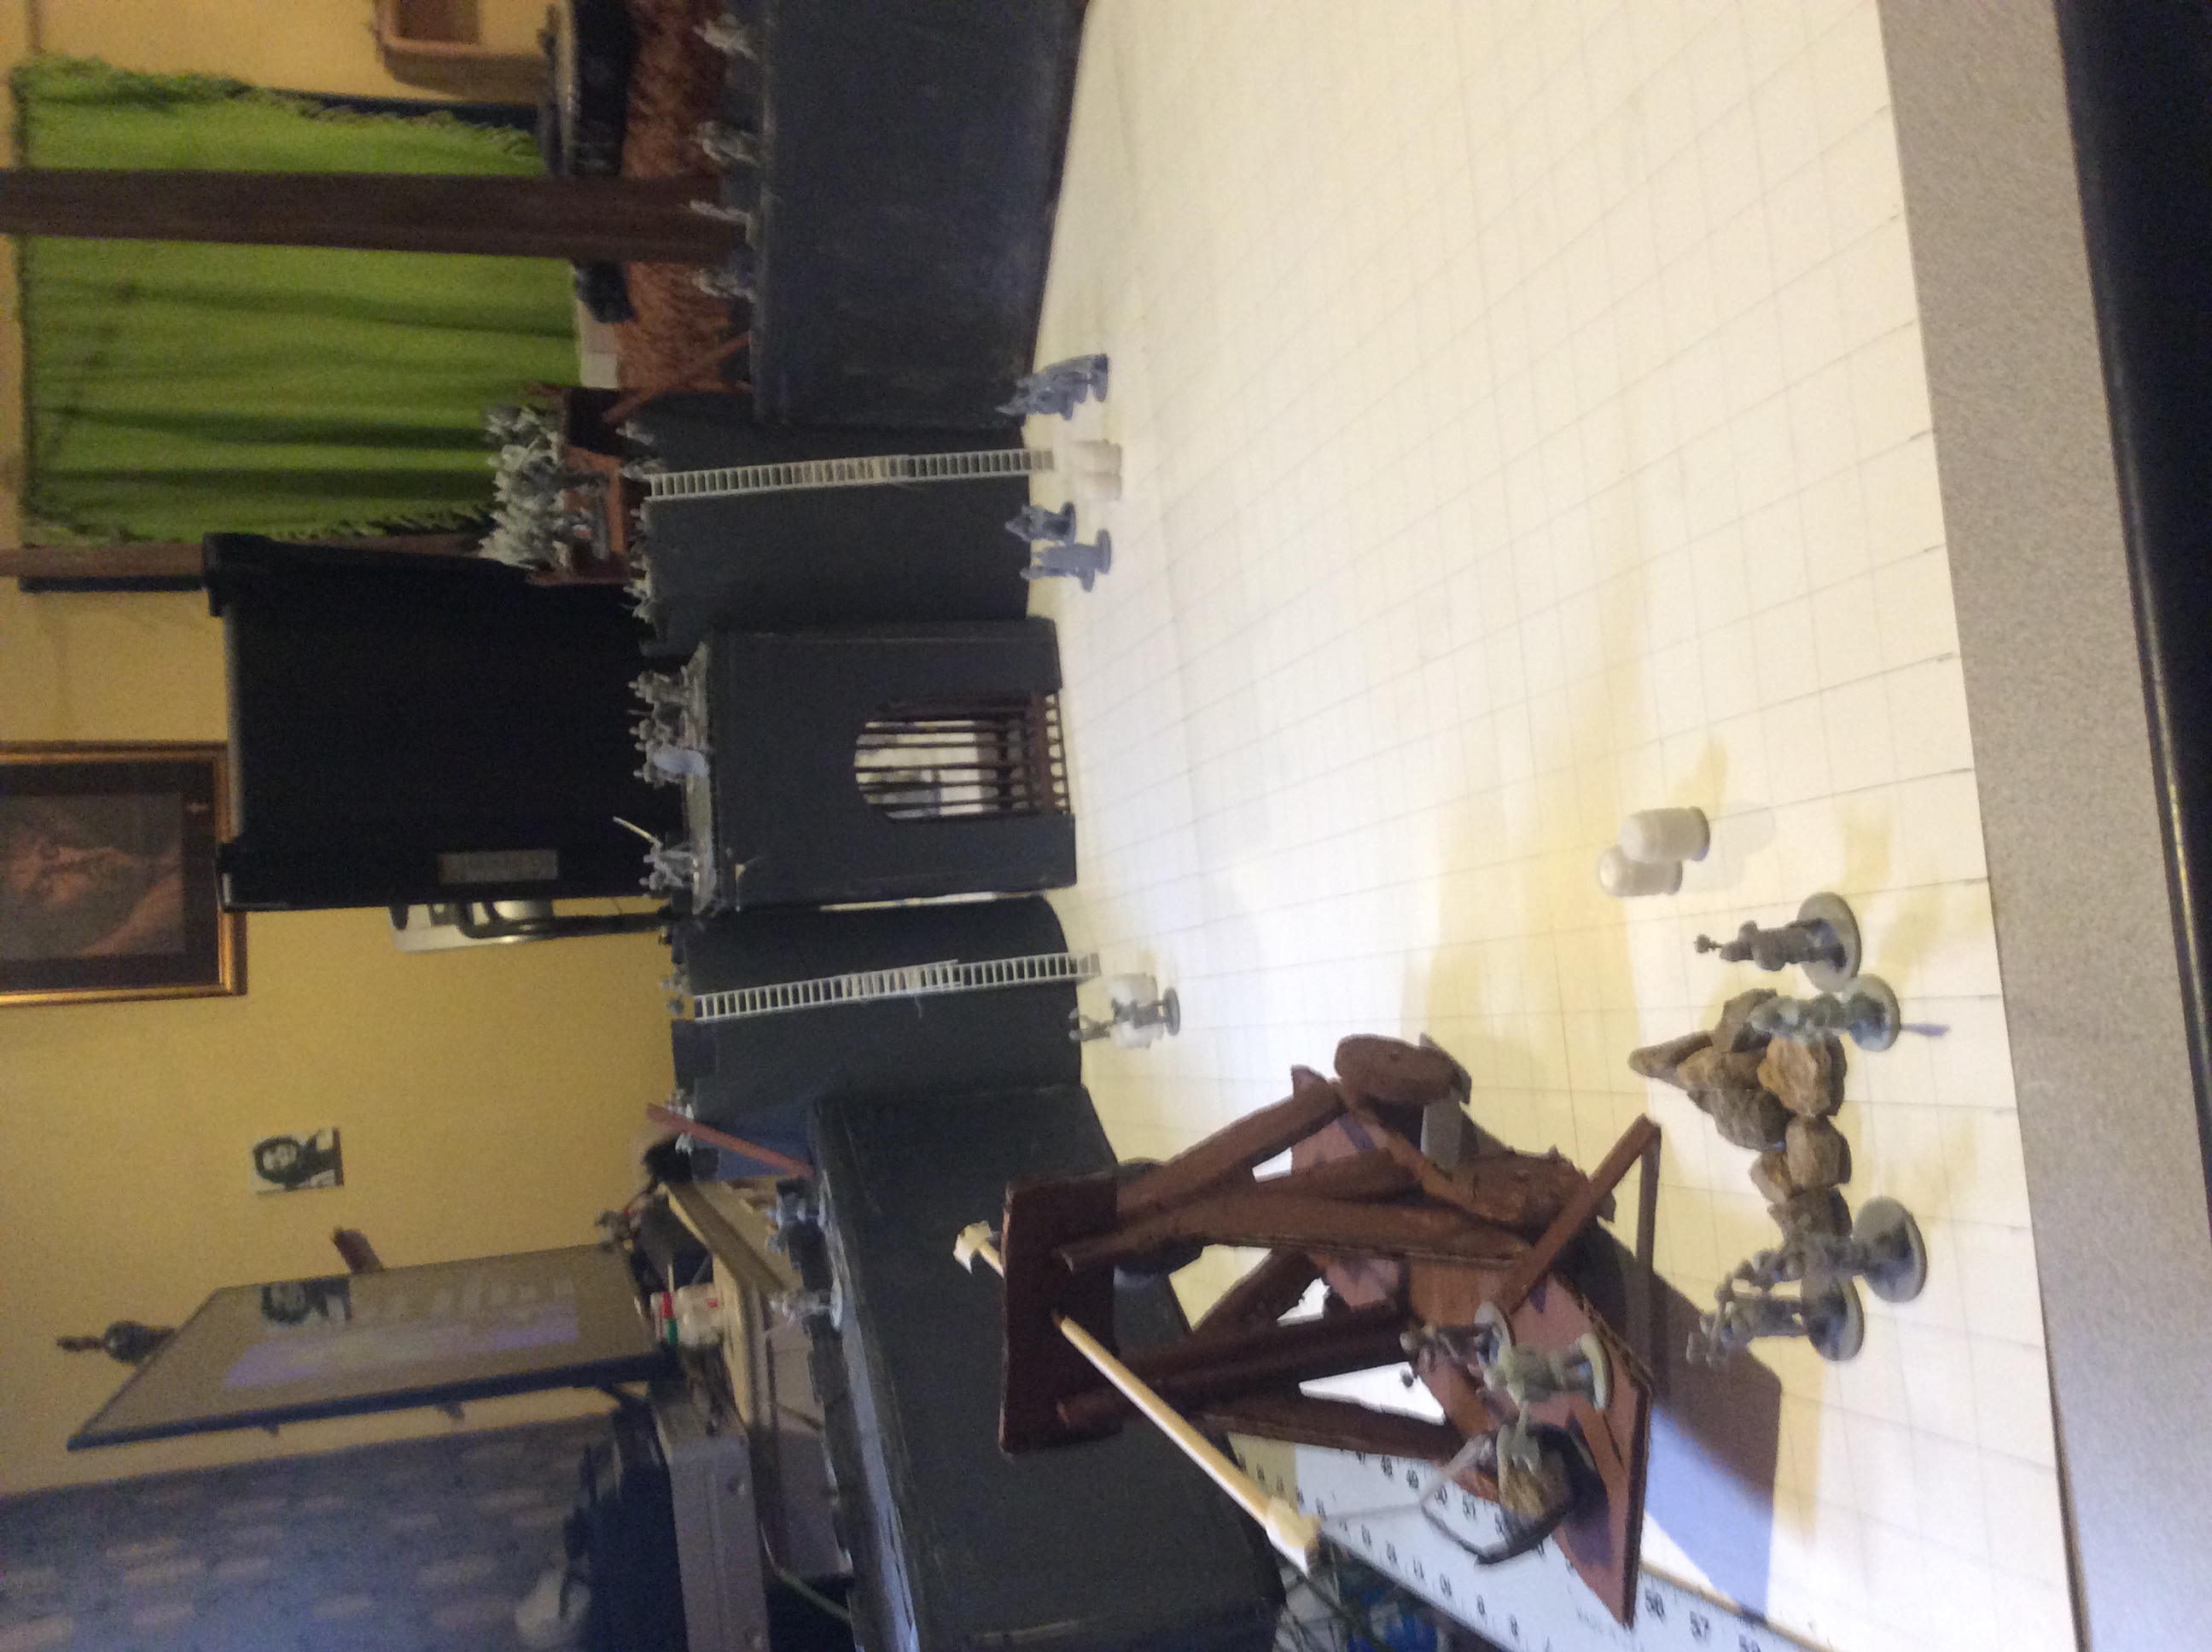
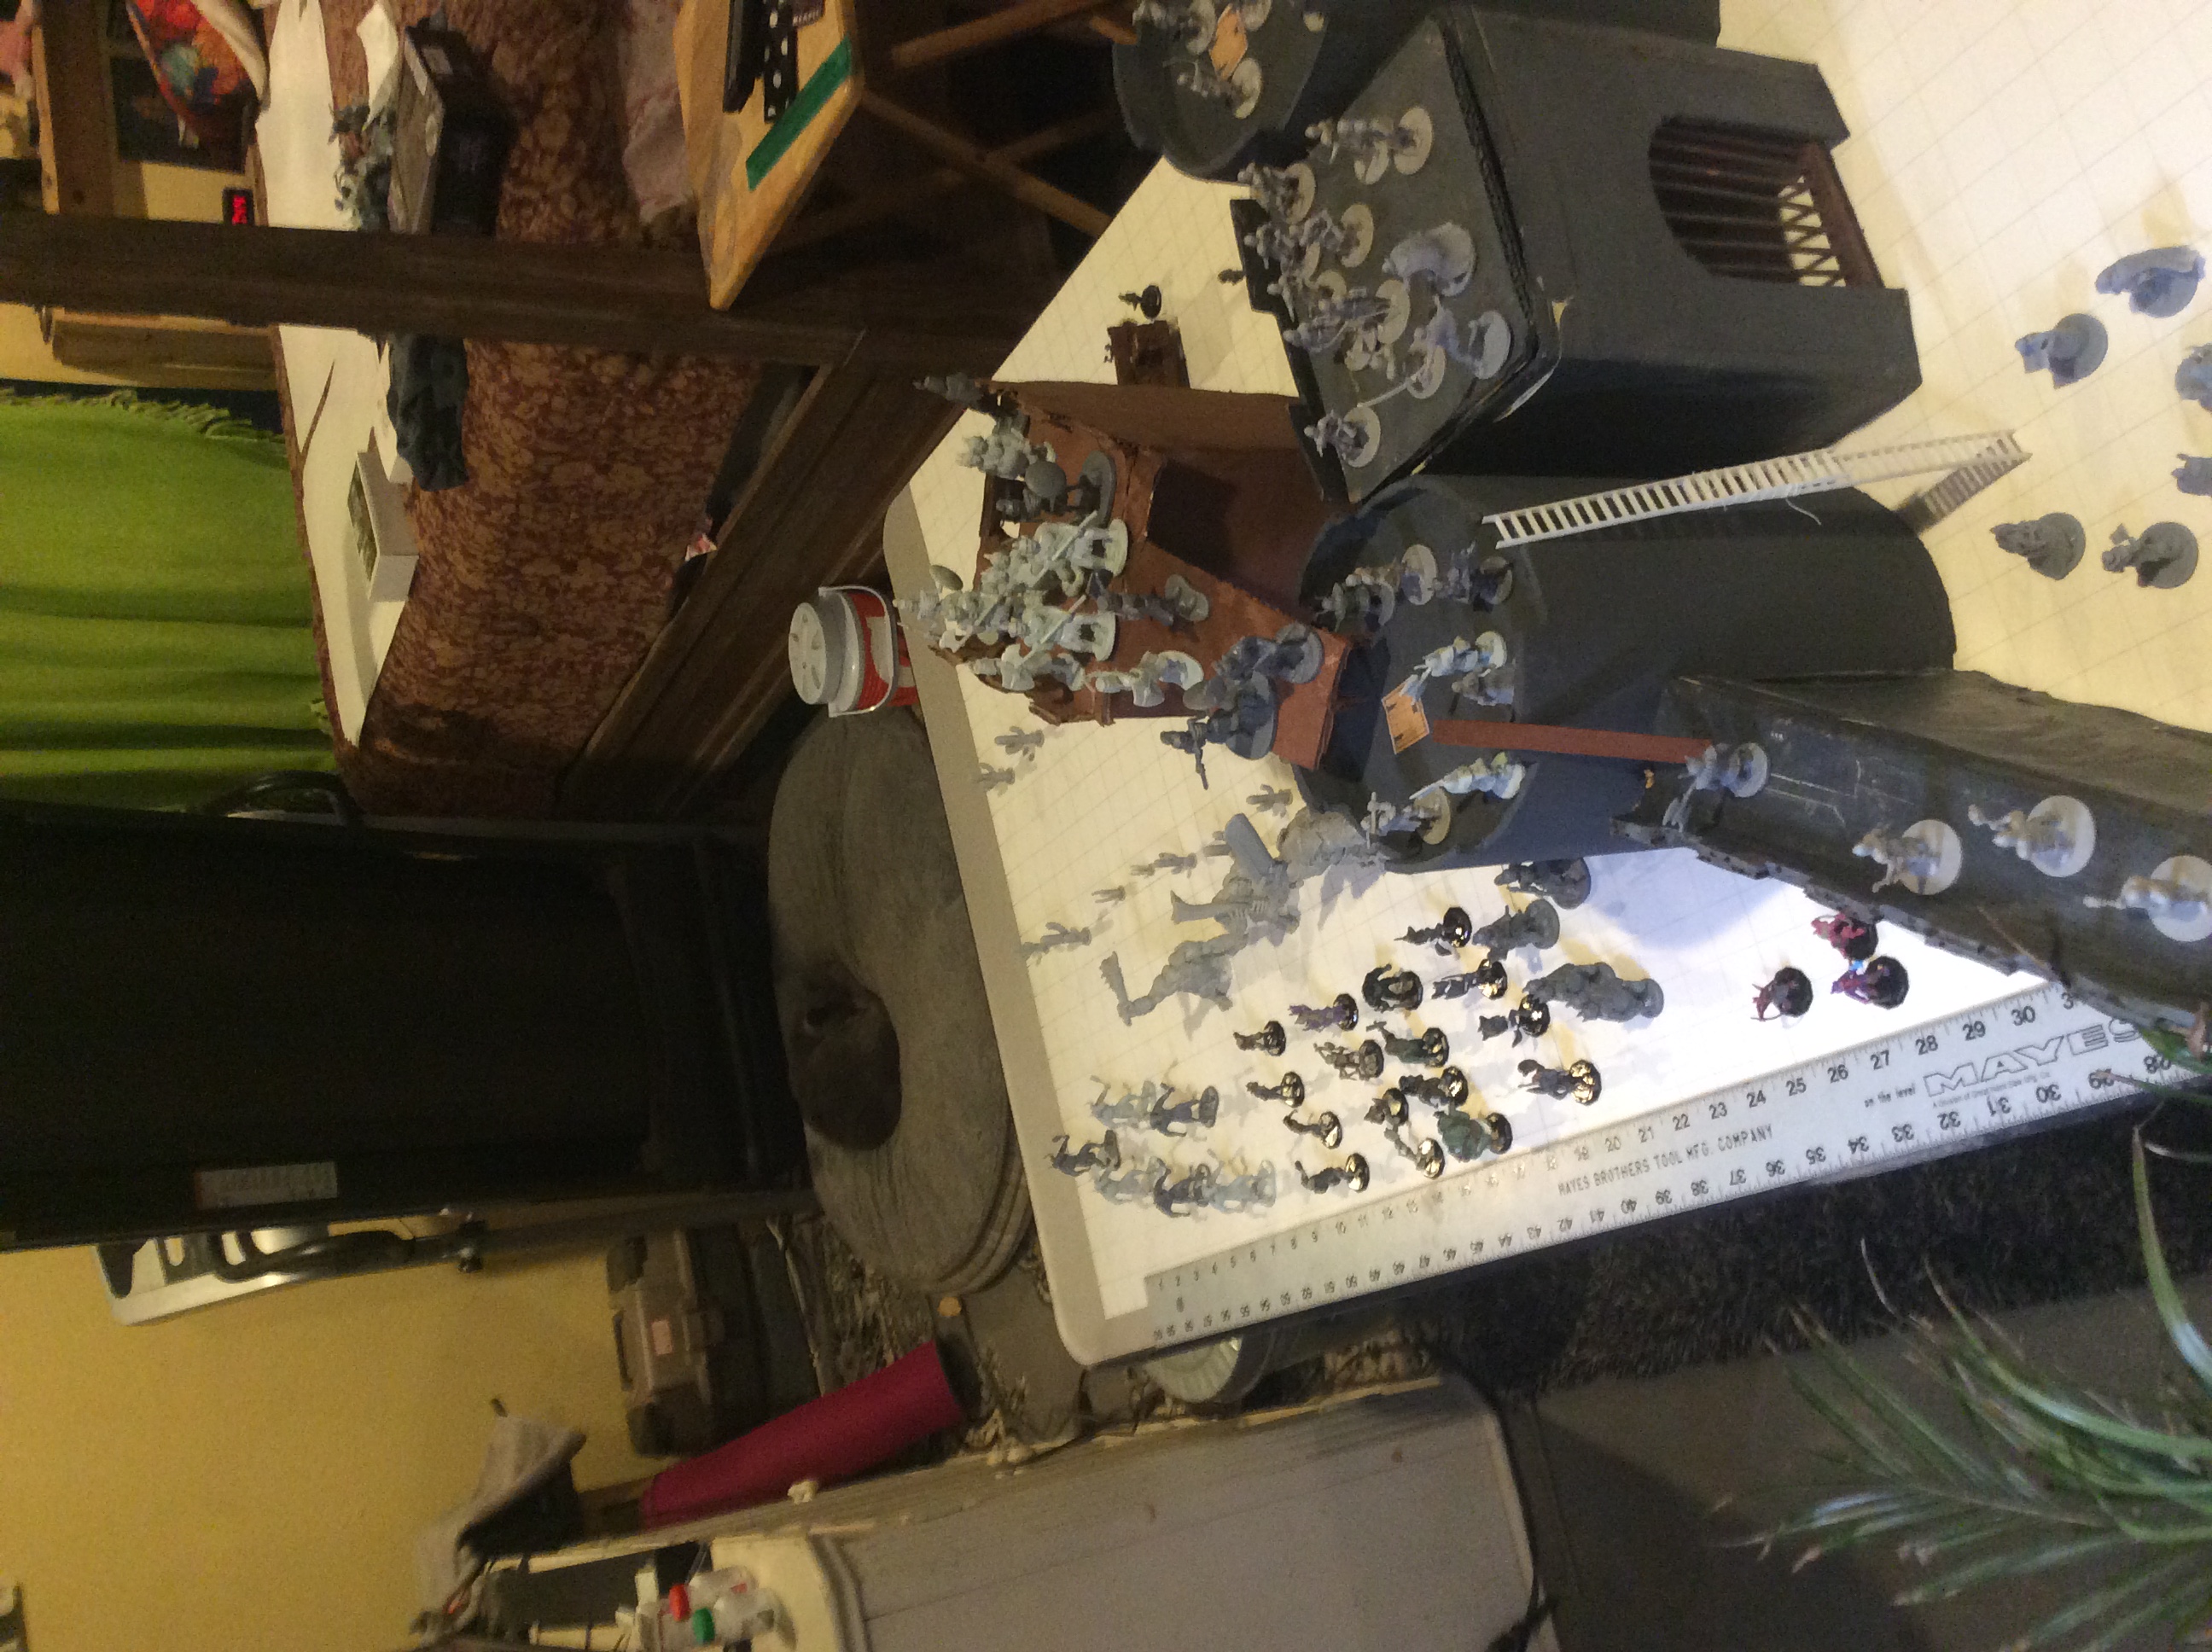
Here we have various depictions of a siege tower attacking the Front Gate. In the battle at Kahar,
three enemy siege towers burned and crumbled to their ruin before sappers dug below Tower 9 and the magmin got
under the tower. The first row depicts the attack from the siege tower the goblinoids named Entark.
Though it latched onto Tower 9 and some invading gobliniods made it to the roof, they were ultimately beat back
and Entark was consumed in flame from the defenders desert bombs (ceramic pots connected together, one holds quicklime, the
other water, when thrown and broken open, the reaction is violently explosive).
The second row shows the attack from siege Tower Ooka, which latched onto Tower 1 and killed many Goldenshield
soldiers before it also was consumed in flames by the defenders desert bombs. The third row, shows
the attack from siege tower Tork, which might have been insignificant, except, sappers were able to tunnel
under Tower 9 and make a cave big enough for some magmin. This alone would not have been a problem because
the Ecclesiastic Brigade was equipped to deal with such a menace, but, because of greed and discontent, they were caught
by the enemy and they turned traitorious. When they should have stopped the sappers, they did not, and so Tower 9 burns.
It burns so bad that the only thing that will remain of Tower 9 is a ring of stones that was once the base
of the tower, inside the ring a fire blazes continually and a small river of molten lava spills out and runs north
where it burns through the wall and runs down the middle of Moja Hamlet, where it destroys many buildings.
The whole river of lava can be seen from the top of the broken wall. The last row shows the enemy, after waiting
for the fires to die down, forcing their way through the broken gate and the perpetual flames in what is left of Tower 9.
The first encounter couldnt be easier. Wherever the PCs happen to be they will encounter one less goblin
zombie than the total number of PCs, but there will be body parts, for example, 3 crawling hands that join the goblin
zombies in attacking the PCs. This should be a medium encounter (in most cases). The goal of the DM being
to use the low level goblin zombies to both train the PCs and guide them through combat encounters for experience.
Designed to use XP points, this campaign can be adopted to use milestones instead: this first level would be
complete when PCs deliver the load to Tower 9. Second level would be complete when they deliver the letter to
Sir Galente. Other levels depend on the path taken by the PCs. The first attack by goblin zombies
provides a mindless enemy intent on fulfilling their orders to kill all humanoids on sight.
When the Front Gate
falls, hobgoblins, bugbears, and goblins, not to mention hordes of other mercenary creatrues, enter the fray and
present opportunities to role play your way out of combat. So what follows is a little bit of advice for the DM.
As a DM, you must understand the relationship between the goblinoids. Goblins are the slaves of thier
hobgoblin warlords who serve the giants. With cursing, threats, and whips, hobgoblins force goblins to attack
enemies in close melee combat. If you need to visualize it, think about the Persian attack on the Spartan forces
at Thermopylae, slaves whipped from behind to charge and attack the enemy. As soon as those initial attacks are
over, most cowardly goblins disengage and flee out into the darkness, away from the war and their evil masters.
They have no problem attacking humans they encounter along the way, as long as they can ambush from cover and flee
immediately. Roleplaying a goblin is roleplaying a sniveling coward.
Hobgoblins are the tacticians who
will know and use advanced military tactics, like hit and run, flanking, and using cover to range attack followed by
groups advancing for hand to hand combat. As far as roleplay, hobgoblins are snarling soldiers. They will
retreat rather than surrender, but they will always take prisoners and relish the idea of conquered enemies.
The bugbears have been commanded by the Fire Giant to guard the Hill Giants on penalty of death, so,at first, it won't
be too likely they will be encountered anywhere except around the Hill Giants. After the war, only a few of each
type of goblinoids survive, so that survivors from all three races will be hired as mercenaries by either the Lamia
or the Dragon.
An issue for low level PCs that pick human, halfling, or dragonborn as a race will be the darkness. I like to assign low level PCs simple
duties: gather the wounded, put out fires, help to maintain supply lines, so it might be that they will be
wandering out in the open, where torch light is bright for 20 feet (4 squares) and dim for another 20 feet
(4 squares, 8 total), but goblins have darkvision up to 60 feet (12 squares). So those first few crossbolt shots
can be deadly. The other races should be able to see in the darkness out to 60 feet as if it were dim light,
so they'll have a better chance at not being ambushed, but, remember DM, these mean, nasty, little goblins will
ambush and then flee, over and over again.
The real issue will be decided by what the PCs are doing and how they react. The goblin zombies are magically
protected as they are flung through the air and land inside the fortress, but once on their feet thier magical protection
is used up and they blunder about attacking anything they see (including hobgoblins, bugbears, and goblins).
A constant terror not because they are fierce fighters but only because of their unending numbers, the goblin zombies
are only the first wave of the unending attacks of the undead.

The goblins, once inside, hide in the
darkness, in the darkest holes, in noiseless spots, behind what ever cover they can find and ambush anyone coming along.

If the PCs are assigned guard duty for a hamlet, warehouse, or something else, the tables will be turned and
they might be able to get the drop on goblins running around.
Thamiar's First Intervention
For the very first adventure hook: The party must save the 14 man garrison at Moja hamlet from a river a lava that
will blanket over half the hamlet. There is a time limit of 22 minutes. You can be as liberal or as unforgiving
as you want to be, but after 22 minutes, Moja hamlet burns. A high level NPC accosts the PCs from afar. Heavily
armed but with only two servants (knights), the NPC orders the PCs to accompany him behind the nearest buildings with the goal
of getting out of sight. There the PCs meet Thamiar the Guardian Naga. Thamiar explains who he is and why his
existence must remain a secret. Thamiar further explains that he has cast Clairvoyance and spied upon
the enemy. He has learned that this master of raising undead will cause a terrible zombie creature to terrorize
the fortress unless the PCs can intervene. The name of these terrible creatures will be "fire zombies".
The PCs are given a letter by the high level NPC as Thamiar explains that the Lady of Kahar has written to Sir Sewale Galante,
leader of the hamlet, explaining everything. PCs notice the letter has a wax seal stamped by the
ever familiar symbol of the Desert Snake.
PCs must reach Moja hamlet, present their letter with an unbroken seal to Sewale Galante, the knight that is in charge at Moja hamlet,
and evacuate the 14 men there before the lava reaches the hamlet and burns most of it to the ground.
Setting:
Tower 9, the Front Gate, and Tower 1, are assaulted by 3 siege towers but beat back all three
attacks. However, sappers manage to dig out a good size cave under Tower 9 and the company dispatched to
clear out the cave and defeat the sappers betrays Goldenshield kingdom and does nothing instead. The magmin
that come with the fire giant get into the cave under Tower 9 and begin to super heat it. Even so, the adobe brick
structure of the Tower might have held up even under the heat of the magmin if Khalista had not been there. Braving
the dangers of war, she watches from almost 120 feet away, and when the time is right, she sends a firebolt right into the
little cave and superheats the magmin. The magmin, immune as they are to fire damage, love the extra heat and
revel in the explosiveness of the firebolt and their flame blazes even hotter. Tower 9 is consumed in flame and
collapses in on itself so that only thing that remains is a ring of stones. The goblinoids keep feeding broken wood,
bricks and stones, and other material into the ring of fire until molten lava spills out. A river of lava from
the remnants of Tower 9 runs north at 1 foot per second. Moja village is 1320 feet away. The PCs are given a wax sealed letter,
they must reach Moja hamlet, present their letter to Sewale Galante, the knight that is in charge, and evacuate the 14 men
before the lava reaches the hamlet and burns most of it to the ground. If the PCs are successful, Sir Galante
gathers his 14 men and retreats east to join with the gathering resistance just as a river of lava arrives. If the PCs
fail, Sir Galante and his men are caught up in the fire and burn alive. Khalista, the author of evil and pain,
raises them as undead, creating the terrible fire zombies that haunt the fortress thereafter.
The Delivery
If your party has followed orders, you ride under Aperton's arch toward Tower 9, follow the road around the Keep,
and witness the begining of the goblinoid attack. Arrows and bolts fly through the air, men and goblins fight on
the walls, trebuchets and mangolers throw boulders high over the walls, and fires light up the night sky.
You are hurriedly greeted by
Corporal Weaver who points to where you will unload your supplies.
You must lead the horses to a clearing 100 yards away from the base of Tower 9 where many men unload the wagon for you.
If your party lingers and does not return to Braek's Munitions Dump right away, you will witness many events:
Three siege towers attack Tower 9, Tower 1, and the Front Gate. Some time after the last siege tower is defeated, not
only do flames engulf Tower 9 and the Front Gate House but also you will witness the Fire Giant climb on top of the burning
Front Gate House and begin to dismantle the burning pieces and feed them into the blazing fire that is Tower 9.
Khalista, hidden amoung the attackers, uses her magic to cause Tower 9 to blaze unrelentingly until it collapes in on
itself and then a river of lava spills out and runs north. If you stay and do not immediately return to the Munitions
dump, then you will witness all this and more: men falling to goblins on top of the walls, the Fire Giant
forces an opening through the burning Front Gate House, darkness covers everything like a blanket despite the many fires
blazing, fear, hopelessness, and despair weigh down on your heart and soul, and an unshakable feeling of doom grips your
intellect as if all that you know and love will cease to exist and an everlasting evil will fill the barren empty endless
void left behind. It is best if your party returns to Braek's Munitions Dump for more supplies as soon as possible.
There is no encounter on the way back to Braek's Munitions Dumb, but as your party reloads the wagon with new
supplies, everyone in the party notices that criers have been sent to all corners of the fortress, especially to the
hamlets. The criers scream out,
"The walls have been breached! The walls have been breached! The
enemy is in the fort! To arms! To arms! All messengers! All suppliers! All healers!
Arm yourselves! The enemy is at hand! The enemy is at hand! The enemy is in the fort!"
A
leader runs up leading what is left of his fire team. He looks at the surrounding chaos,
spots your party and shouts
"You there! An emergency has arisen! Follow me!"
The
leader guides the PCs behind cover where there waits a guardian naga.
The
leader hands a you rolled parchment with a wax seal in the
shape of the desert snake. The guardian naga tells you,
"I am Thamiar, guardian of Hamakhaave, servant of the most
wise, and I am here to obtain your help. An evil has arisen that will see rise of a zombie like creature infused with
fire. The victims of this atrocity are, at present, alive and well at Moja Hamlet. If you so choose to follow
my directives, then you will present this letter to Sir Galante in Moja village with all haste!""
Your party has 22 minutes to get to Moja hamlet, find Sir Galante and deliver the
letter. Jaken Voth, the acolyte of Lord Braek, witnesses all this and wisely does nothing to hinder or interfere
but instead offers that the supplies that your party loaded should go to Lord Galente. Furthermore, Jaken Voth
helps speed your party along with the added instruction that you should return to the Munitions Dump upon completion of
your assignment. If any of the party members are wounded, even slightly, Jaken Voth heals them.
Along the way to Moja hamlet, arrows whiz by out of the blackness, but in the gloom it is hard to make out what
happened. Some wandering goblins ambush your party, one for each PC, the goblins will attack but will immediately
flee if any resistance is given. Worse than the goblins are the crawling hands that creep along in the darkness.
Khalista has been at work and body parts are moving on their own. If your party isn't careful, your adventure
will end even before it begins. Your party must fight through the goblin ambush, survive the spider like hands,
and deliver the letter to Lord Galente before the lava reaches Moja hamlet. Your party should then return to Braek's
Munitions Dump for further instructions.
Development
If you do not deliver the letter, for any reason, then Lord Galente and his 13 men are in the hamlet when the lava begins to
pool up around the houses and in the streets. Khalista and her minions show up and are the authors of the terrible and tragic
deaths of Sir Galente and his 13 men who are afflicted with fire and then subjected to Khalista's animate dead spells.
The resulting monsters that rise up to trouble the dark of night are
Fire Zombies a terrible breed of undead
that haunts the long night of the attack on Kahar.
The Fall of the Front Gate Encounters
The enemy is inside the fortress. Some goblins escape thier hobgoblin overlords and flee from the battle.
Inside the fortress, these goblins will either continuouly flee from one location to another, or they will hunker down in a single location
and ambush anyone or anything that approaches them. Raiding Bands, a hobgoblin leading 4 goblins, are dispatched to round up all
these goblin deserters, and when PCs encounter them they might have goblin deserters in custody. Worse yet, Khalista has
has been active out in the battlefield and has been raising undead servants and giving them commands to kill all humanoids.
Because of the brutality of the battle, she has only been raising body parts as of now, so the PCs are very likely to encounter
the hands, hand and arm, legs, or even the heads of zombie goblins and/or zombie hobgoblins anywhere inside the fortress.
As the PCs move from location to location inside the fortress, they are more likely to encounter others wandering inside the
fortress. If PCs use cover and stealth to avoid encounters, have each PC attempt a DC 10 Dexterity (Stealth) check. For
every 2 individual checks that fail the PCs have one encounter on the way to their destination. Roll a d8, on a 5 above, roll
a d6 on the Enemy Encounter table, but on a 4 or less roll a d4 on the Friendly Enounter Table. If the PCs don't use cover
and stealth (e.g. - they are using a horse and carriage), roll a d8 for every 100 feet they travel, if the roll is 4 or less, they
don't attract any attention, but if the roll is 5 or above, reroll the d8, on a 5 above, roll a d6 on the Enemy Encounter table,
but on a 4 or less roll a d4 on the Friendly Enounter Table to see who the PCs meet:
Fall of the Front Gate
Synopsis
1. The Dark Crusades begin, Tower 1, the Front Gate House, and Tower 9 are assaulted by multiple enemy siege engines.
2. The First Betrayal occurs and the west wall, Tower 2, Tower 3, and Tower 4 are defeated and torn down.
3. Sappers dig under Tower 9 and the Priest's Brigade is sent over the wall to counter them.
4. The Second Betrayal occurs and the Priest's Brigade turns traitor and goes to the enemies side.
5. Tower 9 falls in on itself in fiery ruin causing a river of lava to spill out and run north to Surgebuilt Lake.
6. The Front Gate house is destroyed and Tower 1 is infiltrated and most of the soldiers are killed in the battle.
7. Tower 1 is abandoned for a time.
8. The Defense of the Keep.
9. The Ruining of Apperton's Arch.
10. The Death of the Giants.
11. The Dark Crusades end.
12. After the Mummy Lord battle a few miles to the north, refugees hide the violin and the sword in Tower 1.
13. Tower 1 becomes a bastion for the undead with daily patrols within three miles of the tower during the day and absolute terror at night.
c. The River of Lava
As the material world gives way to a breach that allows the world of elemental fire to pour through and into the material
world, a river of lava pours out of what is left of Tower 9 and runs north.
d. The Defense of the Keep
The Fire Giant takes his gang north and assaults the Keep. Aperton Adderson, Marquis of the Realm, meets
him with his best knights and soldiers and halts the Fire Giant's advance. The battle would have ended in utter
defeat for the goblinoids and the giants but the Marquis' meticuously laid out plan is ruined by the third
treachery: The Warlord of Braek's Munitions Dump does not attack the Giants. Both the Warlord and his Paladin undergo
a terrible transformation and become
Black Guard. The Warlord and his Black Guard go and hide in Barracks B.
The Fire Giant realizes fear for the first time. Unable to advance against the defense and realizing the strategic disadvantage
his force could be put into, disengages his army from the battle and pushes further north towards Aperton's Arch.
Rhael's goal is to reunite his dwindling forces with the northern force of goblinoids that attacked the Rear Gate.
Hard fighting and heavy losses on both sides marred the victory at the Keep.
If the PCs heed their previous order and go to Moja hamlet and give the letter
to Lord Galente, then all 14 of the men of Moja hamlet rush to Tower 7 and join their forces to the soldiers in the Tower. If the
PCs do not heed the order and do not go to Moja Village, then by the time the Fire Giant dies, there will be
Fire Zombies
troubling the area in and around Moja hamlet.
Khalista has been busy outside the fortress raising dead goblin after dead goblin
until hordes of tiny zombies rush into the dark of night and attack any living creature. This is the party's second encounter, 3
goblin zombies a piece. Even though the goblin zombies are ponderous, slow, and lack intelligent attacks,
the overwhelming numbers makes this encounter Hard to Deadly, and the PCs had better be careful when dealing with their first zombie
horde.
Goblin Zombies
You do your best to make your way back to Braek's Munitions Dump, but darkness and moving bodies make the trip dangerous.
From the darkness, enemies approach, not hidden, not ambushing, but stumbling along, barely discernable in the dark, slow
and ponderous they attack. As the enemy enters the light, you recognize them for what they are: zombies!
Walking dead come to rend, rip, and tear the living apart! Goblin zombies and hobgoblin zombies and other nasty things
made into zombies attack your party at the unfair 3 to 1 odds. Draw your swords! Use your magic!
Save yourselves and your horse and cart if you can!
Simultaneously occurs the Breaking of the Walls
The first great treachery occurs at the same time the Fire Giant assaults Tower 9, Tower 1, and the Front Gate.
The Wizard's Brigade, once loyal subjects of the Kingdom of Goldenshield, betray their government and begin to destroy the west
walls with magic. The Lieutenant of Tower 2 dies in his attempt to avenge the treachery. As soon as the dust settles, goblinioids and other
attackers force their way over the debris and into the fortress. Among them is Zhohlei, a yuanti pure blood,
a mercenary hired by the Fire Giant to join his attack. Her unique talent is that she can control desert snakes.
As the PCs return to Braek's Munitions Dump, they find the whole place under attack. A friendly NPC guides the PCs to safety,
but Zhohlei finds the PCs and has her snakes attack.
Zhohlei the Mercenary
Snakes in the Darkness
You cross the bridge on your return to Braek's Munitions Dump and see 2 carts overturned and 4 dead horses
lying nearby. 250 feet ahead, at the intersection of Palo Verde Boulevard and Wild Cactus Road many men are under heavy
attack by hobgoblins and goblins and there is no
sign of Jaken Voth. A few overturned carts act as cover to the nearly 50 combatants. A fire team,
under Sergeant Dusak from Tower 1, spots your party, heads you off, and leads you to safety (Area 1). Sergeant Dusak
leads you under the trellis that spans a gorge and shows you the hidden garden under the bridge. Once
your party is secure, he tells his men to get a quick rest and gives you the following news: "Tower 9 has burnt
down to the ground and a river of lava has run north all the way to the oasis. The Front Gate House was torn down
by the Fire Giant and the enemy forced their way into the fortress. Tower 1 survived but was abandoned during the
fires. The Fire Giant marched his army north and met the Marquis' army at the foot of the Keep. Though the
Marquis's army beat the Fire Giant's army off, the Keep was heavily damaged. The Fire Giant is currently
pushing his forces north towards the oasis and there is an understrengthed company at Aperton's Arch ready to give battle.
There is worse news to the west! Traitors have broken the west walls! Tower 2 is down! Most of the wall
between Tower 2 and Tower 3 has been blasted apart! Tower 3 is in peril! Traitors have turned to the enemy!
Lord Kisharite from the Wizards Brigade has led his unit to Tower 2 and, by using spell scrolls, the have destroyed the walls
with magic. Curse them! Once the walls were down, the enemy entered the fortress and attacked the Barn and the Stables.
This surging band of goblinoids broke off and attacked us here at the munitions dump. Rest here, wait for us to
finish off this band, and then come help with the wounded!"
Sergeant Dusak is eager to return to the
fighting and bids you wait under cover of dark until the worst of the fighting is over
and then return to help evacuate the wounded.
As you wait in the darkness for word to arrive, a lone woman appears
in front of you. At any other time you would welcome her and call out for her to join you, but on this dark night of horrors
you can only stare at her dark silhouette and fear some hidden menace or power. And with good reason, for without
warning poisonous snakes attack your party, 3 for each of you, and if you survive that assault you look and see that the
mysterious woman still stands watching you. Before you can react, a second assault of snakes, this time flying snakes,
attacks your party. If you survive this assault as well, you will look up, and see that the mysterious, shadowy woman
has dissappeared.
The Defense of the Keep Encounters
The enemy is loose inside the fortress. Goblins and hobgoblins, undead or alive, roam about pillaging as they go
many of them mounted on giant scorpians or giant lizards. The west most hamlets have been overrun and if the PCs have
made an effort to deliver the evacuation letters to the hamlets, then the hamlet leaders have begun to evacuate their 14 men
to the east in slow orderly retreat. If not, then Khalista will raise terrible zombies from their corpses. On a
positive note, the Dwarf Lord and the Elf Lady of Kahar have gathered their knights and are patrolling the fortress.
As the PCs move from location to location inside the fortress, they are very likely to encounter others wandering inside the
fortress. If PCs use cover and stealth to avoid encounters, have each PC attempt a DC 10 Dexterity (Stealth) check. For
every 2 individual checks that fail the PCs have one encounter on the way to their destination. Roll a d8, on a 5 above, roll
a d6 on the Enemy Encounter table, but on a 4 or less roll a d4 on the Friendly Enounter Table. If the PCs don't use cover
and stealth (e.g. - they are using a horse and carriage), roll a d8 for every 100 feet they travel, if the roll is 4 or less, they
don't attract any attention, but if the roll is 5 or above, reroll the d8, on a 5 above, roll a d6 on the Enemy Encounter table,
but on a 4 or less roll a d4 on the Friendly Enounter Table to see who the PCs meet:
e. The Ruining of Aperton's Arch
The Fire Giant leads his forces north, leaving behind many wounded and dead goblinoids, all of who will add
to Khalista's growing army of undead. Angry that he was defeated at the Keep, the Fire Giant has his forces gather
equipment and arms. He assembles his dwindling forces and marches north in an attempt to unite with his
other forces, the goblinoids that attacked the Rear Gate. But when he sends his advanced troops through
the Arch in the wall, which is the only way through, none of his forces return and more are drawn into a battle.
A small force under Captain Naviiam holds up the Fire Giants army for some time, inflicting great losses on
the gobliniods. Angry again, the Fire Giant himself enters the fray and disperses the meager defense.
The 2 hill giants then take great pleasure in dismantling the great Arch in the wall that seperates the south
side of the fortress with the Keep from the north side of the fortress with the oasis. It was a seemingly
small event, but the toll the Captain took on both the Fire Giant and the Fire Giant's army would be instrumental in his demise.
The goblinoids have been demoralized and slaughtered in front of Apperton's Arch, but the small defense of King's men gives way as Rhael
the Fire Giant pushes his way up to the front. As a reward, Rhael commands the Hill Giants to destroy the Arch.


In a strategic manuever, a small contingent under Captain Naviiam holds up the Fire Giants army in the bottle neck that is Aperton's Arch.


Captain Naviiam and the King's soldiers give way as the Fire Giant Rhael approaches.
The surviving goblinoid gang follows the Fire Giant north, where they find themselves in The Lush, a vast area littered with 65
foot tall palm trees crowded close together as far as the eye can see. Below the palm trees, fruit trees grow bountifully in
the shade, and below the fruit trees, vegetation of many types (tomatos, peppers, egg plants, cucumber, melons, beans, just to name a few)
litters the landscape. It is here, on this dark desert night, made even darker under that deep vegetation, that the remaining
goblinoids are assaulted on all sides by Goldenshield soldiers and the goblinoid army finally breaks apart and scatters.
But, most importantly, the assault was merely a cover for a top secret manuever to seperate the Giants from each other and
from the 100 Bug Bears that guard the Hill Giants. The 1/2 pack of Bug Bear Body Guards protecting the Hill Giants is assaulted by
only 2 plattoons, the assault is successful at seperating the Bug Bears and the Hill Giants but not one of the attacking soldiers of
Goldensheild survive. Simultaneously, an assault on the Fire Giant, led by the Marquis himself, is also an event both
bitter and sweet: the Fire Giant is slain but the Marquis of the Realm of Goldenshield and many of his close bodyguards do not survive.

Back at Braek's Munition's Dump, the battle to ward off the attacking goblinoids goes against the defenders.
All the attackers are dead but at a high price. Among the defenders, Sergeant Dusak and his five men lay wounded on the ground.
PCs will face a choice: they can rescue the wounded Sergeant Dusak and
his fire team, in which case they will face a pack of evil hyenas that have come to scavenge the dead, or they can leave
and save themselves the trouble. If they stay and are successful in rescuing the five wounded soldiers, they
will not only earn inspiration, but also they should have enough xp to move up to level 2.
Scavengers among the dead
Darkness pervades everything and in the soft desert wind small grunts, growls, and squeaks can be heard, until finally,
a laugh fills the void. Not just any laugh, but
the high-pitched series of short giggle like sounds that mark the distintive laugh of the hyena. If you wait for news
of Sergeant Dusak, only the sounds of the pack of hyenas among the dead will reach your ears and then you will hear men
screaming. If you go to look for Sergeant Dusak, you will find him and his fire team laying wounded on the battlefield.
But you're too late, the pack of hyenas has surrounded your party and numbers 10 per each of you, plus the old hyena matriarch and her
'' 5 hyena bodyguard. Use your skills, wits, wisdom, and knowledge to fight your way out of this one.
The Ruining of Apperton's Arch Encounters
The enemy has penetrated beyond the Keep and broken through Apperton's Arch. New's will soon spread that the Marquis has
fallen and the Wall has been torn down. The last dispatch from command is to evacuate to the east towers. There the
defenders of Kahar will regroup and make plans to hold out against the invasion. As a result, friendly encounters will be
rare (11 or 12 on a d12) but enemy encounters, without using stealth, are a given (if PCs move with stealth they will make a Dexterity
(Stealth) check contested by the Wisdom (Perception) check of the enemy). The roads are wide open and most enemies can
see in the dark so that PCs might be seen as in dim light or lightly obscured, but much of the desert landscape is covered in scrub brush
in many dry ravines and gullies that provide 1/4, 1/2, and full cover. Wise PCs travel through the rough terrain between
the hamlets to increase the odds of sneaking by the enemy.
f. The Battle at Palm Tree Lane
The Wizard's Brigade destroys the west wall.
Goldenshield soldiers launch a counter offensive and devestate the attacking forces.
The Breaking of the Walls
Because this event takes place simultaneously with The Fall of the Front Gate, the PCs can be either here near Tower 2
or there near Tower 9, but not both. However, because the PCs will be at such a low level, challenging the Wizards
Brigade near Tower 2 is not recommended. As a DM, try to guide the PCs to deliver supplies to Tower 9 and get back to Braek's
Munitions Dumb, or deliver the first letter to Moja hamlet, or evacuate to the east towers. The best place for PCs
is to be working for Jaken Voth at Braek's Munitions Dump. This is the best place for them to interact with both good
and evil NPCs. Here they will be able to role play for information, stock up on food, water, weapons, and ammo
or interact in combat with any number of enemies, either defending or attacking enemies that are better matched against them.
But once again, don't railroad them anywhere, because you can always use the Royals, the commanders, or Jaken Voth to rescue them
or heal them as the case may need. In case they get caught up where the Wizard' Brigade are and there is a TPK, you can always use
one of the high level NPCs to resurrect them and let them wake up in Tower 8. The actual reason for the death of
the Marquis comes from one of the first runs of this campaign where a low level party was too close to the Fire Giant
so the Marquis sacrifices himself to save the PCs, and I've kept it as an integral part of the story ever since.
Just before the sun sets, Khalista arranges a meeting with most of the Wizard's Brigade where she spends a great part
of her necromantic magic successfully achieving the mental domination of the Leader of the Wizard's Brigade, and
the charming of many of his subordinates. Almost all of them, consider Khalista friendly and are unwilling to attack her,
the few who resist flee off into the deadly night.
Simultaneously, as the Fire Giant commands his siege towers to assault the fortress
from both the north and south, Lord Lallenlos Kisharite, leader of the Wizard's Brigade, is under the geas spell from Khalista, and most of his
subordinates are charmed by her. Khalista commands Lord Kisharite and his underlings to destroy the walls and towers
of Kahar. The Lord, unable to refuse such powerful magic, leads his brigade west to the base of Tower 2
and commits the first treachery by commanding his brigade to destroy Tower 2 and the walls with desert bombs and spell
scrolls. Escaping the destruction of Tower 2, Lieutenant Hubbard nearly stops the treachery with only a handful of men but
they all tragically die instead. Tower 2 is destroyed when Lord Kisharite uses an earthquake spell, and then, the Wizard's Brigade
begins using desert bomb after desert bomb, and spell scroll after spell scroll, to destroy the walls of Kahar. It takes
the Wizard's Brigade an hour and a quarter to reach Tower 3 and, after some resistance, it too, is destroyed.
Nearly four and a half
hours after sunset, the Wizard's Brigade have destroyed both Tower 2 and Tower 3 and before another half hour is passed they will
reach Tower 4. They actually have some trouble along the way, and it is closer to 11 pm when they are in striking distance of
Tower 4. Though Tower 4 does fall to the spell scroll and desert bombs of the Wizard's Bridgade, their assault is finally
halted when one of the Royals of Kahar arrives. Lady Nalasteron Nazeri brings her 24 Green Knights of Mbili Hamlet and challenges
the Wizard's Brigade to open combat. Upon finding the Lady and her knights highly resistant to all of their magic, the Wizard's
Brigade breaks and flees in multiple directions into the darkness of the night.
As for our adventurers, after rescuing (or not) Sergeant Dusak and his men, the PCs will be forced to head east.
On the west side of the fortress, the goblinoids have found the wall has been destroyed and they enter the fortress
with excitement. Although the goblinoids are surprised, overthrown, and scattered by Captain Naviiam and the Kahar
cavalry, they still heavily outnumber the defenders.
South, west, and north will be cut off by heavy goblinoid manuevering. Melee fighting and long range attacks prevail in the
darkness causing many chaotic events.
If the PCs flee east down the road or head north east off the road and across the
open desert, they will not be pursued, but, within a half mile they will come across a hamlet (Mbili to the south, Tatu to the
north) under attack by a hobgoblin patrol.
Thamiar's Second Intervention
From the dark wilderness, a giant
snake appears, but hardly a menace any longer, but rather a form of friendly familarity. It is Thamiar the Guardian
Naga again, and his brief but quick message urges you to save the 14 men trapped by hobgoblins inside the hamlet.
PCs have the option of by passing the attack, but if they do, all 14 men
in the hamlet garrison will fall, and when Khalista arrives they will be raised as the terrible
Earth Zombies.
PCs will have an opportunity to surprise the attacking hobgoblin patrol but must be careful not to reveal themselves too soon.
They will be set against a hobgoblin patrol attacking wounded men in the hamlet, 1 hobgoblin per PC, with all the usual hobgoblin cunning
and expertise in warfare. If the PCs are particularly resourceful, the hobgoblin patrol could be mounted on wargs
or accompanied by a few wolves, however, we avoid the TPK at all times so that we all have fun. Adding wargs takes the
encounter from medium to deadly, but adding wolves only takes the encounter to hard. Once again, if the TPK does happen,
PCs can wake up in Tower 8 after having been recovered by one of the more powerful Lords wandering the fortress with their servants.
Hobgoblins
Escaping the scavenger attack, the war overtakes you from the south, west, and north. Humans and goblins
engage and disengage in combat, arrows and bolts fly randomly through the air, men and gobliniods screaming in pain
and despair. In the darkness, you can make out that the only open way is either east along the road, or northeast
cutting across the dark desert heading towards the Rear Gate. As you get near the hamlet, you hear the sound of
fighting, shouting, and you see men defending themselves against attackers. Your choice is clear: either stop and
give aid to the besieged men or attempt to sneak past this battle and be done with the whole affair. Those of you
that stay and help will, of course, be rewarded.
Development
If your party does not give aid to either hamlet, then both hamlets will be overrun and the dead will, by Khalista's
foul arts, be turned into the terrible
Earth Zombies, if your party lends aid and is able to rescue
some or all of the men then those men flee east and add themselves to the gathering resistance in the east Towers.
g. The Death of the Giants
Here, then, is the end of the Fire Giant and his two Hill giants. There is no dishonor to their end for they were
overmatched from the beginning. The Fire Giants name is Rhael. Rhael won the honor of attacking the
north kingdoms because of his martial prowess. Rhael is an irascible tyrant who bullies and forces his will on everyone
and everything around him, but he is sharp enough to take advantage of opportunities as they arise. Rhael's
opponent, the Marquis, a CR 10 cleric, is not only capable of defeating the Fire Giant alone but he is
also served by magic users far more powerful than himself and over 500 soldiers, from guards to knights, organized in well
trained phalanxes quite capable of turning back the goblin hordes. Spell casters and healers fill the NCO slots
bolstering their ranks with courage and leadership. Rhael, the Fire Giant and his two Hill Giants would have been slain
on the outside of the walls if not for the three treacheries. The first treachery is the Wizard's Brigade destroying
Tower 2, Tower 3, Tower 4, and most of the west wall. The second treachery is accomplished through inaction: the
team responsible for stopping the sappers under Tower 9 does not stop the sappers but instead goes before Khalista and
bows their knees. Meanwhile, the Fire giant solves problems with direct action, Rhael climbs on top of the blazing Front Gate House
and pulls the burning pieces apart and feeds the debris into the inferno that was Tower 9. In a few of the original
runs, it was Rhael and his servant Deformia Bellcrossia, a chain devil, who dismantle the gate house and stand guard
as the fire burns down low enough for the gobliniods to pass, so never feel like you are limited in your assortment of
bad guys.
Rhael's goblinoid forces, and then his two hill giants Rulos and Eclith, pass through the broken Front
Gate House and gather their forces to assault the keep. Such is the plans that the Marquis makes to hold his Keep
against the Fire Giant and the gobliniod forces: his contingent engages the Fire Giant and the goblinoid forces while
the Warlord of Braek's Munitions Dump, with his 8 paladin, fall upon the rear of the goblinoids and they crush them
like iron between an anvil and hammer. But the Warlord had, in the last 14 years, been corrupted and controlled by
Khalista, and he betrays the Marquis and does nothing. And so great is the mental anguish and torment that troubles him and his knights
that his alignment changes to lawful evil and his knigts become blackguards.
But Rhael recognizes his
danger and that with these forces he cannot beat the Marquis holding the Keep. He abandons the campaign and pushes
north to reunite with his forces attacking the Rear Gate. As Rhael's forces near Aperton's Arch, they meet a small group
of men under the command of Captain Naviiam. This small force does great damage to the goblinoid forces until Rhael himself
challenges them and forces an opening through the Arch. On the other side of the arch, Rhael attempts to gather
his forces but is unable. Under the enormous palm trees, vegatation grows thick and the goblinoids are assaulted on
three sides, a wedge of Goldenshield soldiers forces the giants apart, and two phalanxes assail the bugbear body guard. Although
there will be no survivors, the charge of Lieutenant Belinda Moran with the soldiers of Tower 3 and 4 against the bugbear
bodyguard will be made into a song and an anthem. Nor will they be the only heroic deaths in this Dark Crusade,
for both Rulos and Eclith escape to the east and fight fearlessly until, at last, they are surrounded and overcome by
the knights and veterans in the fortress. Rhael himself witnesses the destruction of his army as the Marquis
brings his force from the south and catches the leftover goblins and scatters them to the wind. Rhael stands alone,
but not undone, he fights against the Marquis and his bodyguard until he falls, a noble and glorious death in battle.
Nor does he die alone, innocents get caught up in the action, and many of the Marquis' bodyguard and the Marquis himself
put themselves in harms way to protect the innocents. The result is that they fall by Rhael's great sword even as life
leaves his damaged body.
When we left our PCs, they were in either Mbili or Tatu Hamlet, and should have been successful at ambushing
a hobgoblin patrol that was pinning down a bunch of wounded guards. From the huge amount of noise and fire coming
from the west, it is clear that the PCs must evacuate soon. If any of the soldiers from the hamlet garrison
die, they will be raised as
Earth Zombies when Khalista arrives in a few hours.
The rescued men
evacuate to the east Towers in groups of 5, thanking and rewarding the PCs on their way out. Here is when we,
as the DM, get to pile it on to the poor PCs by sending them to as many hamlets as they will go to by any means that we
can get them there. My favorite method is to have a dying messenger hand off a sachel of letters from the Lady of
Kahar to each remaining hamlet asking each leader to evacuate to the east Towers. In each hamlet is a garrison of
14 men and if the men are sent to the east Towers they will add their number to the resistance fighters, but if they are
not accosted by the PCs in any way, then they are overcome in the war, die, and are raised by Khalista as
Water Zombies (Nne, Tano, and Sita),
Air Zombies (Nane and Saba),
Earth Zombies
(mBili and Tatu), or
Fire Zombies (Moja). The PCs will have to make their way
through the zombie infested dark desert night, confront the surviving hobgoblins and goblins, give a wide berth to
the fire newts and salamanders infesting the south side of the oasis, carefully avoid the terrible plant like blights
infesting the west side of the oasis, keep away from the spirits, spectors, wights, wraiths, and mummys that infest
the hamlet temples, evade the dust memphits and other elementals summoned by evil, and arrive at each hamlet
in reasonable time before the hamlet garrison is overrun.
Evacuate to the East Towers
The fortress is broken, groups of men run by yelling warnings to retreat, lightning and fire lights up the western sky.
Among the wounded and dying a courier calls out to you, holds a satchel full of letters and tells you:
"Please! Deliver these notices from the Lady of Kahar to each hamlet! Do not stop, do not give up,
we swore to the lady that we would deliver these notices, but now I am the last, and I, alas, am dead."
With that the courier dies and leaves the undelivered letters in your hands.
It is up to you. Will you deliver the letters and attempt to evacuate the men? Honor and reward
are sure to follow, but the first step is, as always, up to you.
ii. The Queen of the Desert
The God Wars
Khalista the Lamia is a high ranking General in the demonic armies with jacakalwere servants deep in the nine hells
1. The God Wars occur and throw her world in turmoil, she grabs 3 servants and flees through as many portals as she can
2. She arrives on Lophator in The Whirlpool of Danube and is overcome by its power
3. She awakes on the shores of The Aljana River far, far away with only 1 servant
4. Shaken by the power she felt, she flees south across the endless Hamakhaave Desert
5. She finds jackals and settles in the Ruins of Sakala
6. Khalista the Lamia becomes rich and makes quite a name for herself: "Queen of the Desert"
The Necromancer
A dark and stormy night brings Prysm, an evil necromancer, who is, clearly, Khalista's superior
1. Khalista is trained in the arts of necromancy by Prysm
2. She receives Prysm's Death Spear - with it she can command Mummy Lords, Mummys, Wraiths, Wights, and ghasts but at a high price
3. Khalista the Lamia crosses the endless Hamakhaave desert with 100 jackalweres and arrives in the Red Rock Mountains in the 48th year of
the Kingdom of Goldenshield.
4. She is sent across the desert to Kahar to sieze the fortress after the Fire Giant leads goblinoids in an attack
5. She witnesses the total defeat of the Fire Giant, the two Hill Giants, and 1000 goblinioids.
The 16 Year Wait
Khalista the Lamia retreats south to the Red Rock Mountains where she dwells in an ancient abandoned temple for 16 years to await the next Dark Crusade
1. She begins to make money by raiding caravans and while she makes a decent living, she longs for more
2. When coal and chalk are discovered in her valley, she siezes many slaves and begins mining operations
3. She finds a market for coal, hires laborers and artisans, and begins to make real money.
4. She never stops raiding and stealing from caravans
5. Her spies infiltrate Kahar fortress.
6. Using her cunning and persuasion, she creates a market for chalk and begins a buisness relationship with some
of the Lords of Kahar.
The Traitors
In the decade and a half that passed, Khalista excercised her skills as a liar, a thief, an infiltrator, and an instigator.
1. Terebo follows Khalista's instructions to the letter and infiltrates Kahar.
2. He sows distrust and enmity between the Healers and the Mages.
3. Khalista, scrying from afar, chooses her target - Kyrakis Braek, Lord of the Healers
4. She has her spies make contact with Kyrakis Braek and learns he is a. insecure b. easily manipulated c. victom of bullying
5. She (her spies) convinces Kyrakis to deal in chalk, teaching him the value of lime, and the secret of the "Desert Fire Bomb".
6. She is a cruel master and humiliates and belittles Kyrakis and yet she entices him into a life of corruption and debauchery
increasing her hold on him.
7. Kyrakis becomes rich and famous and earns the enmity of Lallenlos Kisharite, Lord of the Mages
8. Kyrakis, with great pomp and circumstance, demonstrates the "Desert Fire Bomb" to the Marquis and earns great advancement
for himself and his healers. Apperton's Arch is the result.
9. Lallenlos, in great jealously, perfects spells to move earth and stone and a great building frenzy begins.
10. Barabara Rd and Desert Hills Cut Off are completed within 2 years as a result of this competitive contest
11. Convinced she can keep Kyrakis firmly under her control with bribery and betrayal, Khalista chooses her next target - Lallenlos
Kisharite, Lord of the Mages.
a. The Mangonel
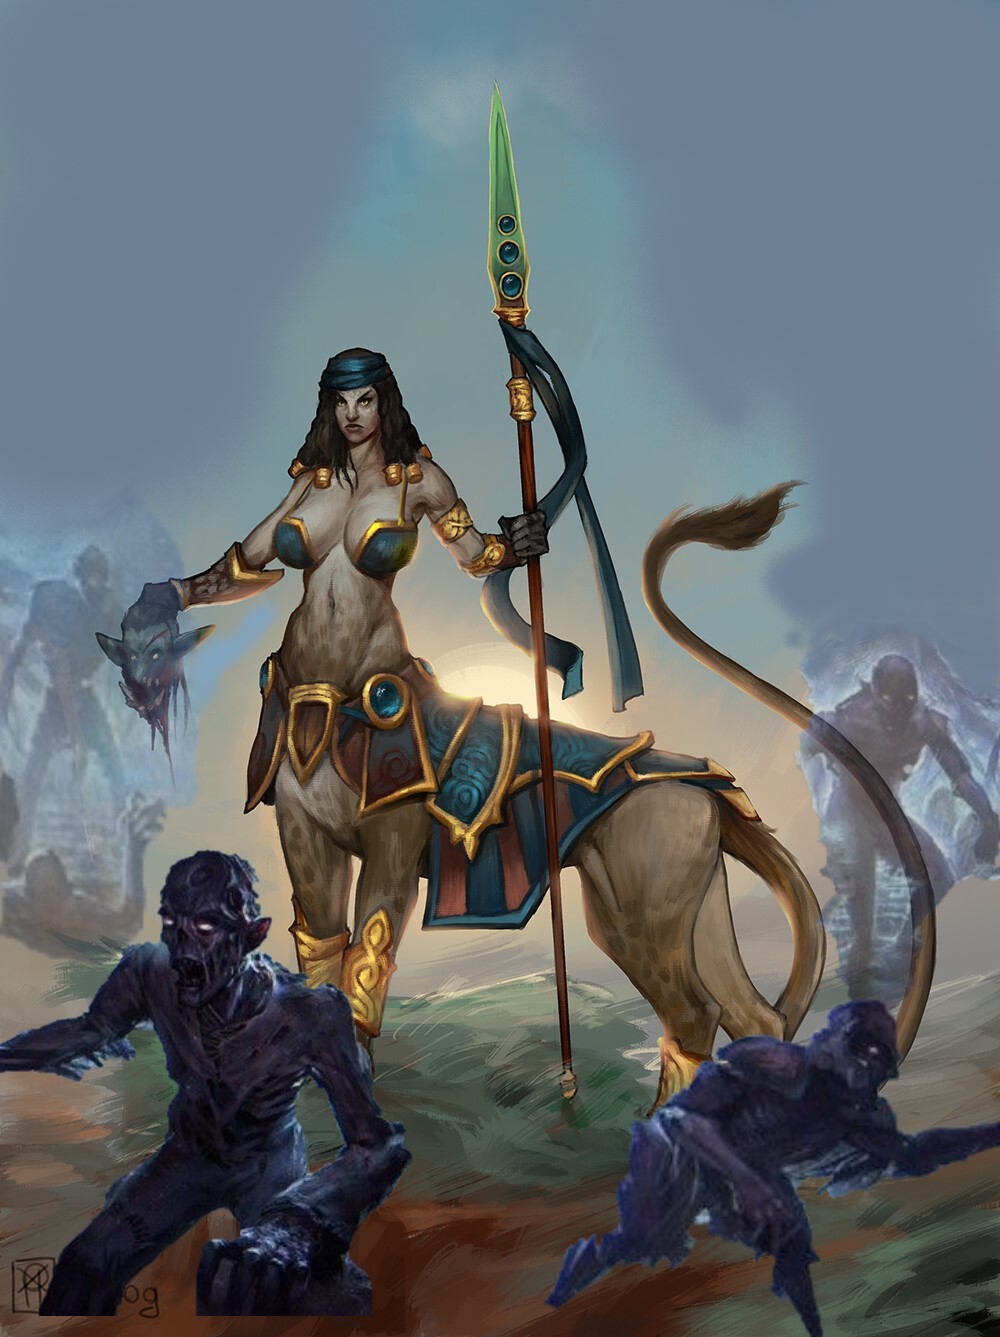
Khalista raises the dead
Khalista disguises herself with magic and poses as a hobgoblin commander. She has goblins gather body
parts and dead goblins and pile them into a mangonel. She then animates the dead bodies as the
catapult flings them into the fortess. The zombie and zombie parts hunt for humanoids to kill inside the fortress.
Level One BattleMaps
b. The Fireball at Tower 9
Khalista, eager to cause as much destruction as possible, sends a fireball into the sapper cave beneath Tower 9
where magmin dance and play in the flames. The magmin relish the extra heat and blaze extra hot fire from themselves
until Tower 9 collapses in on itself in a great firey ruin. Khalista targets the magmin with her necromantic spell
finger of death, but her first attempt to create a fire zombie is not successful. Instead, a merging of the elemental
plane of fire and the material plane where the ring of stones that is all that is left of Tower 9 occurs and lava runs
north, skirting the Lush Hills to the west and splashing into Surgebuilt Lake with a huge plume of steam.
c. Retreat to Tower 1
Khalista wisely withdraws to recover her strength. She will inhabit Tower 1 for over 2 hours.
d. The Fire Snake Eggs
e. The Kruthik Eggs
f. The Fire Newts
Having lost a battle against a stronger tribe, Packnet Toterouch leads his tribe of Firenewts east down The
King's Road. Once he arrives at Kahar, his tribe is in dire need of water and he capitulates at once
to Khalista's servants but finds he is well rewarded. The Queen of the Desert gives him The Lush Valley
for his tribe to dwell, provided he protects the area and patrols The King's Road during the hot desert day, allowing
only merchants access to Kahar, and attacking all military patrols. His tribe, protected from the deadly
Kruthik in the east by the river of lava, revel in the steamy delta where the river of lava meets Surgebuilt Lake.
g. The Planting of the Gulthias Tree
iii. The Coming of Zamj Pustinjski
An Exiled Prince
The blue dragons of Jagged Rock Drop wage war against each other, with half of them supporting the usurper
Wade, and the other half staying loyal to the fallen King Arcilus. The son of Arcilus goes into hiding, far
into the south, deep into the Hamakhaave Desert. There he establishes a lair and eeks out a meager existance
awaiting word from his kin on when he might return to Desolation. He is spotted by Thamiar the Guardian Naga
with the Stone of Seeing and Speaking and falls victim to a suggestion: to fly south, farther south than he might
ever have flown for any reason at all. There, 400 miles north of Kahar, Thamiar the Naga uses the magic of geas
to force the dragon to establish a second lair here, and then Thamiar commands the young blue dragon to forget the
entire encounter. Thus the stage is set, the future has changed, the Lamia will not overcome the soldiers of Goldenshield
with an army of undead because the dragon's kobold army is attacking from the north so she must divert her undead army
to deal with the kobold attack.
a. The Taking of the Rear Gate
2/5ths of the gobliniod gang is sent north by Rhael the Fire Giant to assault the Rear Gate.
They take 3 siege towers and march in from the west after going around the great fortress inbetween Flaming Grotto Canyon and
Tower 4. When the goblinoids charge the Rear Gate in a series of 3 attacks, the defenders defeat the 3 siege towers,
kill 24 goblins and 8 hobgoblins, and wound 62 goblins and 14 hobgoblins. The defenders stop the goblinoid
attack. News runs through the goblinoid ranks that the West Wall has been torn down, which is, indeed, the truth,
as the Wizard's Brigade turns traitor and destroys 3 Towers and a lot of the Wall. The goblinoids disengage with
the defenders of the Rear Gate and march back to the west to enter the fortress from that direction.
Just as the defenders
of the Rear Gate think that they can relax, 2 seperate groups of kobold warriors assault the Rear Gate. Over the course
of a few hours, the defenders endure multiple attacks on both buildings and the Tower. Although their accomplishments
are commendable, they are unable to defend both sides of the wall against the continual reinforcements of their small enemies.
The kobolds establish a position on the west side of the wall. The defenders establish a front on the Wall and hold
on to the buildings and Tower but can only watch as more and more kobold reinforcements enter the battle. Without
reinforcements, it is only a matter of time before the kobolds overwhelm the defenders.
b. The Sand Pits
c. The Razing of the West Building
Zmaj punches a whole into the west building of the Rear Gate. Once inside he destroys every floor but leaves
the shell of the building intact.
d. The Key to the Armory
e. A crooked path to the Rear Gate
f. The Haunted Hole
Almost as soon as Zmaj Pustinjski finishes carving out his liar entrance, Hollowlife, wraith servant
of Khalista the Lamia, begins attacking him with an undead army. These attacks are quick bursts of
multiple assaults difficult for the defenders to predict. More importantly, Hollowlife has his undead hordes
ambush any kobold patrol caught outside the liar entrance or the Rear Gate. These actions are enough
to stem the invasion of the growing kobold army. However, with her undead army busy dealing with the new
threat, Khalista has no means at her disposal to deal with the resistance fighters holding out in the last
three surviving Towers.
The Entrance to the Lair of
Zamj Pustinjski
g. The Silver Plated Swords
Setting the PCs on a course
The survivors of Kahar, loyal to Goldenshield Kingdom, have gathered under the leadership of Thamiar the
Guardian Naga who calls all resistance fighters to the east Towers. Tower 6, Tower 7, and Tower 8, along with
the wall that connects them are all held secure. Thamiar the naga communicates with those he wishes by casting
Sending. In this way, he is able to instruct the leadership of the resistance (namely The Lady of Kahar) on how
to best defend the three Towers. Thamiar may not know about the PCs.
But the PCs meet an important
NPC who will report to them that the Wizard's Brigade, the Priest's Brigade, and the Warlord of
Braek's Munitions Dump have gone traitor, are responsible for the breaking of the walls and have caused the death
of 100s of Goldensheild soldiers. These rogue leaders still have a sizable following and are a real threat
to the Kingdom of Goldenshield. The Wizard's Brigade have siezed Barracks A, the Warlord and his BlackGuard
have set up in Barracks B, and the Priest's Brigade have taken Barracks C. A band of druids have brought
Jared's Pillars, four stone pylons filled with the power to ward off any enemies. The druids set one pillar
at each Barracks and the forth pillar they set across from Barracks B and next to the oasis. Three of
the pillars are complete and now a shimmering protects the Barracks. Inside the shimmering a PC sees
as if in dim light and the ground is treated as difficult terrain plus all perception checks are made with
disadvantage. The druids, an ancient sect of magic users, are setting up the forth and final pillar.
If the druids succeed in erecting the last pillar, the pillars will link and create The Labrynth, an
impenetrable maze of 30' high 10' thick walls that encircle all four pillars. Destroying the pillars
is the only way to get rid of the Labrynth.
The PCs are instructed by this important
NPC to stop the druids from completing the
ceremony which activates the last pillar. If the PCs fail to stop the druids the Labrynth comes into being,
but if the PCs are successful in stopping the druids only the shimmering protects the Barracks. Immediately
following the encounter with the druids, the important
NPC returns and the PCs
are given new orders: capture or terminate the traitors. Unknown to anyone is that the order actually
comes from Khalista. She cast Major Image and attempts to mimic the
NPC without the PCs
catching on to the fact that they are being fooled.
B. Hamakhaave Desert
The Crossing
Khalista and her jackalweres cross the desert from the south to the north.
i. The Sakalan Occupation
The Haunting
Khalista watches from afar as the goblinoids attack the fortress under the leadership of Rhael the Fire Giant.
a. The Haunting of Tower 1
After expending her power on forging a fire from another plane, Khalista leads her minions to the abandoned
Tower 1.
b. The Keep and The Library
Battle of Annihilation
Khalista's jackalweres sieze the damaged keep and the Library and kill or enslave everyone within.
c. The Kobold Incursion
News from the North
A great commotion causes Khalista to sieze her tampering and cast her scry spell. She soon spies an army
attacking from the north and she knows the Rear Gate has been taken.
d. Awakening Ahmensara
The Teleportation Circle
Khalista teleports back to her temple, hurries down to the dungeon level where she dares to awaken the Mummy
Lord. She gathers the canopic jars and returns to Kahar.
ii. Wasteland Wizards
The Barracks
The wizards take Barraks A, the priests sieze Barracks B, and the guilt ridden blackguards take Barraks C.
a. Wizard and Snake
Flight to the south
After their defeat at the hands of Lady Nazeri and her guards, the Wizard's Brigade attempts to enter Barracks A.
There they are confronted by Thamiar the guardian naga who gives them this last chance to repent. The Wizard's
Brigade are overcome with guilt and reject Thamiar's offer and rise up against him and kill him. News spreads
quickly through the land that the guardian naga is dead.
b. Hunters of the Wadi
Jaken's Pillars
The Desert Druids make themselves known and begin to raise the pillars that will create the Labyrinth.
c. The Green Scorpion
Rescue
When the PCs are in dire need, at the end of the round a small green scorpion will appear, approach to within
15' of the PCs and dig itself into the ground (1 round). On the end of the next round, Thamiar the guardian
naga burst out of the ground to help the PCs.
d. The Labyrinth
Last Chance
Before the druids are complete, the PCs could have one last chance to stop them.
The Dwarf and the Fairies
PCs are confronted by a playful pixie and, depending on how that encounter goes, they might either be shown
the entrance to the Labyrinth by either the pixie or a dwarf hunting and killing sprites.
C. The Dead Rise
The Undead Curse
Khalista uses her necromantic powers to raise scores of undead servants.
i. The Mummy Lord Battle
Evil
The battle.
a. The Porch and the Pile of Rocks
The Battle Begins
Amensara, with an undead army with him, attacks the brand new dragon lair
Traps
A multitudee of traps slows down the undead armies advance.
b. The Lightning Block Sentinels
Lightning Eye Beam
Four 12' high pillars with swiveling 4' diameter spheres on top, shoot Lightning Eye Beams out of small gems.
These beams decimate the undead until Amensara puts forth his power to stop them.
c. The Cimic
The Mirror
Set on top of a large pole is a dish like mirror that reflects the sunlight into the tunnel hole.
The Reflection on the Walls
Waiting for the undead army is the cimic, it devastates the low level monsters but flees when the
Mummy Lord arrives.
d. The Umber Hulk Tunnel
The Dark Corridor
Hiding and waiting for the undead are a couple of umber hulks.
ii. Dragon Lair Siege
Wicked
The dragon.
a. The First Lightning Chamber
The Two Mirrors
High on top of 2 20' poles are 20' diameter dishes that reflect sun light into the lair.
Ambush
A lightninig elemental and a group of grells attack the undead intruders.
Brute Force
Amensara forces his way into the dragon's lair by sheer brute force, losing many of his undead
minions along the way.
b. The Second Lightning Chamber
Hidden
The Passage way that leads to Zmaj's chamber defeats the Mummy Lord and all the enemy hosts go by the
hidden opening.
c. The Frightened Dragon
Zmaj Flees
Amensara inflicts Zmaj with fear which causes the dragon to flee the battle and hide in his hidden chamber.
Amensara in Pieces
Amensara almost wins the battle, until the servant of the dragon uses sword, violin, and the second ligthning
elemental to destroy the Mummy Lord and hack him in pieces.
d. A Coward Flees
The Death of Ghiliba Mbaya
Even with victory nearly in his grasp, courage fails the servant of the dragon and he flees the lair
only to run into the wraith with the 12 wight soldiers under his command. He is overcome and dies in a
last effort to return to the lair. His sword and his violin are taken south.
Zmaj returns
With the Mummy Lord defeated, the dragon recovers and burst forth upon the remaining undead chasing them
all out of the lair.
The Siege of the Dragon Lair
The wraith places undead surrounding the dragon lair and begins the long siege.
D. The Traitors
The First
Kyrakis Braek was the first victim to fall to the lamia's schemes. He was befriended by her
servant Terebo, a jackalwere, and was brought to ruin during the Dark Crusades.
i. The Ecclesiastic Brigade
Devotion to Faith
The priests.
a. Kyrakis Braek
The Timid Healer
Kyrakis Braek is targeted by the minions of Khalista.
b. The Sculptor and the Gargoyles
The Swap Meet
Kyrakis Braek is turned away from the magicians audience and his plans to make War Healers as a rank of
corporal in Goldenshield Military comes to nothing. Fustrated and despondant, he follows his wife outside
the fortress to a new swap meet.
The Stoned Carved Sculptures
Appreciating the rarity, Kyrakis Braek purchases two decorated stones and a gargoyle statue.
c. The Sappers at Tower 9
Water Spells
Kyrakis Braek brings his acolytes and priests to the Tower where they have been well trained to extinguish
flames and fires by using Create Water spells.
d. Return to the Munitions Dump
The
Kyrakis Braek is
e. The Rebellion of Jaken Voth
The
Kyrakis Braek is
f. Barracks B
The
Kyrakis Braek is
ii. The Wizard's Brigade
The Magicians
The wizards.
a. Lallenlos Kisharite
The Ill-humored Magician
Lallenlos is .
b. Compulsive Avarice
Dark Thoughts
Lallenlos Kisharite is.
c. The Lieutenant of Tower 2
Bernard Hubbard
Suspecting something is off from the begining, Lieutenant.
d. Resistance at Tower 3
Belinda Moran
Hours before her desperate stand against 100 charging bugbears, Lieutenant Belinda Moran is key
to the evacuation of Tower 3.
e. Lady Nalesteron Nazeri
The Desert Druid
The Lady of the Sands begins.
f. Barrack A
Flight to the Barracks
After their defeat at the hands of Lady Nazeri, the Wizard's Brigade flees to Barrack A.
iii. The Warlord of Braek's Munitions Dump
The Paladin
The Paladin.
a. Nicholas Quinn
The Faithful
Nicholas Quinn is an example of Lawful Good.
b. The Broken Vow
The Oath
Nicholas Quinn is .
c. The Black Guard
The Change
Nicholas Quinn and his paladin change .
d. The Queen's Command
The Expulsion
Nicholas Quinn is .
e. The Guardian of the Stone Door
The Stone Golem
Nicholas Quinn is .
f. Barracks C
The Tortured
Reft with guilt and shame the black guard take refuge inside Barracks C.
iv. The Druids of Koya Rion
The Wadi
The druids are led by.
a. Searc O'Conner
The Faithful
Nicholas Quinn is an example of Lawful Good.
b. Rescue
The Prison
The servants of Khalista free Searc O'Conner from the Hags of .
c. Desert Druids
The
.
d. Illusions
The
Nine .
e. The Pillars of Janae
The cost
sacrifices.
f. The Single Path
Maze or Labyrinth
The difference between a maze and a labyrinth is that a maze has multiple paths that may or may not
lead through the maze, while a labyrinth is typically one continous path. While technically a maze,
the appearence is that of a single path and it is, thus, a labyrinth.
E. The Patriots
Loyal to the Throne
Two Lords were here before the building of the King's Road. The Desert Dwarf Lord Fahred Ahmandi and
the elf desert druid Lady Nazerati Nazeri.
i. Safe Haven
Six
After the night of the war, there were only six safe havens left in what was once the fortress of Kahar.
a. The Hero in charge of High Plains Farm is Landyn Midha
Above the Cliff
above the cliff.
b. The Hero in charge of Chissum Ranch is Anderson Chissum
Below the Cliff
Below the cliff.
c. The Hero in Charge of Braek's Munitions Dump is Jaken Voth
Meeting the Traitor
Kyrakis Braek is.
The Acolyte
Jaken Voth rebels against the traitor magicians returning and wishing to control the Munitions Dump
d. The Heroes in charge of the remaining Three Towers are the Captains
Tower 6
With Saba Hamlet less than a 1/4 mile away, Tower 6 is able to secure a post on top of The Barren Knoll.
Tower 7
Using Nane Hamlet as a staging base, Goldenshield resistance fighters are able to gain back a great part
of the ground they lost, starting with the Dry Creek Bed.
Tower 8
Starting with The Fountains of Palm Tree Lane, the soldiers that gather at Tower 8 regain the lost ground
from Tower 8 and the wall to the river of lava.
e. The Secret Garden of Lady Nazerati Nazeri
Mbili Hamlet
Long before the people of Goldenshield built the fortress and established Mbili Hamlet, the Secret Gardens
of Lady Nazerati Nazeri flourished. After the Dark Crusades, most of the Hamlet is lost to the enemy but
the Secret Gardens remain a secure haven for those loyal to Goldenshield Kingdom.
f. The Desert Castle of Lord Fahred Ahmandi
The Fortress of Lord Ahmandi
Though enduring constant battles between goblins and the undead versus kobolds and the dragon, Tatu Hamlet
is never entirely overrun for very long. A strange reverence settles on all creatures, freinds and foes alike,
and combatants leave the area of the many temples alone.
The World
Some players are curious and will wonder where in the multiverse this place might be.
Lophator is a planet, that had a 4 billion year history, hosted life in a variety of forms and was
suddenly and violently ejected out of its sysyem. After nearly a million years of wandering as a rogue
planet, Lophator was captured by the gas giant Neyarvus circling the blue star Peotor in the galaxy Diathalatos.
In the west of the land, at the equator, is the land of Fortune and the Land of Blighted.
Press to return
Kel's Map
Fortune includes North and South Green Field Valley, the Viture plains, and the
mountains. The Land of Blighted includes the Hamakhaave Desert. Most of the
central desert is heavy sand and dunes, and, applicably, called The Sands of Hamakhaave.
In the north, the desert breaks up into hard packed clay, barren mountains, and sparse
vegatation.
Gia's Map
The Viture plains are endless flat and rolling grasslands bordered by two massive rivers, the Alsakina River
in the north and the Aljana River in south. Forty five miles south of the Aljana River, the green plains
end suddenly and the land drops two thousand feet in a series of rocky crags. At the foot of these impassible,
wastelandy, jagged cliff hills, the Hamakhaave desert stretches south for nearly fifteen hundred miles. As the
sand dunes begin to accumulate, barren rocky mountains litter the north of the Hamakhaave desert. As the land
droped to its lowest point, at 356 feet below sea level, men dug down and discovered water, alot of water, that spilled
out and began to fill the canyon to the north.
As inhospitible as the Land of Blighted was, it was the quickest route from the forest mountains of the Kingdom
of Goldenshield to the lush green plains of South Green Field Valley. So the Marquis of the Realm
took it upon himself to build:
The King's Road
Water Under Hamakhaave
Jagged Rock Drop
The two thousand foot fall from the Viture Plains to the Hamakhaave Desert
A view of a small part of the Jagged Rock Drop from the bottom looking up.
A view of Jagged Rock Drop from the east, just north of Desert Exit.

The edge of the Jagged Rock Drop and the Sands of Hamakhaave

Putting the Maps together


 on the eastern half of the continent Qaraton,
 in the lands of Fortune and Blighted,
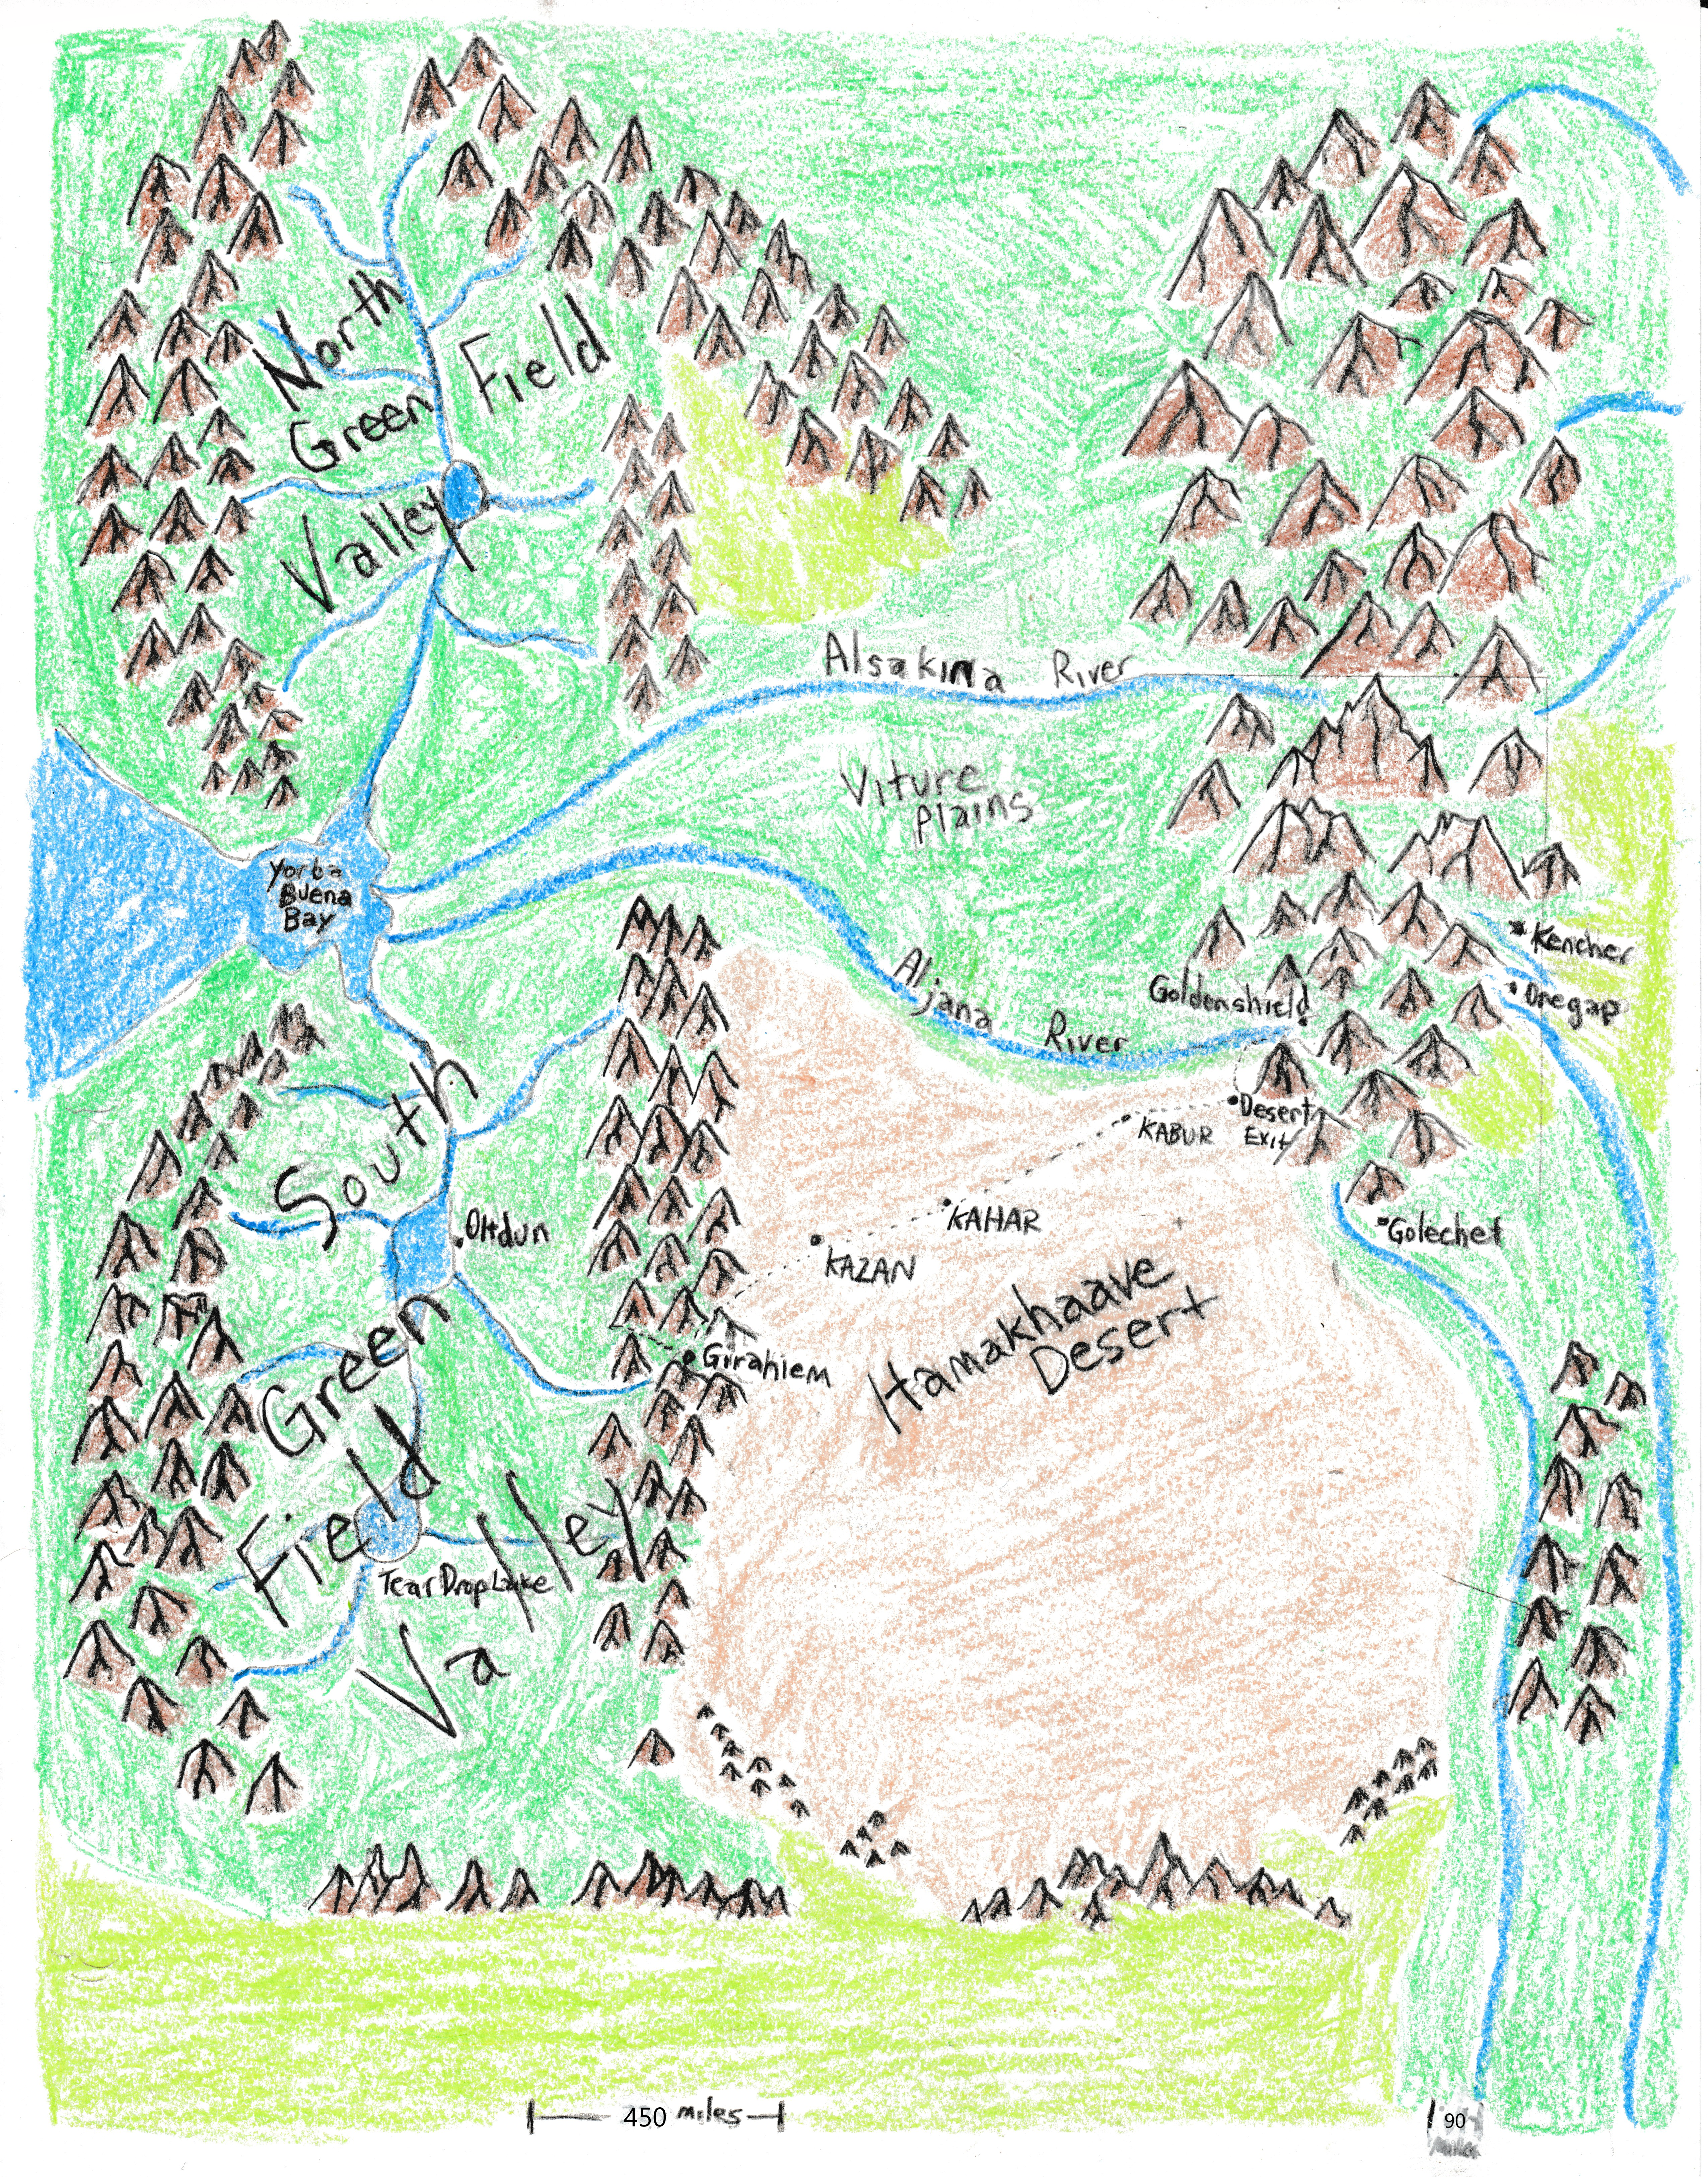 a vast realm of kingdoms, nations, and settlements surrounded by hostile combatants,
vicious opponents, and terrifying foes. The initial setting, where the characters begin, is set in the
the desert fortress of Kahar that guards the King's Road that spans the entire Hamakhaave desert. Kahar is one of three
desert fortresses that guard the King's Road that connects the bountiful land of South Green Field Valley to the forest
mountains of the Kingdom of Goldenshield ruled by the Paladin King.
a vast realm of kingdoms, nations, and settlements surrounded by hostile combatants,
vicious opponents, and terrifying foes. The initial setting, where the characters begin, is set in the
the desert fortress of Kahar that guards the King's Road that spans the entire Hamakhaave desert. Kahar is one of three
desert fortresses that guard the King's Road that connects the bountiful land of South Green Field Valley to the forest
mountains of the Kingdom of Goldenshield ruled by the Paladin King.