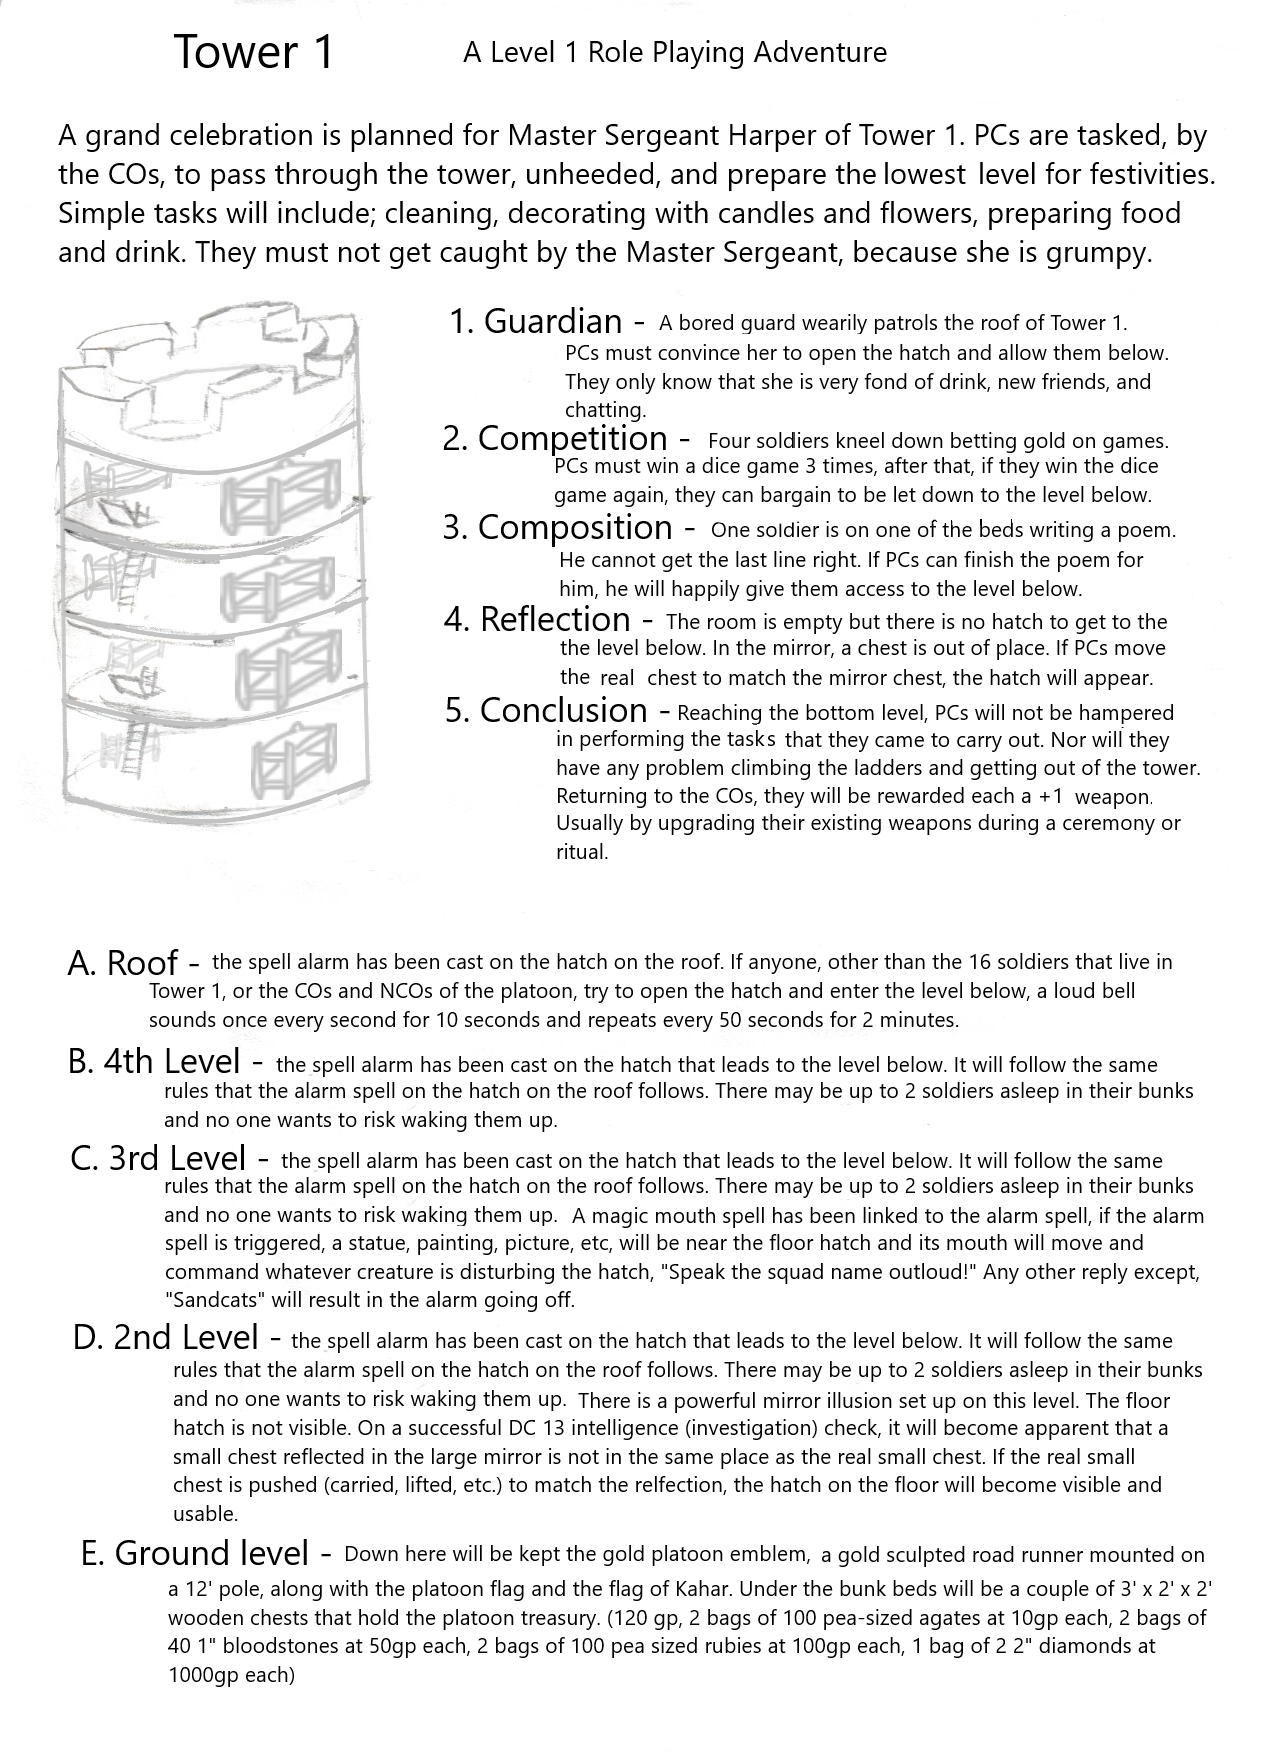
Tower 1
Introduction

Kahar is one of the great frontier fortresses of the Kingdom of Goldenshield, standing with its sister citadels — Kazan upon the Impossible Bridge to the west, and Kabur far to the east.
Tower 1 stands as the twin of Tower 9, a bastion of discipline and order at the Front Gate. Its garrison, under the charge of Master Sergeant Harper, has endured countless assaults and remains a symbol of resilience within the fortress of Kahar.
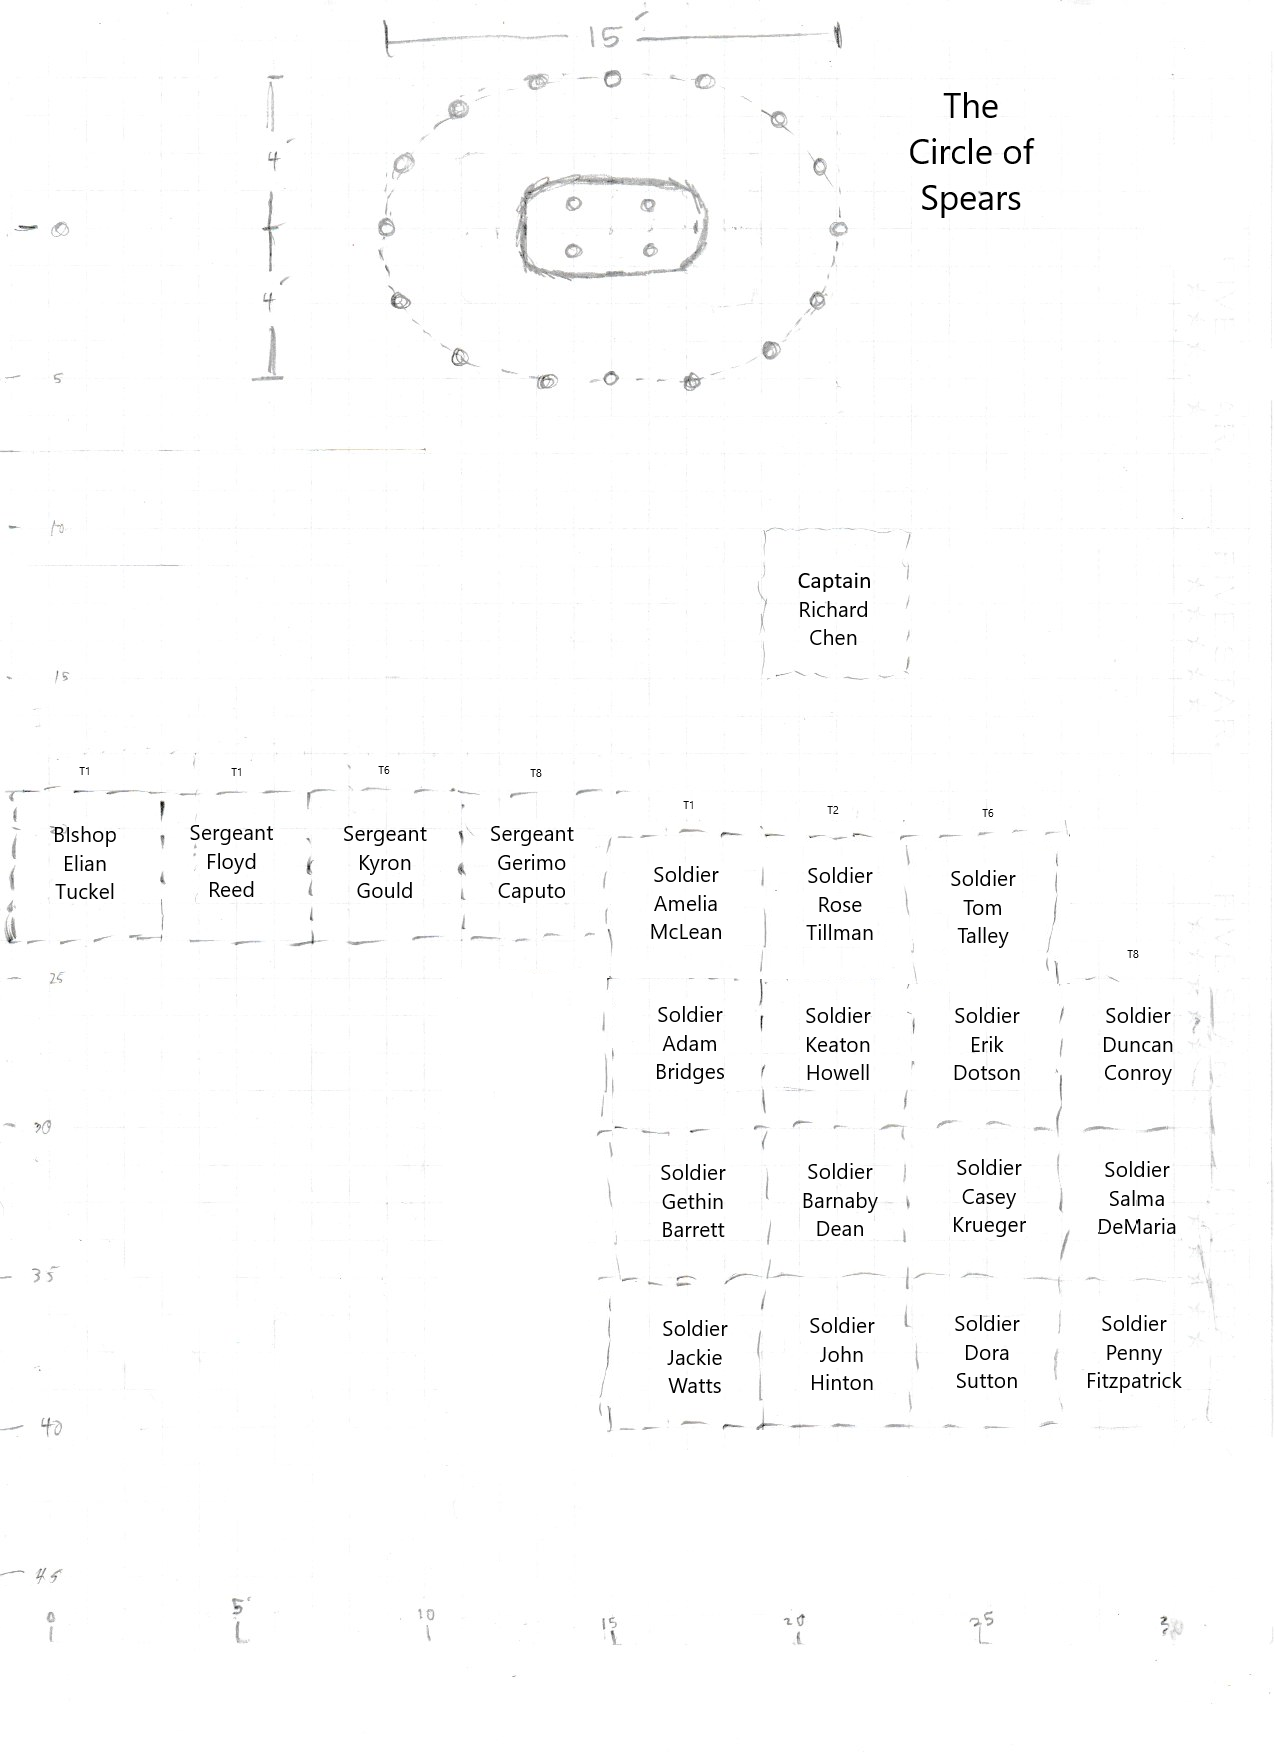
Tower 1 is commanded by Captain Richard Chen but he will mostly be found in the west officer quarters along with the 4 clergy officers, Bishop Brandon, Bishop Tuckel Bishop Horisor, and Bishop Sanders. Tower 1 is a subsidiary of The Front Gate, as a result, the 16 soldiers garrisoned inside Tower 1, along with the 8 NCOs garrisoned outside the tower in the square brick officer quarters building, regularly report to the curmudgeonly Master Sergeant named Millicent Harper, and a young Inquisitor named William Su. Both of these commissioned officers report to Lieutenant Casandra Reese who can be found at Tower 9, the sister to Tower 1. The Master Sergeant is a bully, but her cantankerous negativity and sour temperament are perfectly contrasted by the affable positivity and perpetual good nature of Inquisitor Su. The 2 officers are inseparable friends and both Capt. Chen and Lt. Reese are both very dependant and extremely fond of the pair.
Tower 1 is a huge tower, cleaned and washed with water and lime weekly. The top of the tower, protected by battlements, boasts over 571 1/2 ft2, and is ready for battle and war. Barrels of crossbow bolts and arrows are lined up neatly in rows. Piles of sizable rocks are neatly stacked in accessable positions, ready to drop or throw at an enemy either far below or climbing hastily up ladders and ropes. A ballista, capable of hurling stones, bolts, or javelins, is operated by Inquisitor William Su with great accuracy.
Each level has 2 bunk beds, a ladder leading to the trap door above, and a trap door leading to the level below (except the ground floor). Very much like the typical tower of Kahar. Just like every other tower, there are no windows, the only entrance and exit for each room are the trap doors on the roof and the floor, and the walls are 4' thick. The roof has one trap door leading down to level 4, but, even if in the unlikely event that no one was guarding the roof, the trap door is protected by an alarm spell (renewed every 8 hours) that only allows designated authorized personal to use it. Therefore, only the 16 soldiers of Tower 1 and the CO's and NCO's of the Front Gate platoon can open the trap door without setting off a loud hand bell alert.
The roof of Tower 1 is prepared for battle. Barrels of ammunition, for bows, crossbows, and piles of rocks for slings and throwing, line the roof in neat isles. Weapons are hung in accessable areas and step ladders are set up in places needed to see over the parapet. The only entrance on any of the towers to the lower levels is the top hatch on the roof.
As far as duties and assignments go, each soldier rotates assignments once a month and then starts over when neccesary. Three soldiers guard the roof of the tower, and they will never sieze surveilling south out into the desert plateau. They answer to the NCO's in charge of the dual portcullises. Meanwhile, three more soldiers, usually led by the Inquisitor, patrol over a mile northwest along the wall. Additionally, a squad (5 soldiers total), led by the Master Sergeant, patrol south all the way to the King's Road, usually from morning until afternoon. And, finally, the last five soldiers are assigned maintenance and operation duties needed to sustain the tower, including white washing the exterior of the tower weekly.
It should be easy to stick in any PC that wants to be a part of the Tower Guard at Tower 1. A full list of names can be found here and it is as simple as replacing an NPC with a PC, noting that anything above a soldier (PFC) is above level 1 and shouldn't be assigned to someone just starting out. Consequently, players can be part of the military at Kahar, born and raised there, or independant of that part of the government, or visiting from foriegn lands, or from an outlying village or town (keeping in mind this is a harsh desert). The adventures at Kahar can handle a wide variety of PCs.
A Celebration in Tower 1
A strictly role playing adventure is to take brand new level 1 PCs into Tower 1, without the Master Sergeant or Inquistior catching on and finding them out.
Capt. Richard Chen and Lt. Cassandra Reese wish to honor Master Sergeant Millicent Harper on the anniversary of her long service. Knowing Harper’s temper and her dislike of fuss, they dare not involve their own soldiers. Instead, they quietly enlist the PCs to decorate the lowest chamber of Tower 1. The task seems simple — hang banners, arrange lanterns, prepare a feast — but the tower’s magical defenses make even carrying a garland a perilous challenge. Rumor has it that last year’s prank nearly ended in flogging, so discretion is vital. If the PCs succeed, they may earn Harper’s grudging respect — or her wrath, should she arrive early and catch them at work. Inquisitor William Su watches from the shadows, curious to see how outsiders handle the tower’s wards.
The Wards
Opening the roof hatch reveals a sturdy wooden ladder that leads to the level below. But anyone that opens the hatch that is not a part of the tower garrison will set off a bell alarm that all can hear. This is because a great magician, Oztirix the Abjurer, has warded each level of each tower to protect them from all intruders. Here at Tower 1, the hatches on the roof and level 4 are protected with the spell alarm, which will only allow COs, NCOs, or the 16 soldiers that belong in the tower to pass without setting off a bell alarm. On level 3, the hatch is not only protected by an alarm spell, but also, there is a magic mouth which will question the person who wishes to enter, and if the question is not answered correctly, the bell alarm will sound. At level 2, the Abjurer set up a magic mirror that will hide the location of the hatch until the furniture in the room is made to match how the furniture in the mirror is set up. Generally, only one piece of furniture, a bucket, a pillow, a chair, will need to be moved a few feet in order to match where it is in the mirror. Once this is done, the hatch will appear and the PCs will have access to the lowest level of Tower 1.
The Roof Guard
The magical wards are not the only problem. The PCs must convince the guards to give them access to the lowest level. To start, on this roof that the PCs are sneaking in, there is a single guard that PCs must convince to open the hatch for them, allowing them access to the level below. Some bits of information the PCs can pick up is that the guard is fond of drink, gossip, and new friends. If the PCs are successful in getting past the guard on the roof and into the 4th level, they will face a new challenge.
The Dice Game
On the 4th level, between the bunkbeds, are 4 soldiers betting gold pieces on a dice game. On two of the bunkbeds will be sleeping soldiers, and though the game is raucous, the dice playing soldiers are quiet enough to not wake the sleeping soldiers. If the PCs join the game, they must follow the quiet rules and win 3 times. Once they have won 3 times, they can bet the soldiers that if they win again, the soldiers must open the hatch to the level below, but if they lose, they must leave.
The Romantic Fool
If the PCs make it to the 3rd level below the roof, they will find a similar layout to the bedroom above. Except, on these two bunkbeds, there is one sleeping soldier on 3 of the beds. Lined up near the walls are 4 chests, simple decorations on the walls, and, expectantly, they will face another challenge. A single soldier sits on one of the other beds and is struggling to finish a poem to the person he fancies and admires. He will share the stanzas with the PCs and if they can provide a suitable last line, he will gladly open the hatch to the 2nd level for them, if not, they must return to the roof. He is very similar to the guard on the roof, in that he mostly enjoys the companionship. If the PCs can only come up with a mediocre ending for his poem, but they all enjoy themselves trying to come up with it together, then that is more than enough for this soldier to open the hatch to the level below. Once again, they must be careful to not wake the sleeping soldiers or they will be kicked out of the tower at once.
The Mirror Puzzle
However it goes, if the PCs make it to the 2nd level, they will be alone among the furniture of the room and will have to figure out the secret of finding and opening the last hatch. With only vague hints and small rumors lying about the room, the PCs will have to guess that the hatch and the mirror are somehow tied together. A DC 13 INT check will reveal that an object (usually a small chest) is not in the same spot in the mirror as it is in the room. Moving the item in the room to match the item in the mirror will cause the hatch to the level below to magically appear.
The Celebration
If the PCs manage to solve the mirror puzzle on the 2nd level, they will be able to climb down the last ladder to the lowest level. Here they can undertake the task they were bidden to do without interruption. Likewise, they will be able to ascend the ladders of the 4 floors without being interfered with. But most importantly, once they reach the top of the tower, they will be rewarded with +1 magic weapons appropriate to their class. Level 1 adventure solved.
Follow Up
If the PCs have completed their task at the lowest level of Tower 1, when they return to the roof, they will be confronted by Captain Chen himself, who is impressed with their performance, and wishes them to take on another task. He has heard rumors, mostly from children, that the Playground, a large rock park southwest of the Front Gate, is haunted by a boogeyman. As silly as that sounds, he wishes the PCs to investigate. He will provide them with a map of the Playground, and some basic information about the area. He will also provide them with a fair amount of gold to cover any expenses they might incur. The PCs can visit the Playground and investigate the rumors of haunting, and if they are successful in uncovering the truth behind the haunting, they will be handsomely rewarded by Captain Chen. This follow up adventure is described here.
The 7th Dark Crusades
The Necromancer/God/King Prysm goads the fire giants into leading vast goblinoid hosts north to destroy the kingdoms of men. In answer, the giants create The Games, brutal trials of strength and cunning that select three champions. Each victor earns the grim honor of leading ten thousand goblinoids into the desert wastes, and each chooses two hill giants to accompany him. None who win the Games ever return to the lands of fire.
The assault on Kahar during the 7th Dark Crusades is remembered as a massive military campaign led by fire giant warlords and their goblinoid hordes. Yet the truth, known only to a handful of survivors, is that the fortress did not fall to the armies outside its walls, but to the enemy hidden within. Khalista the lamia, working in secret for thirty two years, used the chaos of the Crusades as cover for her own designs. Through traitor magicians under her sway, she opened an Arcane Gate that allowed the invaders to bypass the outer defenses, transformed Tower 9 into a volcanic deathtrap, and orchestrated the collapse of the three western towers. Without her unseen hand, the fortress would never have broken.
The Fire Giants' Armies Advance
The march north takes five years. Thirty thousand goblinoids, driven by three fire giant champions, followed by their six hill giants, cross the burning plains. The first ten thousand peel away toward Kazan. Twenty thousand continue eastward and arrive at Kahar, where another ten thousand, led by Rhael the Fire Giant with his hill giant kin, Rulos and Eclith, turn aside to assault that fortress. The final ten thousand march on toward Kabur.
Rhael's host arrives 1 year and 6 months before the synchronized assault date. But Captain Chen and the defenders of Kahar are relentless. It takes seven months of brutal fighting just to take the plateau. Only then do the goblins begin building trenches and mounds, fourteen of each, under constant harassment. Though they could build a trench and mound in a day unhindered, the defenders delay them so severely that each pair takes nearly twenty days to complete. Some are built simultaneously, but the full siege works require 173 days.
Even then, the siege remains incomplete. Rhael's army cuts off the Desert Haven Road and isolates the Front Gate, but never encircles the fortress or threatens the Rear Gate. They wait, because the final ten thousand goblinoids must reach Kabur before the synchronized assault begins.
After securing the plateau, Rhael leads a column of ogres northeast along the enclosing wall, a brutal march of three and a half miles, to crush the outer village of Nane. The ogres trample homes, gardens, and shrines flat beneath their stone wheels and iron boots.
But the retaliation is swift. Captain Chen coordinates a counter-strike from the fortress, driving Rhael's forces back across Sundered Scarp. The fire giant slinks back to the Front Gate with a diminished ogre host, his pride wounded and his momentum broken. The siege resumes, but the defenders now know: Rhael can be pushed.
Thus the stalemate continues until the nightfall of the 17th of Hot. As the three moons rise into alignment, Rhael assembles his ten thousand. Their goal is simple and terrible: to be inside the fortress by dawn on the 18th. They commit to full attack.
The Traitor Magicians
Captain Chen sends Master Sergeant Harper to investigate why magicians and their apprentices have gathered near the northwest wall. The Master Sergeant, not uncomfortable at the presence of the magicians, and nearly letting her guard down, is attacked by two apprentices who hurl magic missiles. But both Inquistior Su and Corporal Pierce rush to her aid and heal her. After a fierce fight, the magician apprentices are captured and brought inside Tower 1 for questioning, though they reveal nothing.
The Red Tendril Glyphs and the Arcane Gate
Several leaders of the Wizard's Brigade, with their full entourage of servants and apprentices, sneak behind the west Officer's Quarters. One hundred and twenty feet northwest of Tower 1, on the inside of the thirty foot wall, Atorn the Evoker inscribes the first of his pulsing, throbbing, red glyphs. He then sends his raven familiar to find Khalista the lamia, a necromancer of terrible might and ability. The raven locates her behind a fallen siege tower 300' south of Tower 9, and uses its ability to allow Atorn to see through its eyes. Atorn opens an Arcane Gate. It leads into the midst of the battlefield, and appears near the southwest corner of the fallen siege tower where Khalista and her minions wait for him. Atorn passes through the Arcane Gate, exiting the other side, he inscribes a second glyph on the side of the fallen siege tower, adjacent to where he exited the Arcane Gate.
The Sacrifices
This is no ordinary Arcane Gate spell, for Atorn, using forbidden magic learned from the servants of Khalista, has altered his ability to sculpt spells and store them in glyphs. These two glyphs pulse red and, even with five hundred feet between them, link. The servants of Khalista bring up a struggling hobgoblin. Red tendrils shoot forth from the glyph and attach to the hobgoblin, pulling the victim against the wall and holding it. The hobgoblin is left writhing in pain, while being drained of the power and essence needed to sustain the Arcane Gate. Khalista leaves orders to change the sacrifice every three days. She leads them through the Arcane Gate, back inside the fortress. She betrays Atorn when her servants seize him and she causes the glyph to reach out its tendrils and grips the hapless wizard. He will not die after three days, her servants will replace him after many hours, and lock him in the lowest level of Tower 1 with his own red glyph tendril magic. As long as Atorn lives, the Arcane gate endures.
The Raze
Khalista has begun raising the fallen goblins into undead slaves, zombies and skeletons bound to her will. She sends these creatures through the Arcane Gate with a single command: kill the soldiers of Kahar, loyal citizens of Goldenshield. Goblins and hobgoblins surge in behind them, and fighting erupts inside the walls of the fortress. Captain Chen witnesses the impossible and begins to understand: Kahar has been betrayed from within.
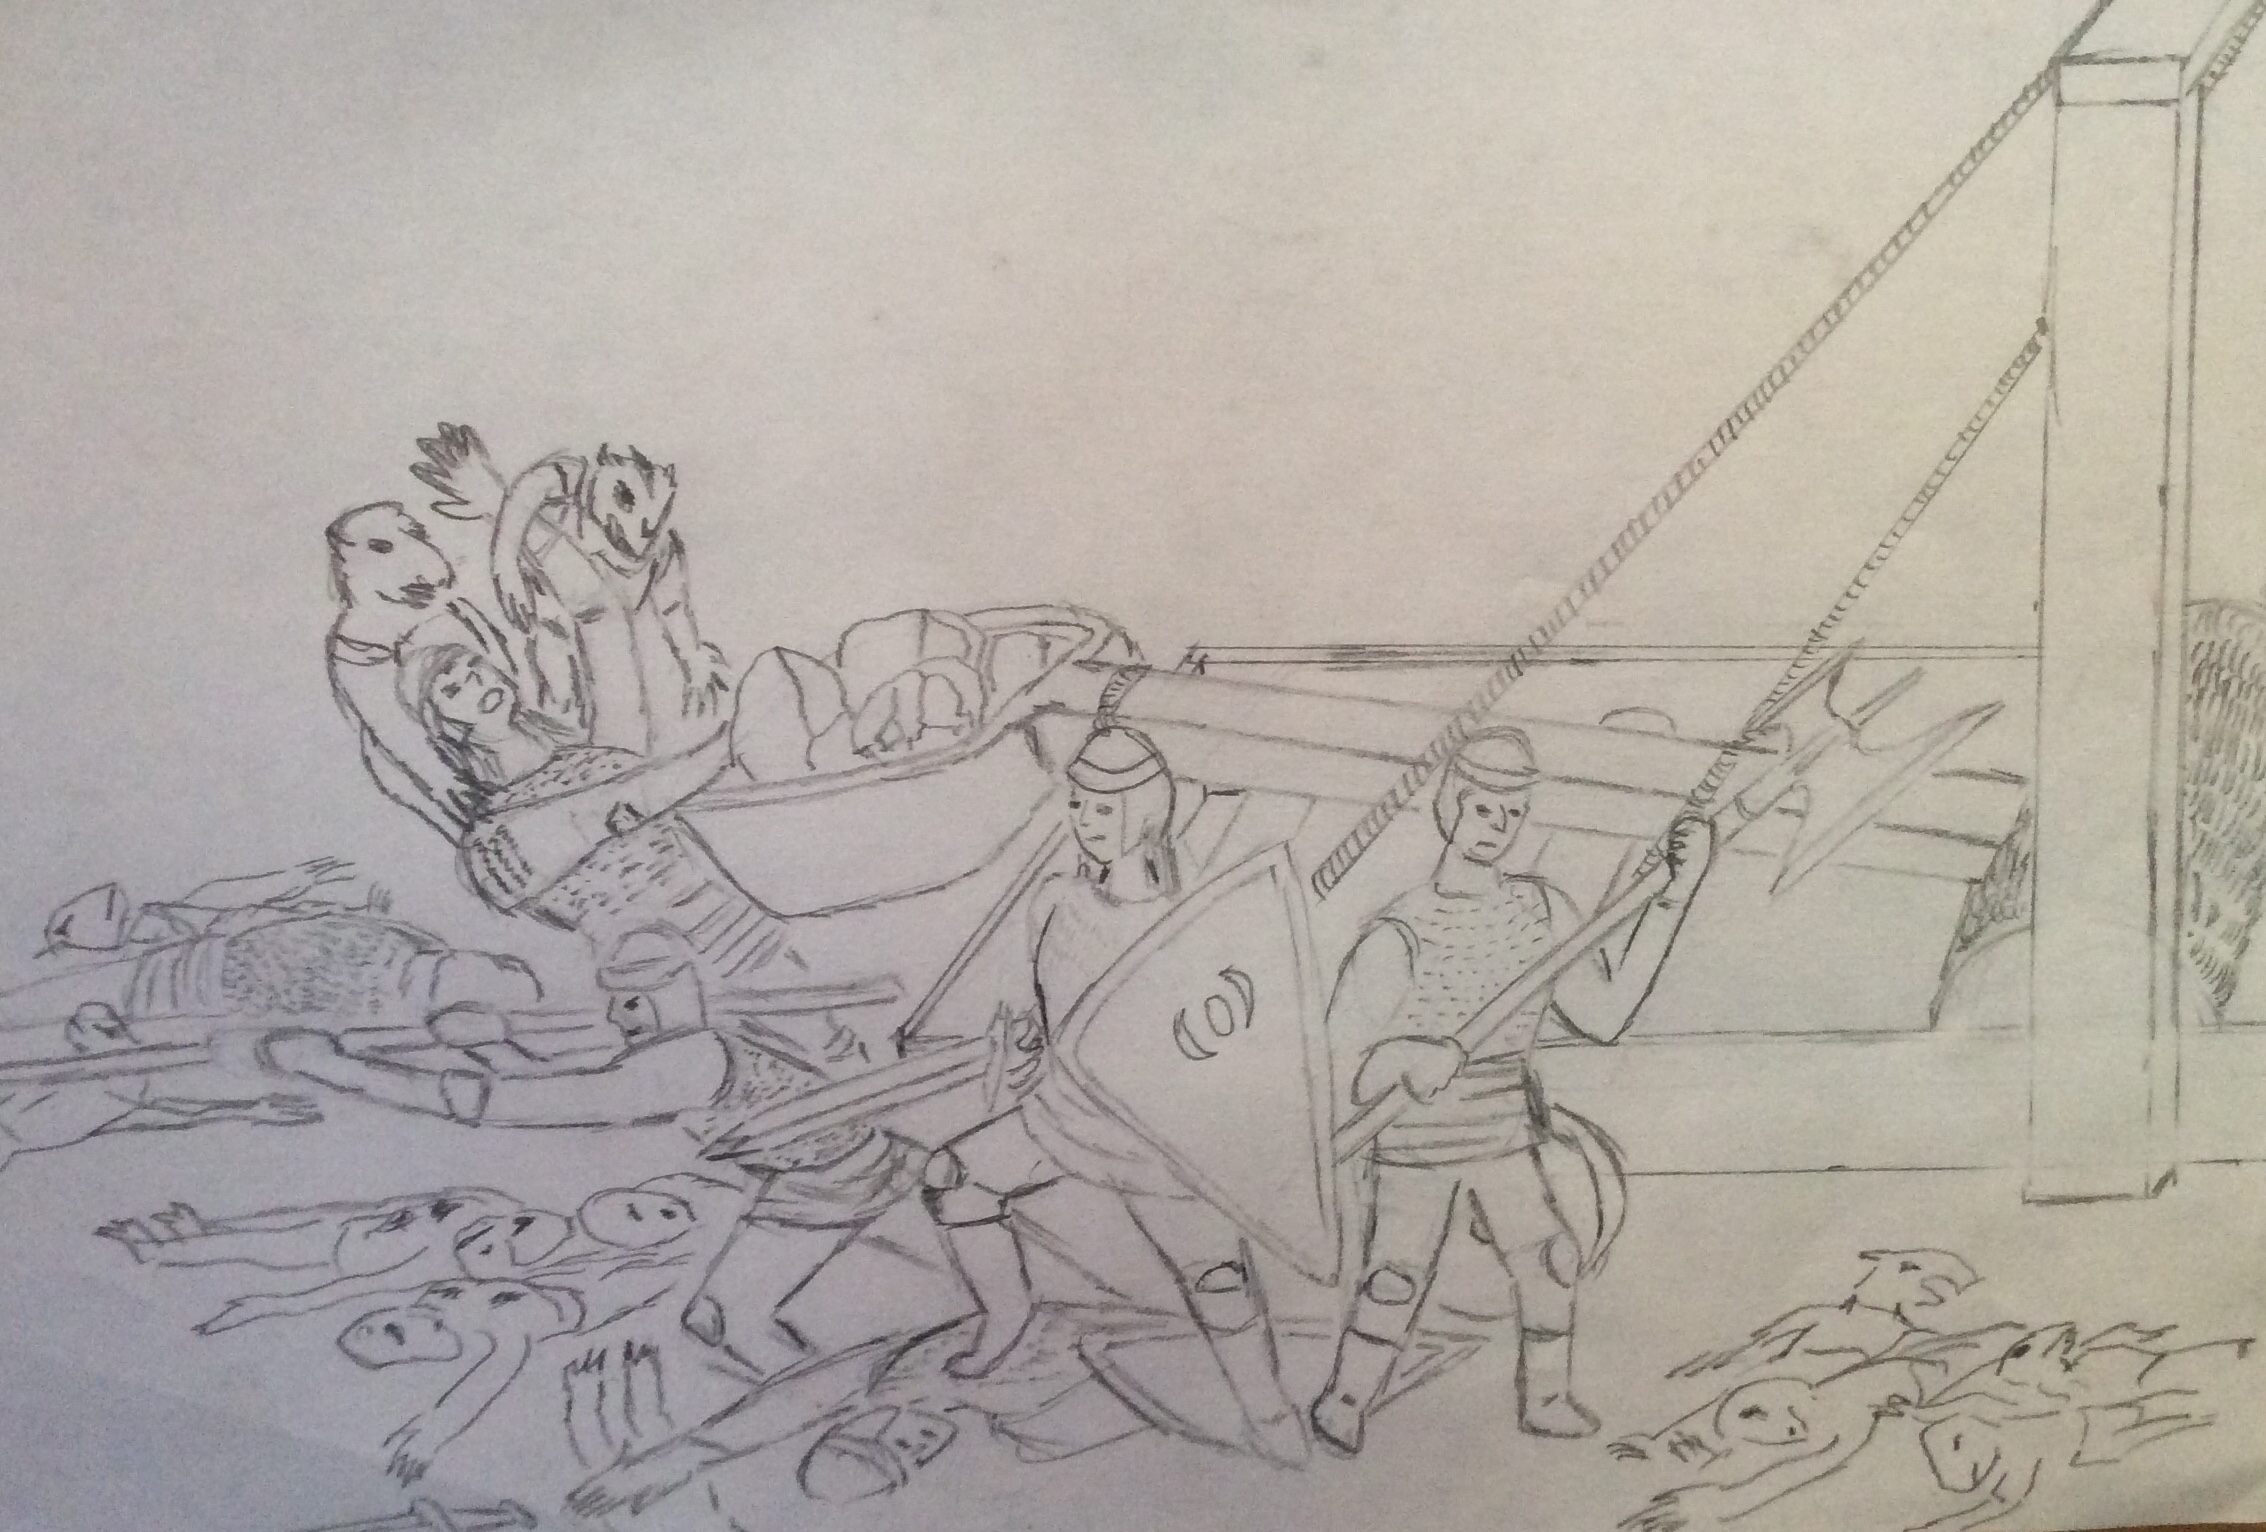
The siege tower Ooka slams against Tower 1, its hooks biting into the stone as it disgorges goblins and hobgoblins onto the battlements. Oscar Hull, a visiting correspondent, is struck down by a ballista crew as he attempts to set the tower ablaze. Harper rallies her soldiers and meets the attackers head on, driving back wave after wave in brutal close quarters combat.
The Mage Apprentices Return
Goblins and hobgoblins pour onto the roof of Tower 1 from the ramp of siege tower Ooka. Amidst this chaos, another two mage servants, searching for their captured comrades, sneak on to the roof and manage to free their companions. Mounting an attack, they fling magic missiles and thunderwaves, followed by countless firebolts, not at the attacking goblins, but at their one-time comrades, the defenders of the tower.
Soldiers reel in panic. From across the roof, Captain Chen evaluates the scene: an Arcane Gate, 120 feet to the northwest, has goblins and zombies pouring into the fortress, two siege towers have latched onto both defensive towers and goblins are pouring in from the top. Captain Chen's decision is immediate, his order efficient: retreat, regroup in the courtyard. Most soldiers on the roof of Tower 1 and the west side wall obey immediately.
Inquistor Su jumps on to the enemy siege tower ramp, blasting goblins aside with magic, buying time for soldiers to retreat. But Inquisitor Su is taken out from behind by traitor magicians. Mage servants, trying to escape the tower, use the spell Scorching Ray against him. Master Sergeant Harper clears out the remaining goblins, vaults over fallen debris, and charges towards the traitor magicians with vengeance in her eyes. The mage servants, nearly spent, cast one last enchantment and the Master Sergeant is gripped by the spell Hold Person. Tower 1 falls, but nearly all the soldiers of the garrison manage to escape down to the courtyard below.
The other Towers fare no better
Down in the courtyard, a runner from Tower 2, soldier Rose Tilman, arrives with grim news: Tower 2 has been overrun. She reports mysterious disappearances, growing paranoia, and finally betrayal by the court magicians, who crushed Captain Hubbard's loyal soldiers with spells of earth and stone. Captain Chen dispatches a squad to confirm her story, but the fortress now faces the specter of treachery within its own walls.
Abandoned Sentinel
Siege tower Ooka remains attached to Tower 1, abandoned, yet enduring as a grim monument long after the war has ended.
The Battle for the Courtyard
In the courtyard, Captain Chen's garrison attacks the Fire Giant and his entourage, fighting them to a standstill even amid the heat, fire, ash, and smoke pouring from what was once Tower 9. They manage to force the Fire Giant and his bodyguard back into the river of lava, with Lt. Reese instrumental in that victory. Their losses are heavy, and with reduced troops they retreat to the Keep.
Regrouping at the Keep
At the Keep, their forces merge with the incoming troops defeated at Tower 2 and Tower 3. All soldiers come under the command of Capt. Chen, who is informed that some of the enemy — jackalweres —are nearly impervious to their weapons. Capt. Chen sends Lt. Reese to fortify the Keep while he leads three small groups of soldiers against the incoming jackalwere menace.
With heavy losses, including the death of Bishop Brandon, the three groups defeat the incoming jackalweres. Their sacrifices allow those at the Keep to strategize not only for defense but also for a strategic retreat. The defeat of the jackalweres surprises both attackers and defenders. Moreover, the defenders manage to sever the attackers' communication lines, preventing the reserve jackalweres from learning that the initial assault failed.
The Siege and the Collapse
Lt. Reese leads a desperate defense for several hours, holding out against the jackalwere siege. Unexpectedly, her carefully planned retreat nearly collapses when most of her left flank breaks. Soldier June Gumble, wounded and alone, earns renown as she stands against nearly impervious foes, buying enough time for her comrades to escape.
Though the Keep ultimately falls, it is not a rout. Capt. Chen reunites with Lt. Reese and organizes one final counterstrike.
The Charge Through the Arcane Gate
Capt. Chen selects four NCOs and fifteen soldiers proficient with long spears (use pike stats) and heads south. He wins the north entrance to the Arcane Gate and scatters the mage servants and magicians stationed there. Entering the Gate and appearing at the south entrance to the Arcane Gate, he falls upon the enemy as they are setting up the statues. Oztirix uses Globe of Invulnerability to shield himself from spells and flees, hiding in the shadows at trench 5.
The mage servants of Oztirix and his undead slaves are slain or scattered, but the statues remain unharmed. Capt. Chen gathers his soldiers and identifies the large gathering of jackals as his primary target. Without hesitation, he charges into their midst, scattering jackalweres and jackals alike.
Khalista's Trap
But from her hiding place atop Tower 1. Her necromantic aura and divinations spill outward, ensnaring Chen and his soldiers as if she were among them. Using her scrying ability, she has witnessed the victorious charge of the spear wielding soldiers under Capt. Chen. She has seen them mow down her undead servants, wipe out the goblinoids aiding her, chase off her two attack ogres, and scatter her contingent of magicians. She reads the spell scroll Circle of Death, infuses it with her necromantic Finger of Death, and unleashes the spell just as the soldiers charge.
The Fall of Captain Chen
All of the soldiers are caught in a sphere of negative energy and die painfully and terribly. They are all split in two. Capt. Chen is transformed into the ghost Chen and the wraith Kartur; his four NCOs become wights under Kartur's command, bent on destroying all living things; and the fifteen soldiers become shadows, undead beings resembling dark exaggerations of humanoid silhouettes. Kartur, his wights and shadows will become a bane to the soldier on the battlefield in the upcoming wars, but ghost Chen will also be there, warning, encouraging, and providing aid during challenging times.
The Circle of Spears
Lt. Reese arrives too late with reinforcements. Though she cannot save her commander, her sudden onslaught drives the enemy into retreat, but they take advantage of the darkness and hide within Tower 1. Lt. Reese erects the monument known as The Circle of Spears in memory of Capt. Chen and the twenty brave soldiers.
She gathers the surviving soldiers of Goldenshield and fights her way back through the Arcane Gate to rejoin their companions north of Apperton's Arch.
The Haunting of Tower 1
Khalista Ascends Tower 1
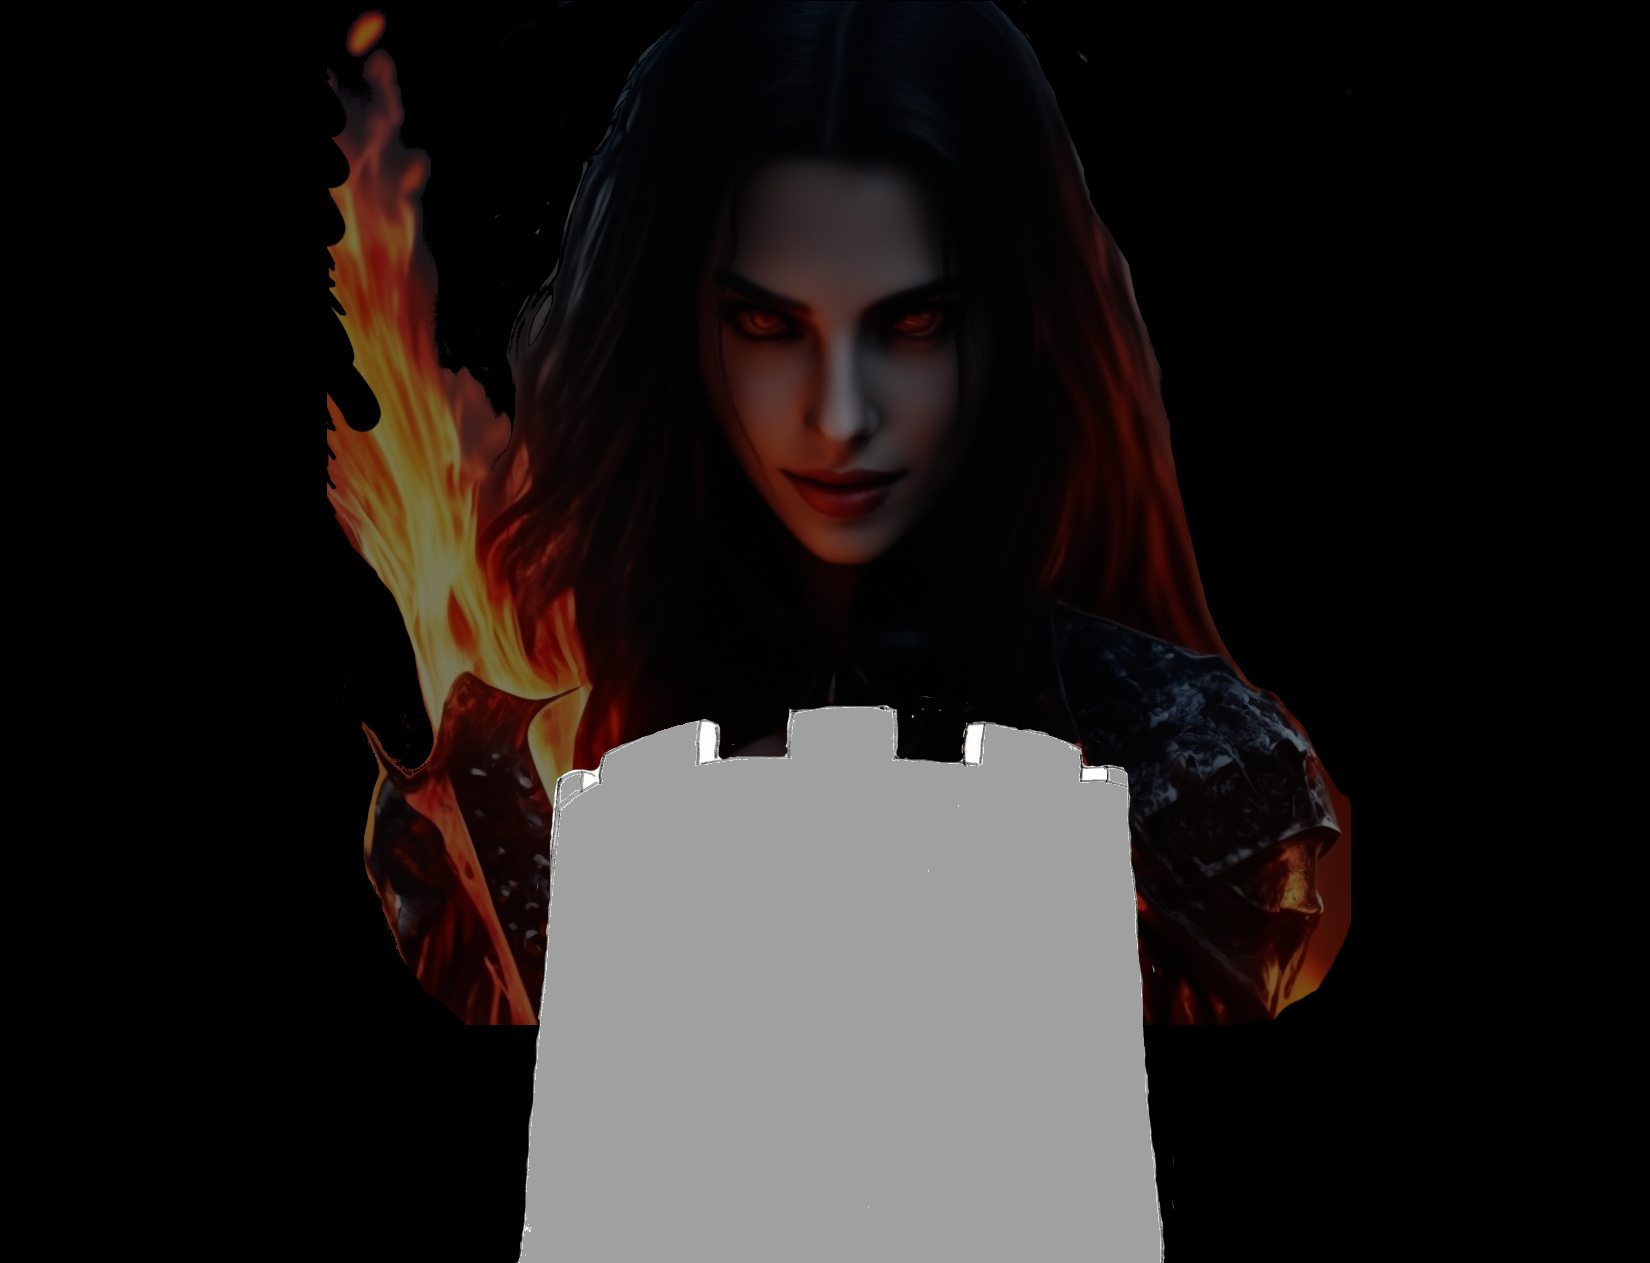
Khalista stepped through the Arcane Gate and climbed to the top of Tower 1. From there she watched the battle, scrying and weaving illusions. It was here she transformed Captain Chen, splitting his spirit in two: one half into Kartur, an evil wraith, the other into a gentle ghost touched by lingering goodness. Before midnight, the lamia descended into the lowest level of the tower to begin her forced hibernation.
The Arcane Gate and the Red Tendril Glyphs
When Atorn opened the Arcane Gate inside the fortress, he stepped through to the base of the fallen siege tower Edgit. There he inscribed a second array of red tendril glyphs into the shattered wood, creating the external anchor of the Gate. An unwilling hobgoblin was dragged to him. The tendrils lashed out, seized the creature, and pinned it to the tower, feeding on its life to sustain the portal.
Atorn returned through the gate with Khalista and expected a second sacrifice to be presented that would maintain the internal half of the Gate but Khalista betrayed him. The tendrils turned on their creator, wrapped around him, and pinned him to the wall. Atorn is kept alive, for the Gate requires 2 living anchors that need replaced every 3 days. During her hibernation she moved Atorn to the lowest level of Tower 1, where the red tendril glyphs bound him like chains.
The Arcane Gate requires renewal every three days. The external sacrifice must be replaced, and Atorn must remain alive. Above him, in the chamber directly overhead, a brain in a jar pulses with stolen thought — a grotesque stabilizer for the Gate's lingering magic.
The Birth of the Haunting
As Khalista withdrew her ethmoid bone and entered her forced thirty six hour hibernation, her unshielded necromantic aura seeped into the stones of Tower 1. The lowest level became corrupted, and the weapons stored there absorbed the taint. Those not yet discovered grew in power but became cursed, and any weapon returned to the chamber would likewise be strengthened and twisted.
This moment marks the beginning of the Haunting of Tower 1. The lamia's presence, the bound traitor magician, and the lingering Arcane Gate have left a stain that endures long after the siege ended.
The Volcano
Tower 9, only thirty feet away, melts into a heated pool of molten rock and then blows like a volcano spewing smoke, fire, and ash into the air. The Front Gate House burns. The Fire Giant jumps on burning Front Gate House. The enemy pours through the Arcane Gate.
The Road to Tower 1
Hamakhaave Desert
To the north lay Harsh Wind Bites mountain range. This vast mountain system, a crumpled spine of the earth, stretches 2250 miles from east to west, its jagged peaks forming a 750-mile-wide expanse of towering relief from north to south. To the south lay Broken Red Rock mountain range, sprawling 2750 miles from east to west and almost 1000 miles from north to south. And in between, seperating the two ranges by nearly 150 miles, lay the hard pan salt flats of the Hamakhaave desert.
The Plateau of Kahar
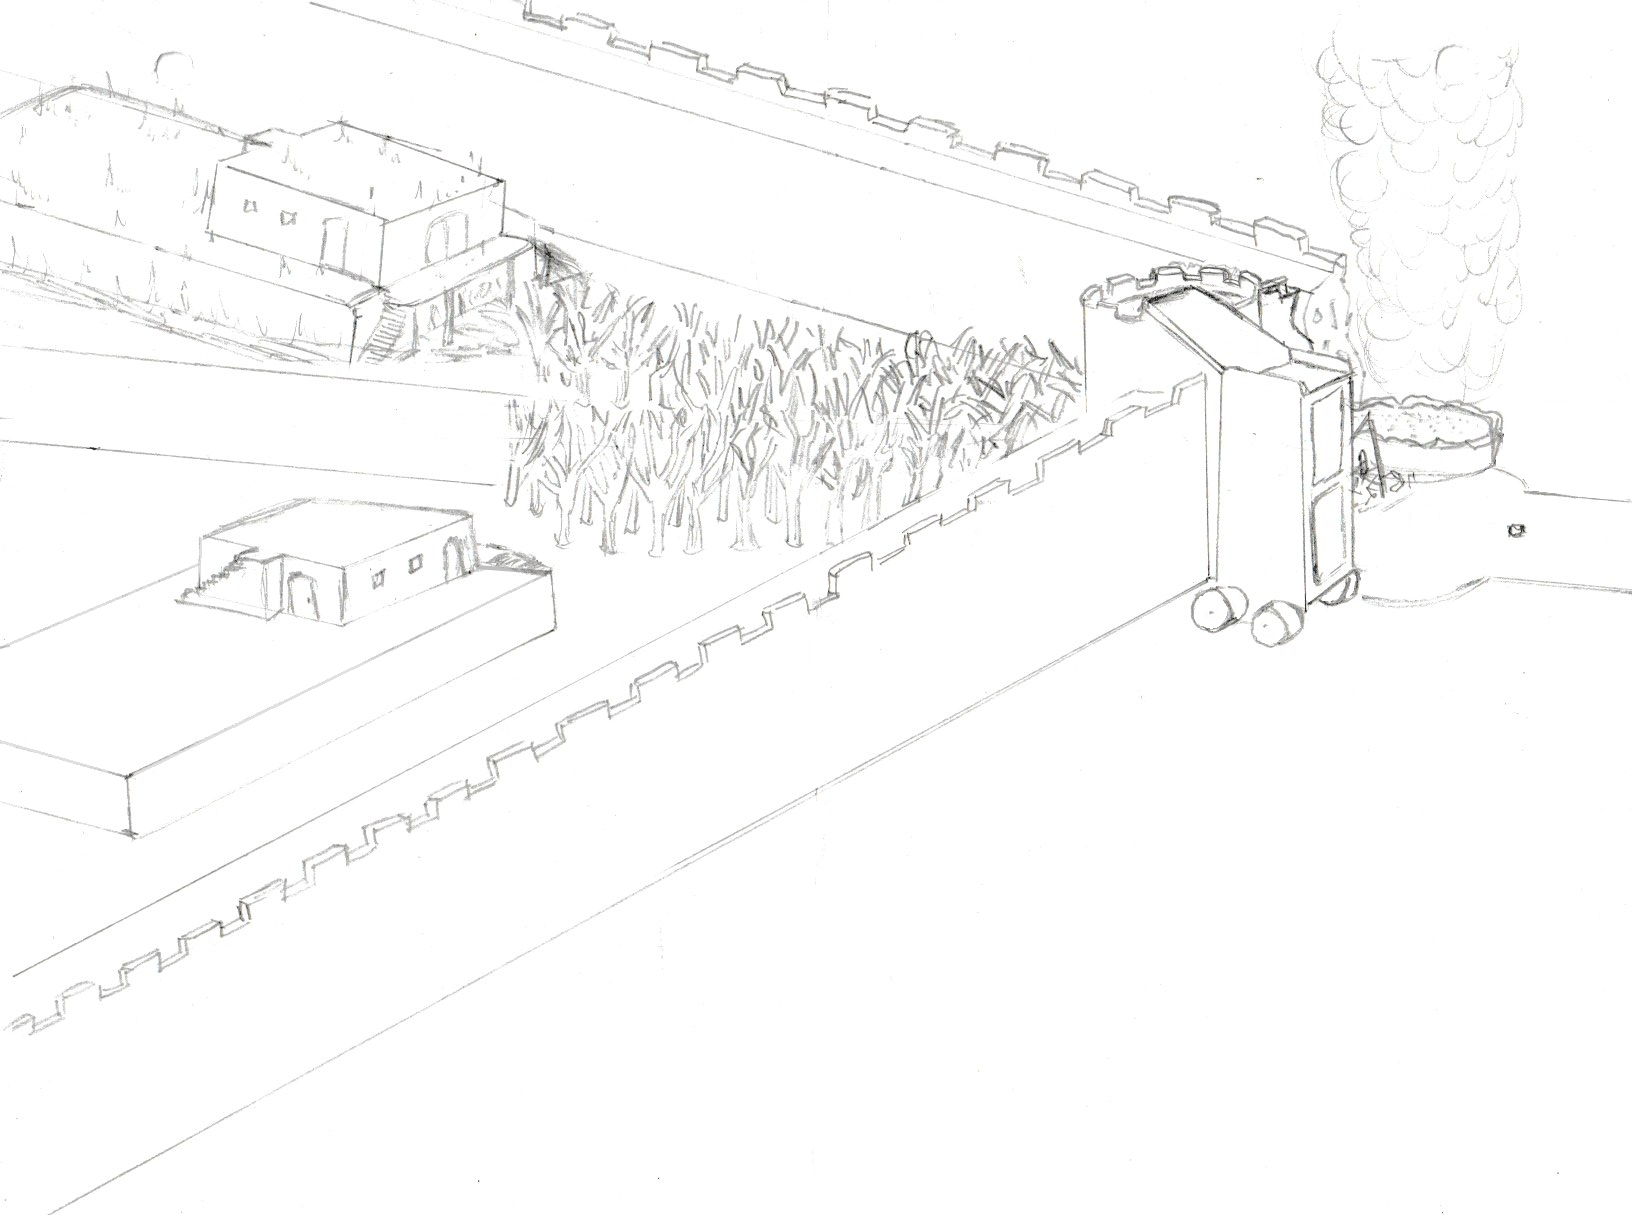
On the extreme west side of this desert is a barren, 5130 foot tall mountain named Mount Pallid. On the northeast side of Mount Pallid is a half mile wide, 8 mile deep canyon. At the outlet of Flamming Grotto Canyon is a fan shaped apron of dirt that spans 8 miles wide from east to west and 6 miles long from north to south. Rising 60 feet above the desert floor, the men of old shaped the edges until the entire plateau became a mesa, surrounded by steep cliff sides on all sides and a mostly flat top. Only one entrance was carved into the plateau, a long, gentle sloping ramp, 100 feet wide, with a 20 foot wide stone paved road in the middle. This was named the King's Ramp.
The King's Road
Hugging Harsh Wind Bites mountain range is a 40 foot wide large slate rock road. The King's Road has two foot drain ditches on both sides, has 8 inch curbs on both sides, and is raised 1 foot above the desert floor. It was built with a deep sand base, stone slabs in cement above that, crushed stone in cement above that, and finally large flat slate rocks as the surface of the road. It was a multi-layered engineering marvel, built with distinct strata for stability and drainage. It was also a solitary streak of human engineering amidst the raw, vast, empty wilderness. The King's Road stretched out like an existential thought: long, straight, and nearly utterly alone.
Turning North
From the King's Road, Desert Haven Road, the only road for 100's of miles, makes a T-intersection and runs north for 1,260 feet until it reaches the base of the great sixty-foot cliff of the looming plateau. On both the left and right stand two square adobe-stone buildings with flat roofs and walled parapets. They have no doors or windows — only ladders — and a single water well sits behind the eastern structure.
From the Forward Post up the King's Ramp
The steep sides of the ramp are ornately decorated, the 20 foot wide road smooth and polished. This is the King's Ramp, a gently sloped (12:1, seven-hundred-twenty-foot-long) ascent that lifts the road onto the high ground where stands the fortress of Kahar. To the left looms Mount Pallid, to the right the heights of Lizard Tail Ridge stretch high up into the sky. Behind you lies the vast emptiness of the Hamakhaave Desert, its salt flats shimmering for hundreds of miles. Somewhere beyond that shimmering horizon, the Broken Red Rock mountain range waits unseen. In front of you is the Front Gate of the Fortress of Kahar.
Desert Haven Road: From the top of the King's Ramp to the Front Gate
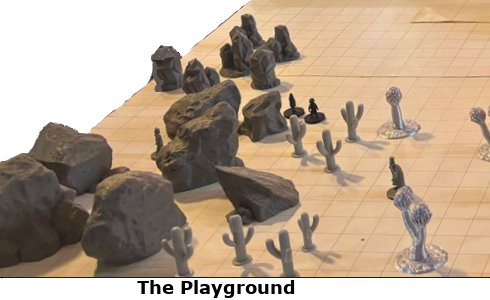
From the top of the ramp, Desert Haven Road continues another 2,580 feet before ending in an eighty-foot-diameter plaza at the base of the Front Gate. Both sides of the road feature a carefully maintained desert landscape of saguaro cacti, Joshua trees, pincushion cacti, and barrel cacti. To the west, large rock formations and gem pillars form “The Playground,” backed by the abrupt edge of the Plateau. To the east lies “The Classroom,” its silver torch cacti, saguaros, and Joshua trees marking the intersection of Desert Haven Road and Rear Gate Cutoff Road. Farther south, simple parks and cemeteries stretch eastward for miles, their designs reflecting the stark beauty of the arid region.
Rear Gate Cutoff Road
One other road branches northeast at a 45-degree angle just 122 feet from the Front Gate. This is Rear Gate Cutoff Road. It lies 2,178 feet north of where Desert Haven Road crests the plateau and passes only 42 feet from the edge of the great stone-paved circle plaza. Rear Gate Cutoff Road runs parallel to the northeast wall, maintaining a steady hundred-foot distance as both descend toward Tower 8.
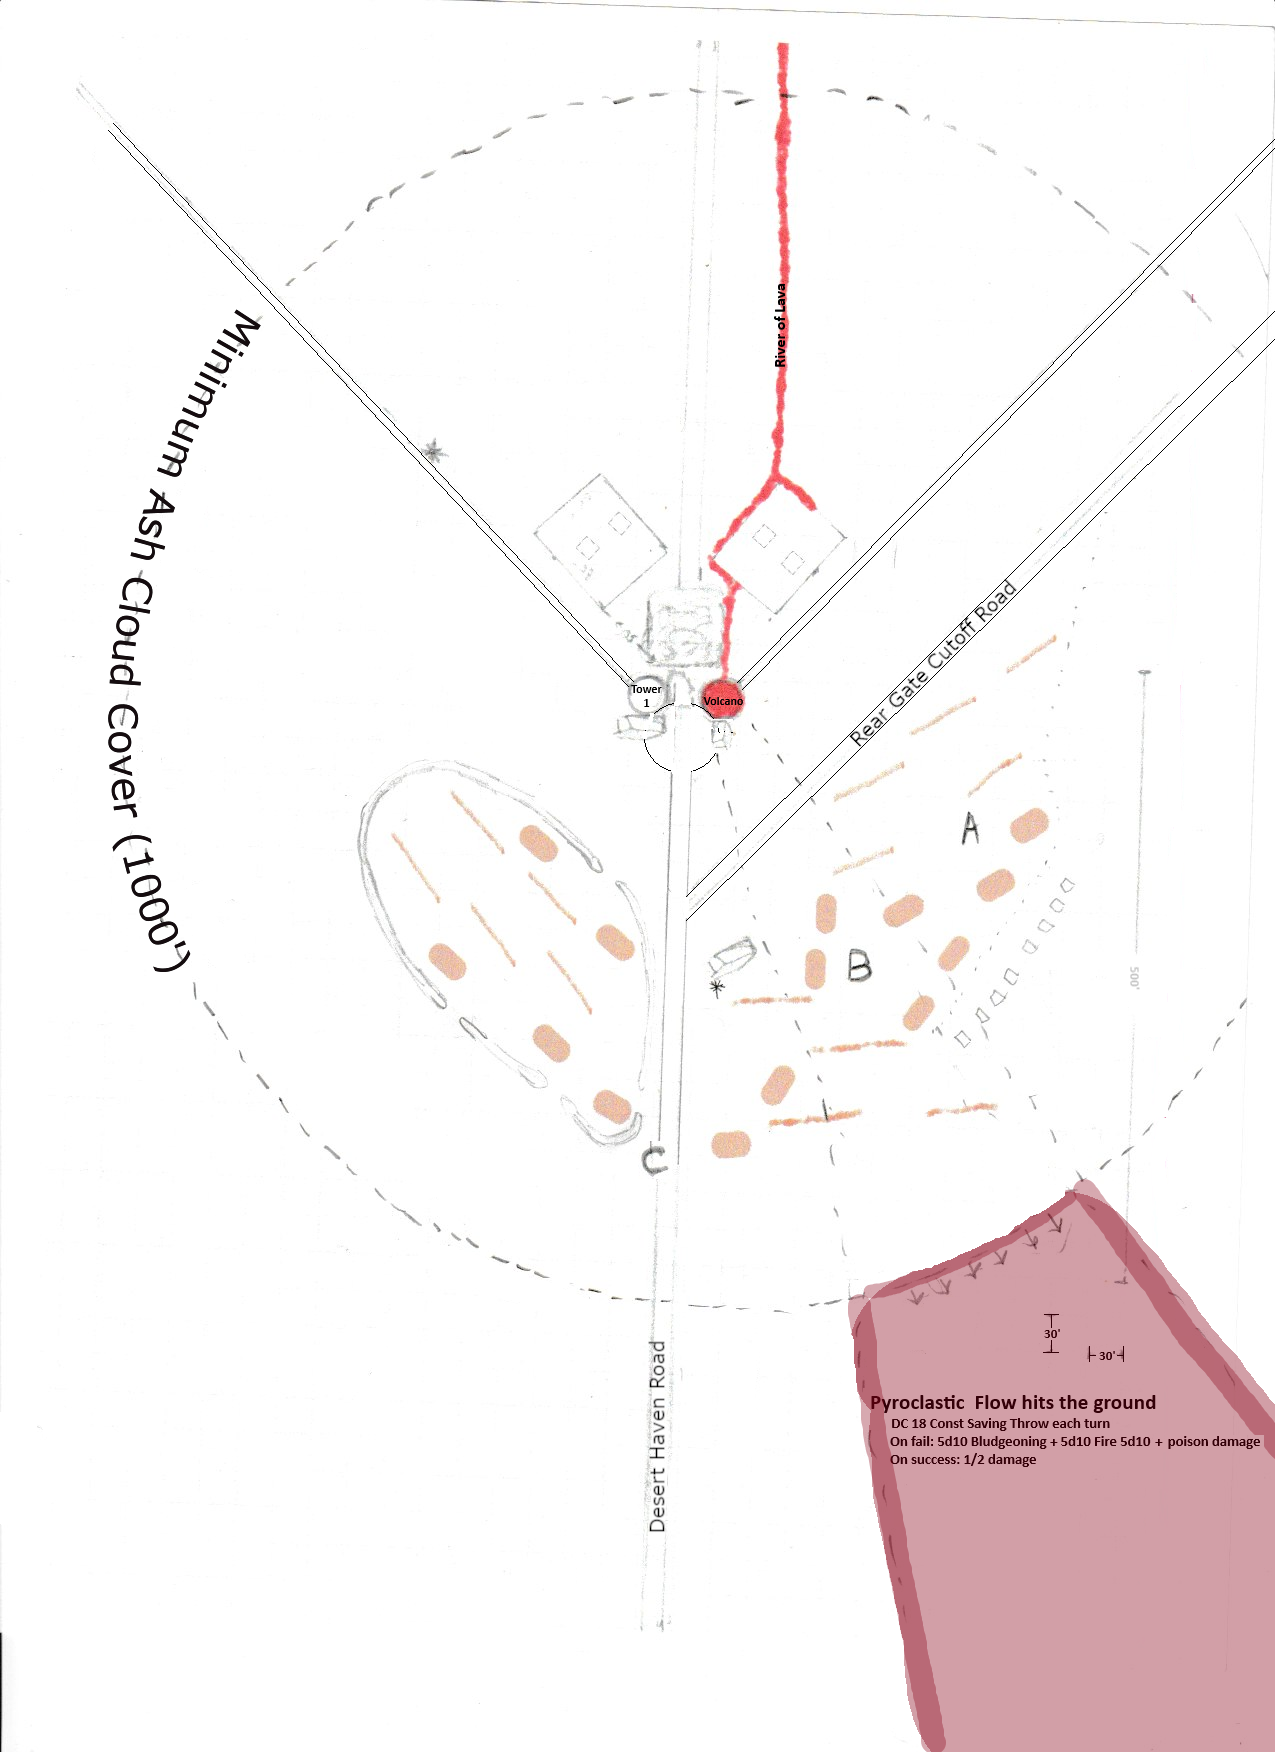
The Battlefield Under the Ash Cloud
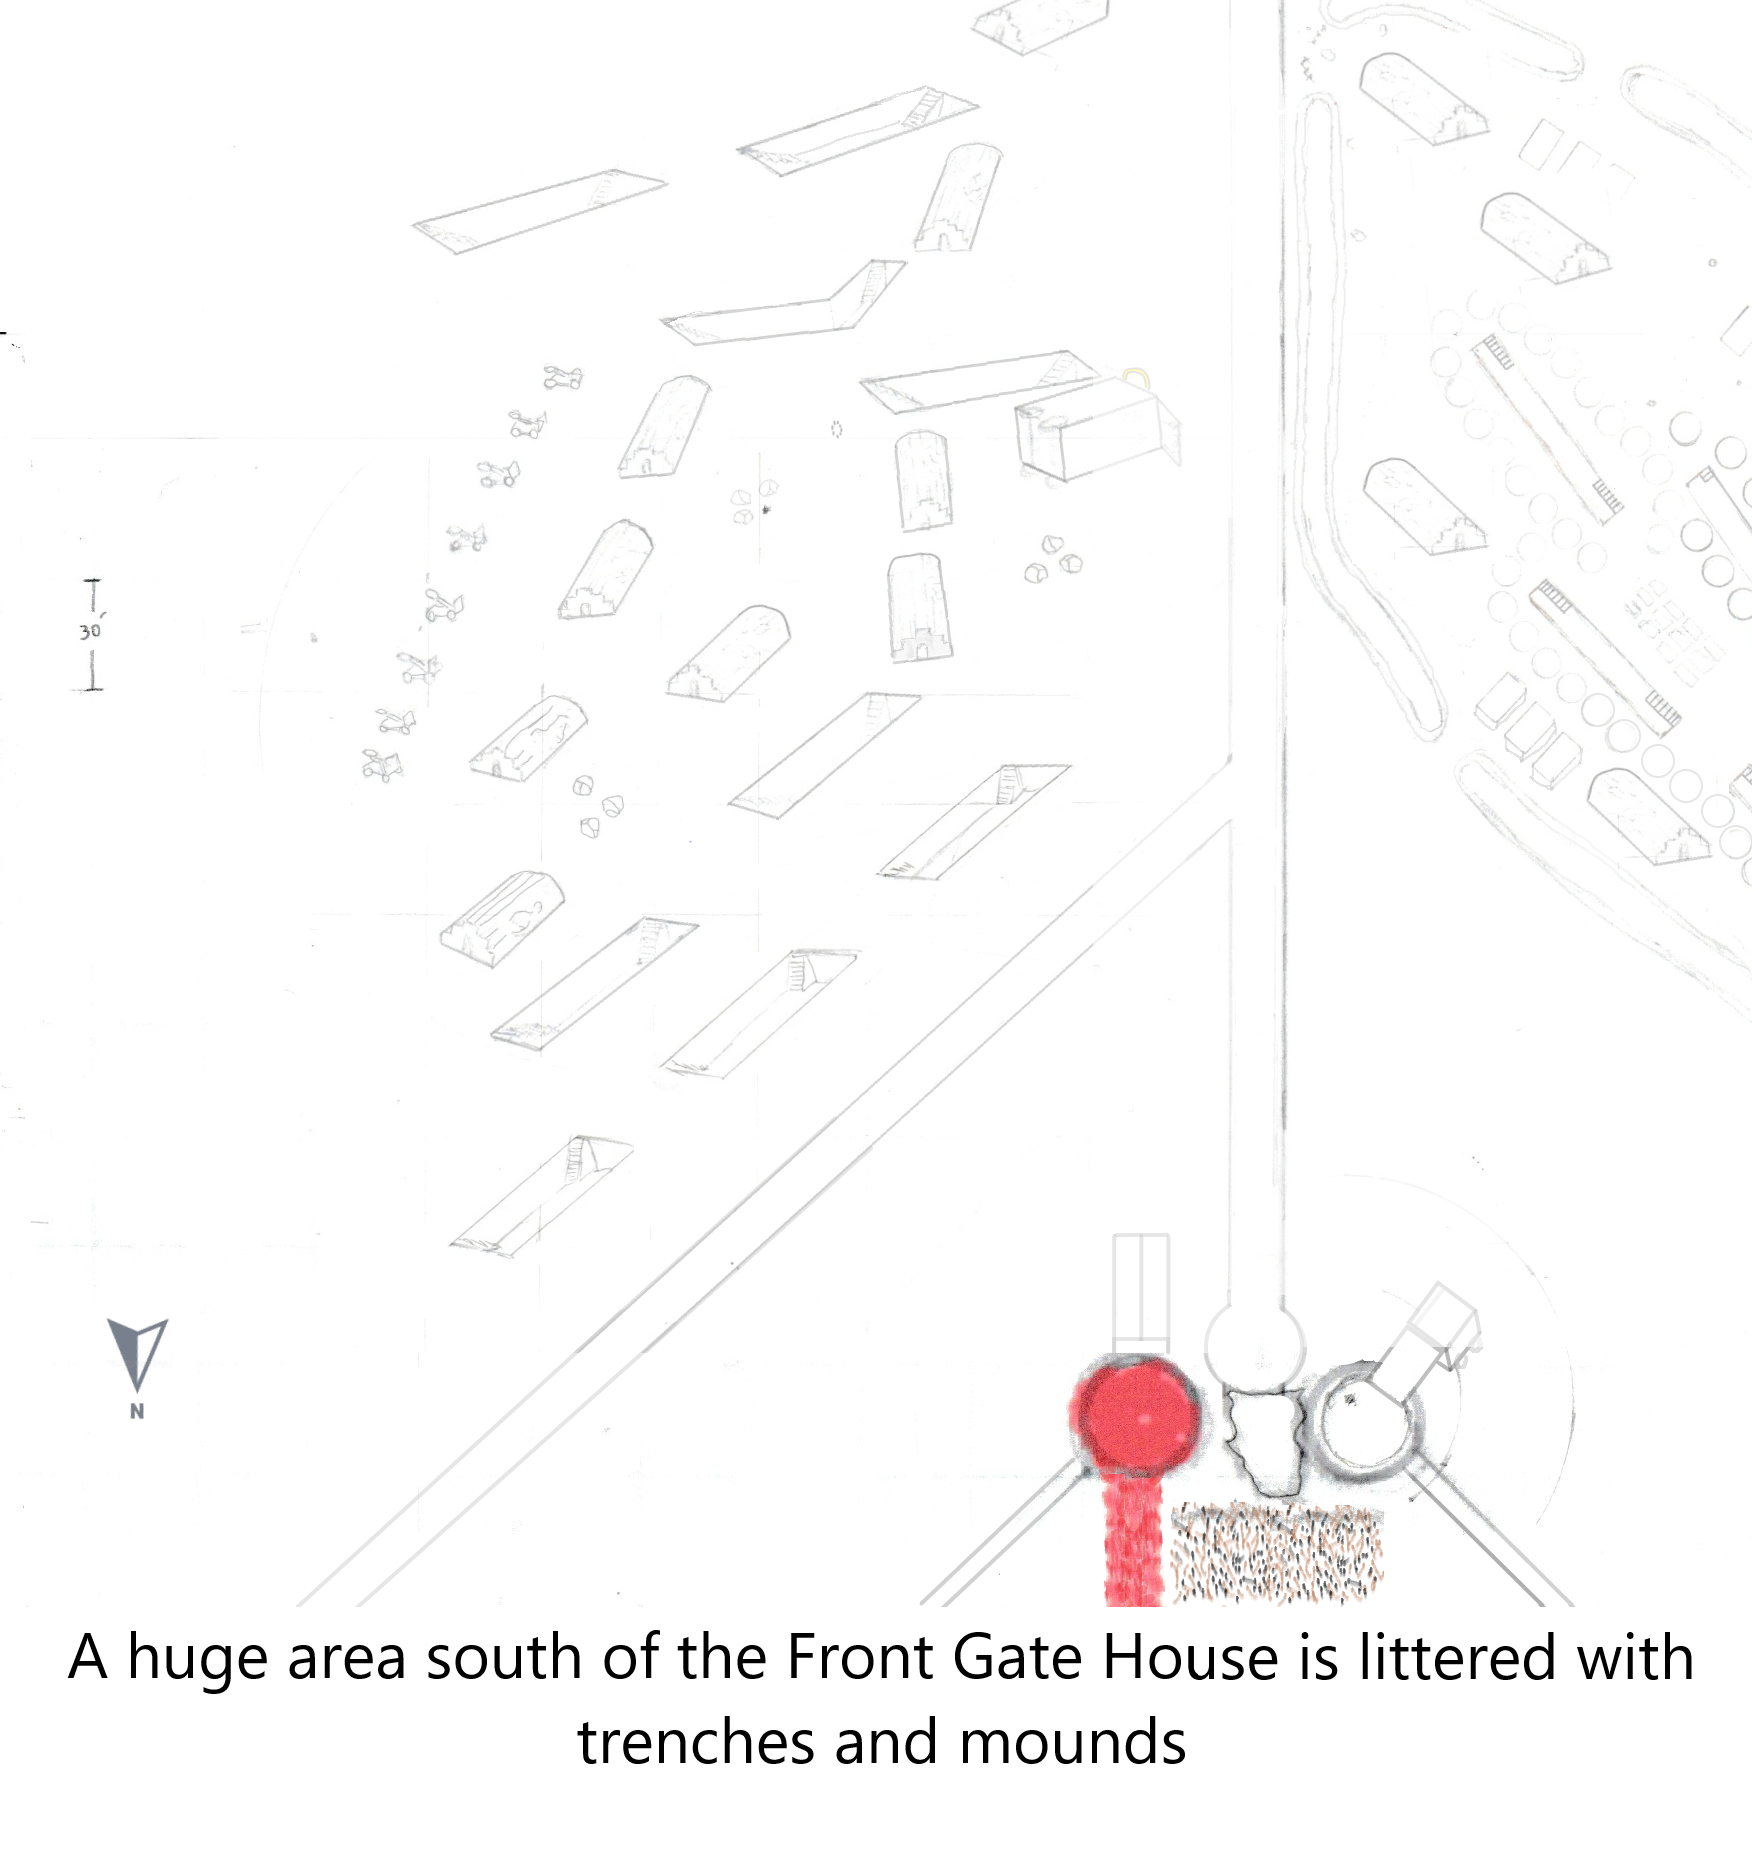
The parks are gone, the cemeteries looted, "The Playground" and "The Classroom" are no more. The invading armies have burrowed trenches and raised mounds, the fire giant and the hill giant have heaved the great boulders where children once played high over the fortress walls, or splashing harmlessly against the magically protected walls and towers. The eruption of Tower 9 has transformed the entire region. A vast ash cloud hangs over the area, dimming all light and muffling sound. Smoke, soot, and drifting embers obscure vision, while the oppressive air carries faint, unsettling whispers. The devastation extends to both sides of Desert Haven Road, where trenches, mounds, and fortifications litter the landscape and provide perfect cover for wandering undead forces.
The battlefield on both sides of Desert Haven Road is scarred by rows of trenches and raised earthen mounds, remnants of the goblinoid fortifications that once defended the goblin soldiers as they made their way to attack the Front Gate. But it is on the east side where the conflict will remain active. On the east side stand nine trenches and nine mounds; on the west side stand five trenches and five mounds.
The trenches are twelve feet wide, nine feet deep, and between sixty and eighty feet long. Most are choked with shattered armor, broken weapons, and discarded tools.
The mounds rise twelve feet high and stretch thirty‑five to forty feet in length, each with an interior space large enough for one or two rooms. These chambers once sheltered goblinoid soldiers from the chaos of battle, but now lie cracked, scorched, and half‑collapsed beneath layers of ash.
The remaining goblinoids have gathered among the western mounds, hiding in the shadows of their ruined defenses. There are not very many of them left. Twenty-four goblins, 6 hobgoblins, and 3 bugbears. They will build an impressive but small war camp in the coming weeks and months.
Eastside Battlefield: Southern Approach
Hedonistic Travelers and the Corrupted Path
Word of forbidden pleasures and whispered promises draws hedonistic adventurers along this route. They arrive by secrecy and rumor, seeking pleasures that defy morality and memory. Many bring innocent victims with them, unaware of the dangers ahead. Their abandoned wagons, beasts of burden, and scattered belongings mark the path north, silent warnings of what lies beyond.
Behind them come the slave hunters, with scores of slaves lined up ready to be sold as labor for field and household, as craftsmen for construction and mining, but all too often as sacrifices for ritual and food. Their chains clink softly in the ash‑laden air, a sound that carries farther than it should. The slave hunters do not rush. They know the road is theirs.
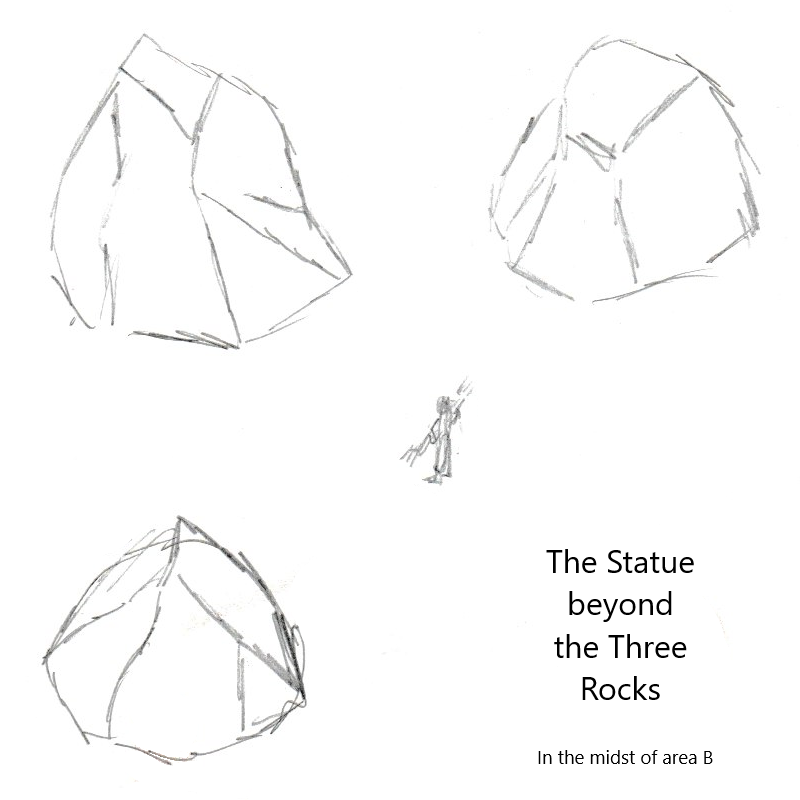
Area C: The Statue in the Middle of the Road
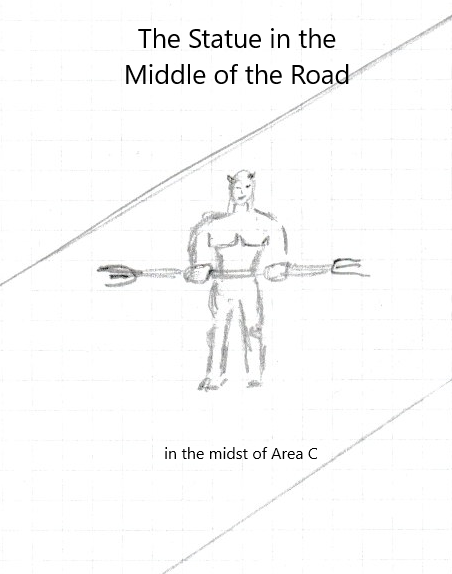
You have crested the King’s Ramp and walked most of the distance toward the Front Gate. The volcano to your right burns brighter as you approach, its light pushing through the drifting ash and smoke. Visibility is poor, and the sense of danger is unmistakable. At the exact center of the red circle that defines Area C stands a nine‑foot statue (AC 15, HP 30) of the goblin god Prysm. Its upraised hands hold a double‑sided trident parallel to the ground. Around the statue lie twenty corpses — goblins and soldiers locked together where they fell. The statue radiates a 100‑foot‑radius field of necrotic energy. Undead within the field regain 2 (1d4) hit points at the start of each turn, while living creatures attempting to heal recover only half of what they roll. Zombies inside the field automatically succeed on their Undead Fortitude. The full 200‑foot diameter of this necrotic zone is represented by the red circle marking Area C.
The Road North
The twenty‑foot‑wide paved road is buried beneath ash and soot. Red light from the volcanic glow reduces everything to silhouettes, and drifting smoke obscures the rest. Nothing seems to move, yet at the same time everything feels alive with activity — until you look directly, and find nothing there at all.
The air is stifled, hot and heavy, swallowing sound, yet occasional gusts carry faint crying whispers, words too quiet to understand. Ahead, a giant figure slowly resolves into a statue holding a double‑sided trident. Then — without warning — a single scream tears through the gloom, loud and desperate, the kind of sound that makes your jaw snap shut and your heart lurch. It vanishes as quickly as it came, leaving only drifting ash and oppressive silence.
One hundred feet from the statue, the air turns cold. Corpses on the roadside seem to groan and sigh, though surely it is only the wind. Darkness grips at your nerves and chills your blood. The statue becomes uncannily attractive, as if something in its shape pulls at your attention.
The air grows heavy and sticky. Nauseating smells fill your nostrils. It almost feels as if unseen hands are drawing you toward the statue. Forty feet from it, the figure shifts—somehow—into a repulsive sculpture, humanoid and animalistic at once. The sight of it fills your body with the urge to retch.
The statue is revealed as unholy. It is a representation of Prysm, the God‑King. The statue is evil.
The Trenches and Mounds of the Battlefield
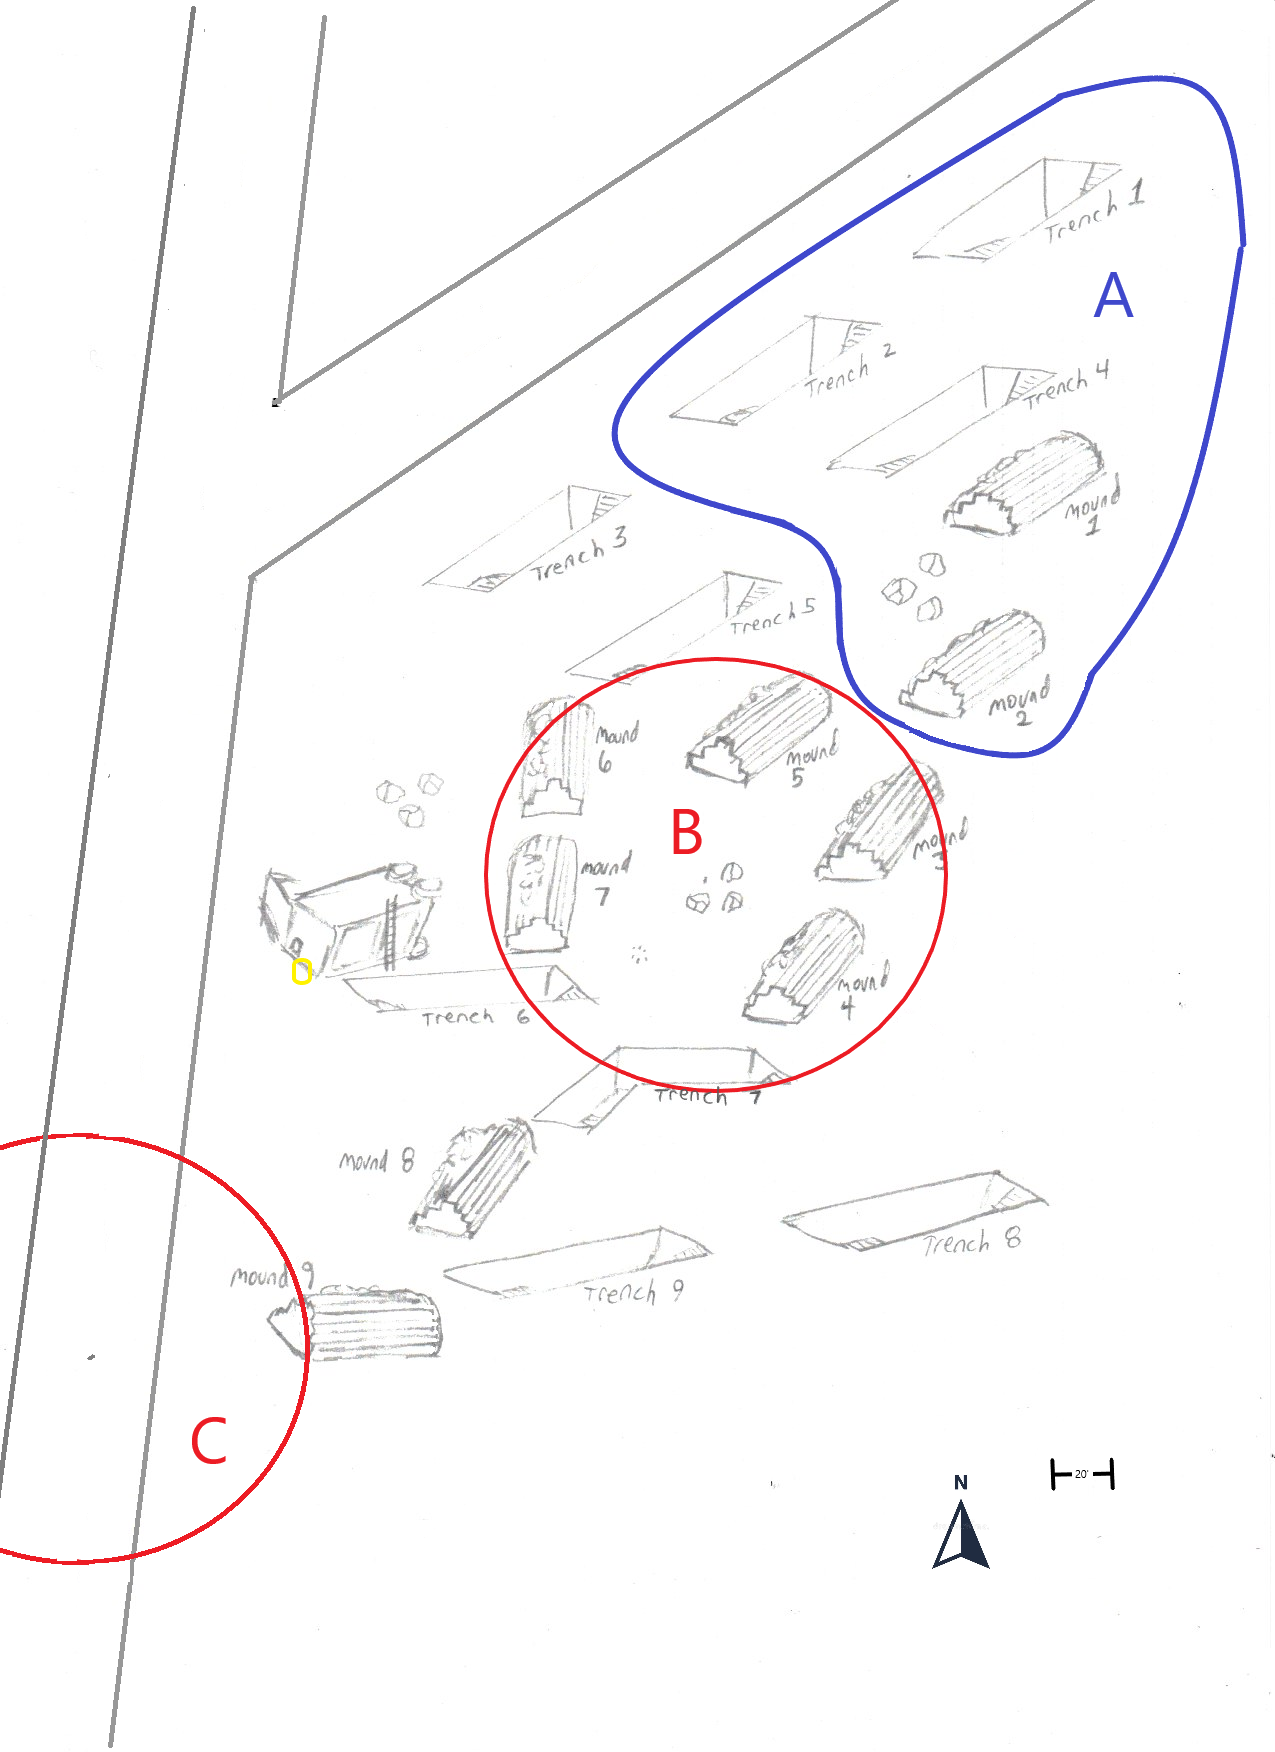
The battlefield is divided unevenly across Desert Haven Road. On the east side stand nine trenches and nine mounds, the primary line of goblinoid fortifications during the siege. On the west side lie five trenches and five mounds, fewer in number but the same in construction, built on the narrow strip of land before the plateau drops away sixty feet. The trenches are twelve feet wide, nine feet deep, and sixty to eighty feet long, choked with shattered armor, broken weapons, and discarded tools. The mounds rise twelve feet high and stretch thirty‑five to forty feet in length, their interior chambers intact but covered with dust and ash. In the coming weeks, the surviving goblinoids will transform the western mounds into a small but formidable war camp.
Approaching the Mounds and Trenches from the East
If approaching the mounds and trenches from the east, heading southwest under the oppressive ash cloud canopy, the landscape unfolds as a desolate wasteland shrouded in perpetual twilight. The thick smoke and soot obscure the sun, casting an eerie dimness over the scarred earth. Drifting embers float like malevolent fireflies, and the air is heavy with the stench of decay and sulfur from the nearby volcanic remains of Tower 9. Visibility is limited to a few dozen feet, making every step fraught with uncertainty as shadows shift and whispers echo through the haze. The mounds loom like ancient burial cairns, their entrances half-buried in ash, while the trenches gape like open wounds in the ground, filled with the remnants of battle—broken blades, splintered shields, and the skeletal remains of the fallen. Undead patrols may lurk unseen in the fog, and the necrotic aura from distant statues saps the life from the living, urging caution as you press onward toward the heart of the battlefield.
The Fallen Siege Tower and the Arcane Gate
On the east side of Desert Haven Road, 300 feet south of the volcano that was once Tower 9, lies a fallen siege tower. On the southwest side of the fallen siege tower, closest to the road, stands an Arcane Gate. On the map, the gate is designated by a yellow circle.
The Arcane Gate
A glowing ring filled with opaque, swirling mist, stands next to the southwest side of the fallen siege tower. 10' tall and 10' wide, the Arcane Gate dazzles the eyes and bewilders the mind, summoning visions of travels to secret places. An incomprehensible desire to approach the Arcane Gate overcomes you, a desire to investigate and explore, a desire to enter. But this giant visage of voyage is dwarfed by the fallen siege tower. Even on its side, the siege tower rises up nearly 25', dark chambers that once housed attacking goblinoids run back nearly 20' deep, and the length of it, even on its side, seems greater than 40'. Sunless and starless, the murky blackness contrasts with the yellow luminescence surrounding the misty opaqueness of the Arcane Gate. The smell of death permeates the air, even as the noise of rustling and whispers quits to nearly nothing. The noiselessness of the place deafens you.The entire area around the south portal of the Arcane Gate is filled with trenches and mounds left over from the armies of the Fire Giant. On the east side, a battle wages between the undead and the soldiers of Goldenshield. The undead, who swoop out of the Arcane Gate and into armed conflicts with the soldiers of Goldensheild, are able to hold their enemy as long as they remain within the protective circles of the statues. The undead have been beat back from the area next to Rear Gate Cutoff Road and only now do they hold two trenches, but they will not be able to hold these trenches too much longer. The soldiers of Goldenshield hurry southwest from the last 3 towers in the east, down Rear Gate Cutoff Road, and rush in their counter attacks to regain their fortress from their enemies. The result is an unending battle between living and undead under the darkness of the ash filled smoke canopy just south of the volcano that was once Tower9.
The siege tower was 40 feet tall, 25 feet wide, and 20 feet deep. On it's side, it was 25 feet tall, 20' wide, and 40 feet long, so it was tall even on its side. The Arcane Gate is always in darkness, even in the morning, because the mile wide cloud of ash and smoke that surrounds the volcano covers everything with shadow. Even in the morning, when the sun peaks under the cloud cover for a few brief hours, the 10' diameter portal is shadowed by the 25' tall fallen siege tower it sits next too. Its glowing yellowish thin outer ring stands in stark contrast to the shawdoy darkness that surrounds it, and it is easy to see from far away, even amoung the swirling mists, fog, and smoke that looms over the entire area
The south portal of the Arcane Gate is outside the protective circle of area B and just northwest of trench 6. Supplies of ammunition going to the southern battlefield arrive from the south portal of the Arcane Gate at regular intervals and are stored inbetween trench 6 and mound 7, and inside trench 6 itself. The south opening of the Arcane Gate is protected by all the creatures abiding in area's B and C.
The Arane Gate is governed by an Abjurer named Oztirix, who is called Shield by the undead under his command, but is named Perfidy by Goldenshield soldiers. He is the epitome of cruelty and will kill anyone that displeases him. He knows the demand for man flesh is high, especially among the jackalweres, so he does not worry about offending his Queen or any of the local rulers if he kills visitors indiscriminately. Shield will not take the blame. Shield will lie, cheat, and betray even his closest allies. He will sacrifice a loyal servant at a whim. Even so, there is no shortage of fanatics that wish to serve him. Shield demands that his servants, the mages, mage servants, and undead under his command, receive all visitors to the Arcane Gate. Shield demands that his servants disarm all visitors before allowing them through the Arcane Gate, and that they be escorted, not only through the Arcane Gate, but also escorted north all the way to the Library. Every visitor that does not immediately comply will be eliminated with extreme prejudice. The road to Tower 1 will be busy.
This magical portal serves as the final link in Shield’s slave trade network. Here the captives’ journey ends, and their forced servitude begins. The Arcane Gate delivers victims directly into the fortress, where their ultimate destination is Khalista’s lair — the King’s Library itself. The Library has been completely transformed. Its books were burned in a ceremony when Khalista claimed the building, and its shelves have been remade into couches, pillows, and lounging spaces. Her enchantments make the interior appear inviting to those under her influence, but the comfort is only a façade. Most captives arrive in chains, and the illusions do nothing to change their fate. Most are killed and turned into undead soldier, others are offered in her rituals, and some are taken by her jackalweres. The Library’s beauty is only the surface of a far darker purpose.
There will be a living sacrifice chained to the exterior southern wall of the fallen siege tower with red tendril glyphs. This sacrifice will only live for 3 days and must be renewed on death for the Arcane Gate to endure. Shield will demand that his servants keep up with this task. Furthermore, at the lowest level of Tower 1, Atorn the evoker is restrained by more of these red tendril glyphs, and he also must be kept alive if the Arcane Gate is to endure. There is no alarm or ward on the Arcane Gate. Anyone that can reach it undetected can use it with little fear of being discovered, unless they are simply seen.
When Khalista dwells in the Library, she creates 20 (4d10 - 2) zombies at a time, every 4 hours, and sends them south into the Arcane Gate to aid in the "After Battle" deep in the mounds and trenches south of the volcano that used to be Tower 9. These zombies will be commanded by Kartur, the wraith that terrorizes that battlefield. Destroyed zombies are gathered and turned into skeletons.
The Mound on the Right and the Trenches Beyond
Mound 9 rises 30 feet to the east of the Statue in the Middle of the Road. Thirty feet northeast of Mound 9, set at a skewed angle, stands Mound 8. Fifteen feet east of Mound 9 lies Trench 9, and thirty feet beyond that is Trench 8. Both trenches are dark and foreboding, choked with ash and shadow. The silence is broken only by strange, eerie, and unpredictable noises. Trench 9 houses 5 (2d6 – 2) shadows (MM p. 269) lurking in the deepest gloom, while Trench 8 hides 5 (2d6 – 2) specters (MM p. 279). These undead are commanded by two wights (MM p. 300): one haunting Mound 9, the other stationed at Mound 8. Together they form an unsleeping watch over the road and the gap between Areas C and B. Trench 7 and Trench 6 are empty, as is the fallen siege tower.
The Alarm
Once any creature other than undead comes within 20 feet of the statue, an alarm is triggered. A great voice bellows from inside the statue:
Area B: The Statue on the Battlefield
A second statue, identical to the first, was set up here by Shield. It also radiates a necrotic field that aids the undead but hinders the living, as represented on the map by the red circle labeled B. This circle is also 100 foot radius and covers an area of 31,416 square feet. The statue is in the middle of 5 mounds (mounds 3, 4, 5, 6, and 7) and adjacent to 3 large boulders. It is just as tough as its twin that is in the middle of the road (AC 15, HP 30). Every 4 hours, 10 to 20 (4d10 - 2) zombies (mm pg 315) come from the southwest (the Arcane Gate), head northeast, which is the middle of area B, attacking any creatures they come across, except other undead, and fight until destroyed. At mound 7, a wraith plots the destruction of the soldiers at area A by planning a frontal attack of zombies. As soon as the zombies are available, (every 4 hours) the wraith will lead them in a head-on charge into the soldiers at area A. 2 wights cover the assault from mounds 5 and 3 with arrows. They will all fight until destroyed, but, if they are slain, the wraith, the wights, and the 15 shadows have a special curse that will bring them back at the top of the next hour. They will reappear near their associated mounds or trenches and will have little to no memory of what occurred to them before, they will only have the burning hatred that causes them to want to destroy all living things. Goldenshield soldiers from Tower 8 will send 1 horse and cart daily, escorted by 2 squads, to this area to supply reinforcements, food, water, ammunition, medicinal remedies, and other equipment. These will be the squads that PCs will be accompanied by if they are sent southwest from the surviving three towers of the east. The Resistance fighters at Area A do not fully understand the statue's role in this cycle, only that the undead seem to surge from this region with unnatural regularity.
Area B: The Statue Beyond the Rocks (continued)
A Hidden Menace
Hidden behind three large boulders and shrouded in mist and shadow stands a 9-foot stone statue of the dark god Prysm, holding a double-sided trident in its outstretched hands. The air around it reeks of rot and cold stone. The statue feels almost sentient, and intruders approaching too closely will hear it call out in warning.
The statue stands at the center of Area B, marked by the red circle. It emanates a 100-foot radius field of necrotic energy (200 feet across)
that heals undead 2 (1d4) hit points each turn and causes living creatures to regain only half the hit points they would normally heal. Zombies within
this field automatically succeed on their Undead Fortitude.
 When any nonundead creature comes within 20 feet of the statue, the alarm is triggered. A great voice booms from within the stone, shouting:
Heroes fallen to death in war,
These will rise throughout the land,
As long as I am left to stand.
A hand-bell tolls from inside the statue ten times in ten seconds, repeating every fifty seconds for three minutes. The alarm mobilizes all undead in Area B. Skeletons in Trench 5 rush to Mound 5 to fire on the intruders. The two wights at Mounds 3 and 5 cease their ranged attacks, draw their swords, and move northward in a flanking maneuver toward the statue. The wraith at Mound 7 charges directly east, commanding any zombies with him to follow. All undead will fight to the death to protect the statue. If the threat ends, they return to their previous duties — usually attacking the soldiers in Area A.
Area B: The Statue on the Battlefield's History
The statue was erected here by Shield and is identical to the one in the road. It stands among five mounds (3, 4, 5, 6, 7) and three large
boulders. Every four hours, 10 - 20 zombies emerge from the Arcane Gate to the southwest and move northeast toward the center of Area B. Skeletons
accompany them only to replace losses, never exceeding five total.
The zombies gather near the three boulders and are joined by the
wraith Kartur, who assumes command. Kartur does not strategize; he simply drives the undead forward with relentless hatred. He targets lawful-good
enemies first, using Life Drain repeatedly until the target dies, escapes into sunlight, or strikes him with radiant or silvered/magical weapons.
If destroyed, Kartur reappears at Mound 7 at the top of the next hour, as do the wights and the fifteen shadows bound to this battlefield.
The wights normally remain at Mounds 3 and 5, firing on the soldiers in Area A, but they can be drawn out by the presence of living creatures.
Zombies attack immediately upon detecting life and will not retreat. While inside the necrotic field, all undead rapidly recover hit points, making
them extremely difficult to destroy. The soldiers of Goldenshield learn by the second or third day not to engage the undead inside Area B, but to
wait until they leave the protective zone before attacking with full force.
Goldenshield soldiers from Tower 8 send daily reinforcements
— one cart and two squads — to resupply Area A with food, water, ammunition, and medical support. The Resistance fighters at Area A do not fully
understand the statue's role in this cycle; they only know that the undead surge from this region with unnatural regularity.
Area A: The Front of The Resistance Fighters
Small parties might choose to leave the road before reaching the statue. Those who veer left can find the description of the west side
here. For now, it is enough to know that the west is infested with goblinoids — not the disorganized, cowardly kind, but
disciplined, battle-hardened troops who follow their hobgoblin commanders with precision, using their nimble escape to full advantage.
If
a party leaves the road to the right, they must avoid the tireless vigilance of the wight at Mound 9, the five shadows at Trench 9, and the five
specters at Trench 8. Those who manage to bypass these threats, or who maintain a wide enough berth while heading northeast, may eventually
encounter Goldenshield soldiers at Area A. It should not be difficult for the party to convince these soldiers that they share a common enemy,
as nearly all foes on the east side are undead.
The soldiers here are focused on attacking Area B and clearing the undead entrenched there.
This is nearly impossible while the second statue remains standing in the center of Area B. Shield never responds to this statue directly; anything
approaching from the east is assumed to be an enemy, not a supplicant or caravan. The soldiers understand little of the undead's exact patterns,
only that waves of them emerge regularly, and that the statue must be destroyed if the assaults are to cease.
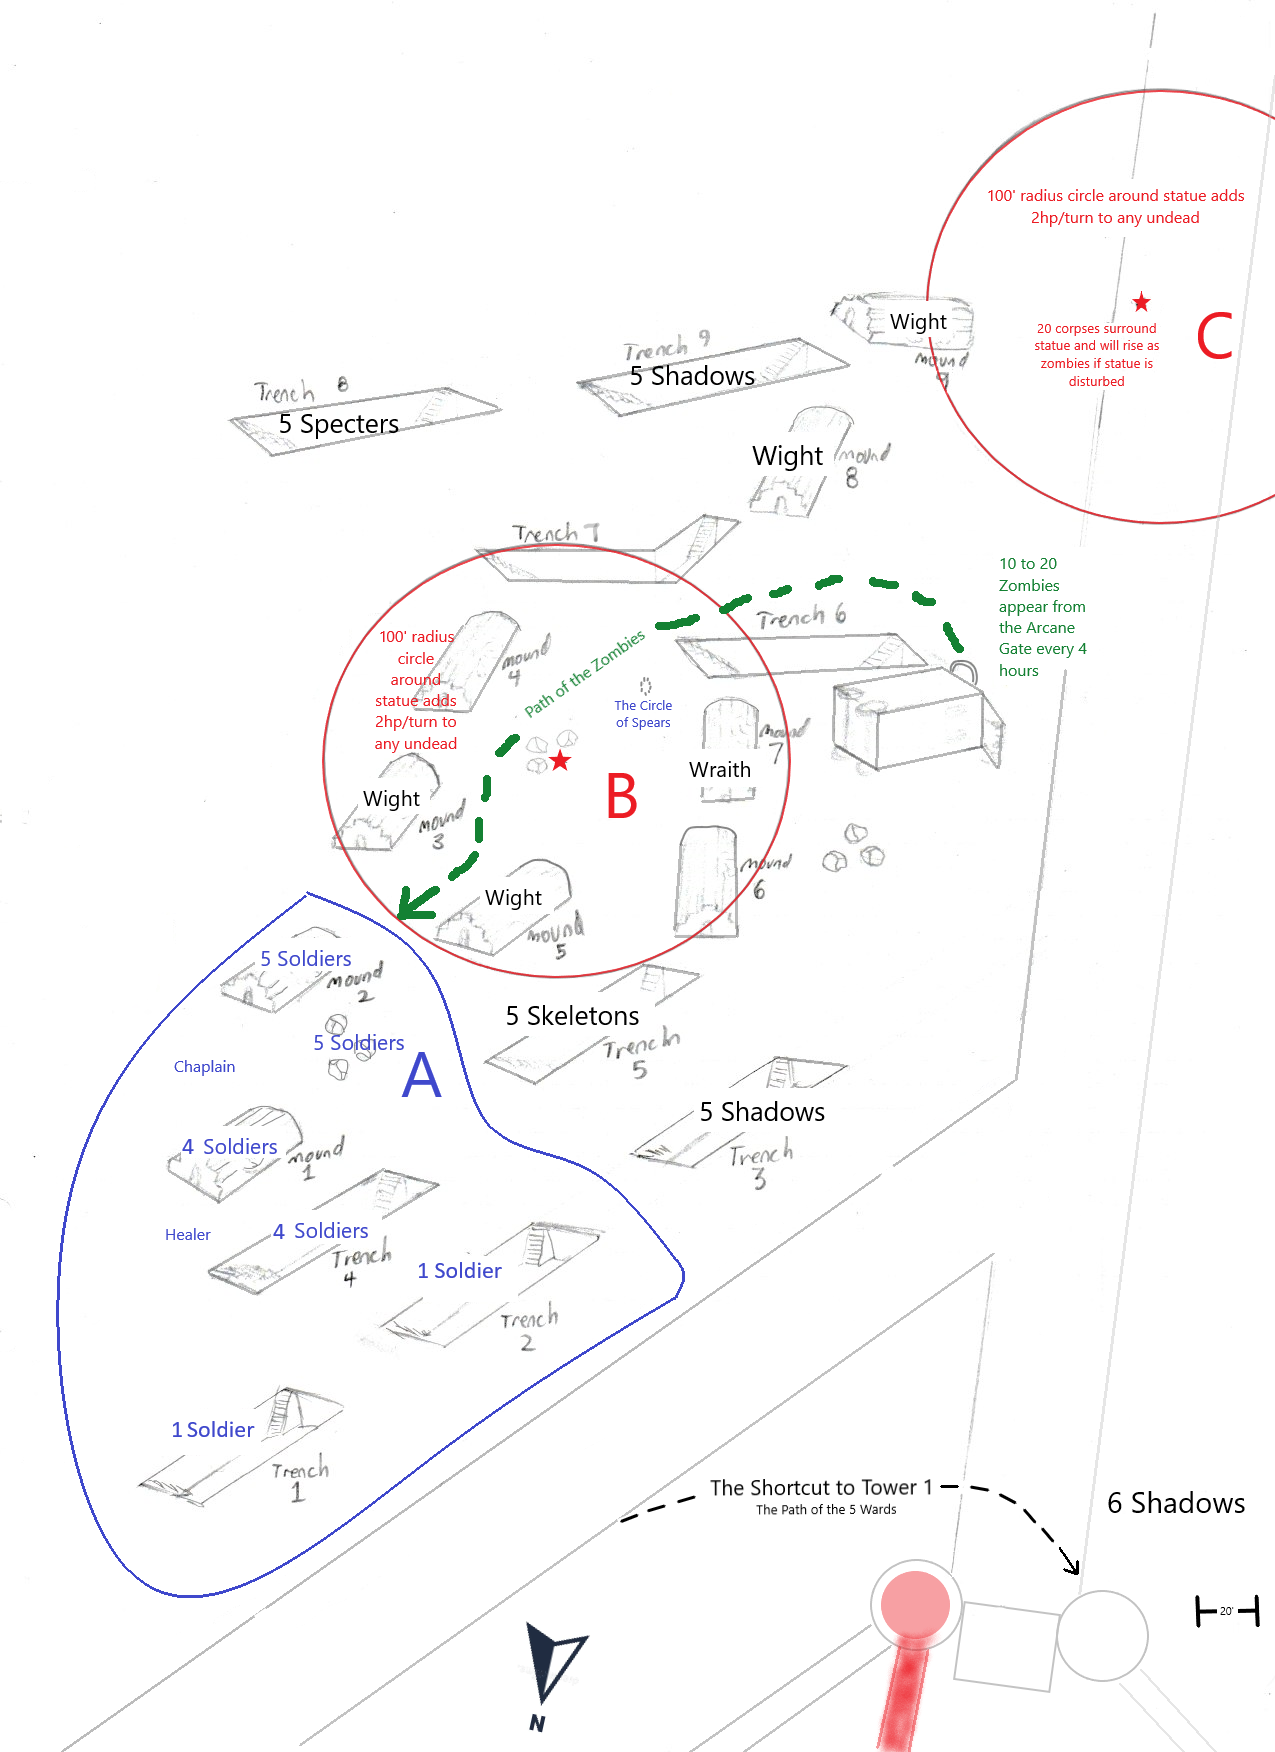
Trenches 1, 2, and 4, along with Mounds 1 and 2, form the defensive line of Area A, marked by the blue circle. Two squads (22 soldiers) of
Goldenshield troops hold this section. They are actively seeking to expand their territory by taking Trench 5, but their advance is stalled by
the wights firing from Mounds 5 and 3.
If PCs arrive with soldiers, they will be hailed as allies. If they arrive alone, they will be
challenged, but the guards are generally friendly toward living, speaking creatures. The soldiers are constantly occupied — tending the wounded,
restocking supplies, repairing gear, coordinating drills, scouting, and maintaining the perimeter. Water and rations are stored and guarded at
Trenches 1 and 2.
Some soldiers are engaged in ongoing ranged combat, picking off exposed enemies or returning fire against the many undead
attacking from a distance. Others are deployed on patrol in fire teams of five. One such team is currently pinned down at the three rocks west
of Mound 2.
Although reinforcements (two squads) and supplies arrive daily, the soldiers have no reliable method for defeating the undead protected
by the 100-foot radius necrotic field emanating from the statue in Area B. They suspect the statue shields the undead, but this belief is based
more on instinct and superstition than on confirmed evidence. They offer hints and suggestions that the statue must be destroyed, but none can
explain precisely why.
Anyone who encounters the ghost at the Circle of Spears will receive a clear warning that the statue must fall if
the undead are to be defeated. NPC soldiers will play a crucial role in supporting PCs who attempt this task — holding back the zombies rushing
to defend the statue and engaging the skeleton archers at Trench 5.
However, the wraith and the two wights remain significant threats to
anyone attempting to destroy the statue. As long as it stands, the soldiers will be unable to take Area B.
Additional Details
The Front Line
The forward positions at Area A — Mounds 1 and 2 and Trenches 1, 2, and 4 — lie in perpetual dim light beneath the ash‑cloud canopy of the volcano. From these positions, Goldenshield soldiers endure constant long‑range fire from the wights at Mounds 3 and 5 and the skeleton archers entrenched at Trench 5. Thirty‑five feet south of Mound 1 stand three large boulders that provide the only reliable cover from this barrage. A nearly identical cluster of boulders lies thirty‑five feet west of the gap between Mounds 3 and 4, concealing the statue at the heart of Area B.
Kartur, the wraith, waits at Mound 7 for the next wave of zombies to emerge from the Arcane Gate. These undead arrive roughly every four hours, gather briefly, and then surge northeast toward Area A. Kartur, the wights, and the shadows can remain active at all hours due to the dim light, and all of them reappear at their mounds or trenches at the top of the next hour if destroyed. Soldiers quickly learn that entering Area B is extremely dangerous, as the undead there reform too quickly to be meaningfully pushed back.
The only respite comes during the brief window of sunlight that breaks through the ash clouds each morning between 9 and 11. During this time, the wraith, wights, shadows, and specters withdraw into the deeper darkness, allowing the soldiers to tend their wounded, regroup, and prepare for the next assault. Roughly four hours after sunrise, reinforcements and supplies arrive from the east — up to two squads replacing those who have held the line through the night. This cycle repeats daily.
The Circle of Spears
The Grave
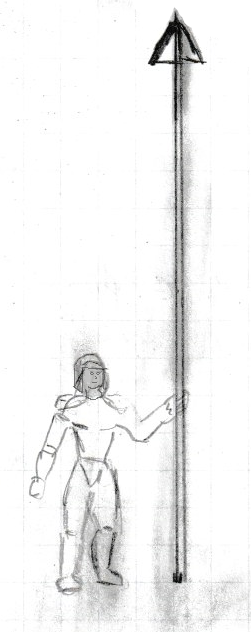
16 silver coated spears surround a large area of loose soil. 4 more silver spears are embedded in the center of this area. The area is 15' long, 8' wide, and raises up 4' high. This is the grave of 20 brave soldiers, dug in haste and revered. The spears are 15' long and their sharp points are embedded deep into the ground. Even in the middle of this dark, evil land, there is a calmness to this place, a sacredness, and a touch of holiness. The silver spears around the mound shine very bright and can be seen in glimpses and peeks from almost 100' away, even in the swirling mists, fog, smoke, ash, and clouds.The Fall of Captain Chen
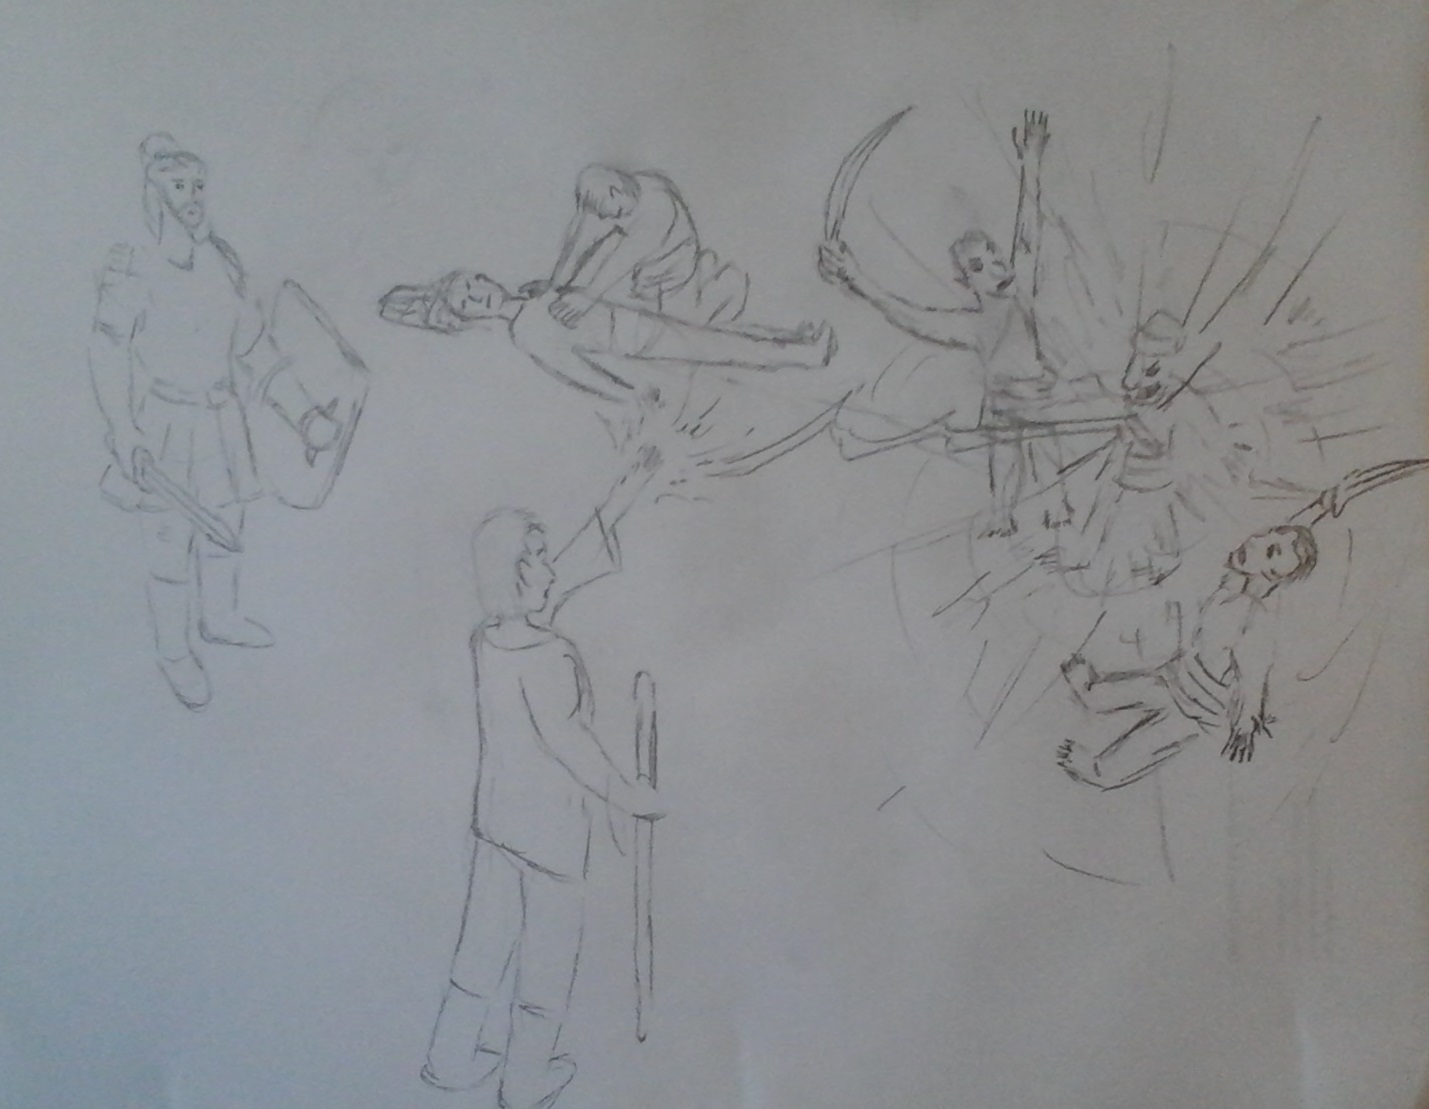
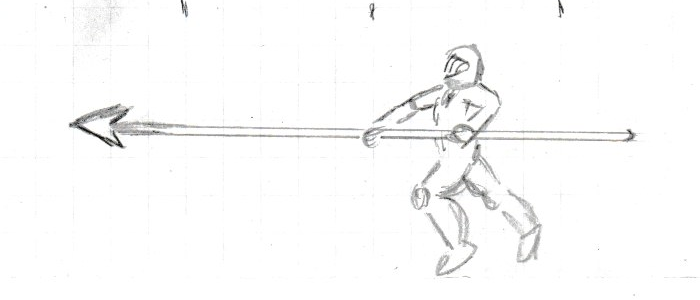
Just before dawn on the 18th, Capt. Chen of the Front Gate House leads 19 brave soldiers in a counter attack into the Arcane Gate. Armed with 15' long silver coated spears, the soldiers cleave their way through the innumerable undead, force the goblinoids to retreat, and scatter a small group of ogres trying to bar their way. The path of destruction this small band of Goldenshield soldiers brings about causes the enemy to falter and retreat. But Khalista the lamia is hiding on the roof of Tower 1, and with her dark, necromantic powers, she prepares spell scrolls with necromantic energy. Even as Capt. Chen and his command win the battle field, she casts her deadly spells upon the whole group. She overcomes these heroes and condemns them to undeath. The Capt. is transformed into Kartur the wraith, his 4 NCOs become wights under his command, and the 15 soldiers are reduced to shadows condemned to patrol the darkness and attack all living beings.The Rivening
Lt. Reese arrives with reinforcements too late to save the heroes, or to capture Khalista, who takes refuge inside the lowest level of Tower 1. Lt. Reese gathers the fallen soldiers, digs an 8 foot deep, 8 foot wide, 15 feet long hole and places them carefully into the grave. After her songs and prayers, she places the spears as a monument to the fallen soldiers. During the ritual prayer by Lt. Reese and her company, and unseen and witnessed by no one, the wraith Kartur, the 4 wights, and the 15 shadows split in two. The split results in all of them remaining the evil entities that they are, but also all of them become ghosts.The Hourly Ghost Cycle
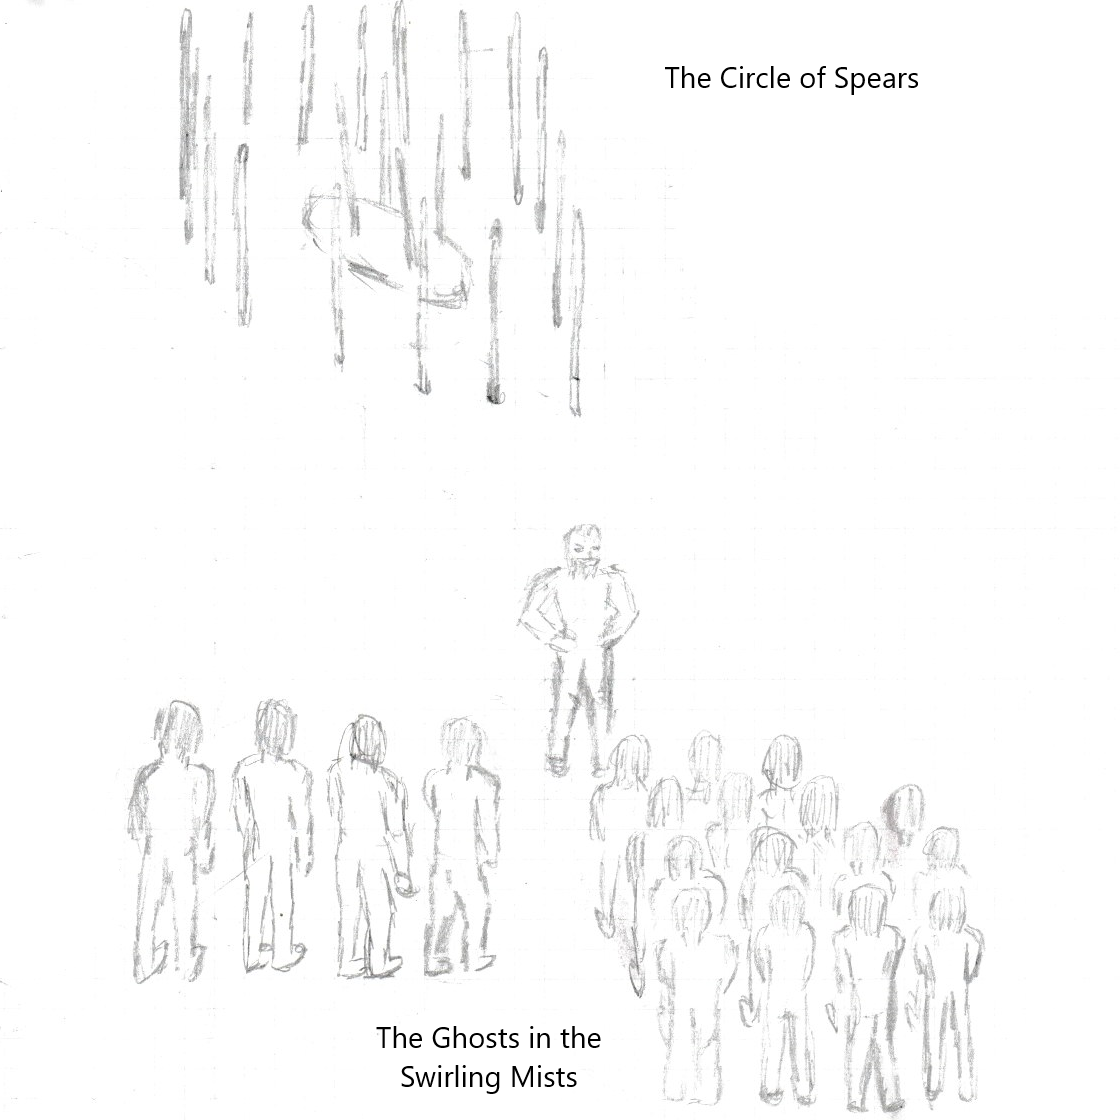
 At the top of every hour, 20 ghosts appear next to the wraith, his wights, and the shadows. The ghosts disappear,
but reappear at the circle of spears. The ghosts will act out a scene where the commander ghost, formerly Capt. Chen,
urges them on with encouraging words to attack the enemy. Except this time, they will head northeast to destroy the statue
in the midst of area B. The ghosts will only ever be barely seen, and only from far away. The commander's voice will not
be heard clearly, but rather heard in echoes and reverberations sending eerie shivers down your spine. The ghosts will
always be in the midst of heavy smoke, ash, and swirling dust clouds, very hard to make out and most of them won't ever
be seen clearly. Furthermore, most of the ghosts will never be seen up close, but will disappear into the mists heading
northeast before anyone can get close enough to interact with them. The ghosts will disappear in this manner even if you
are heading directly towards them, the choking fumes blind your eyes and the ghosts simply disappear right in front of you.
At the top of every hour, 20 ghosts appear next to the wraith, his wights, and the shadows. The ghosts disappear,
but reappear at the circle of spears. The ghosts will act out a scene where the commander ghost, formerly Capt. Chen,
urges them on with encouraging words to attack the enemy. Except this time, they will head northeast to destroy the statue
in the midst of area B. The ghosts will only ever be barely seen, and only from far away. The commander's voice will not
be heard clearly, but rather heard in echoes and reverberations sending eerie shivers down your spine. The ghosts will
always be in the midst of heavy smoke, ash, and swirling dust clouds, very hard to make out and most of them won't ever
be seen clearly. Furthermore, most of the ghosts will never be seen up close, but will disappear into the mists heading
northeast before anyone can get close enough to interact with them. The ghosts will disappear in this manner even if you
are heading directly towards them, the choking fumes blind your eyes and the ghosts simply disappear right in front of you.
The sole exception is the ghost commander. The ghost commander is an eerie, ghostly apparition of Capt. Chen that can be recognized by those that knew him in life. This ghost lingers but will not directly interact with anyone. This ghost will assume anyone it is talking to is the reinforcements it is expecting, and it will only bark out commands, firm, but friendly: